

Overview
Once your LLM Gateway is set up — see Using the LLM Gateway — the Controls group of LLM Management is where admins govern how the people, keys, and agents in their organization consume it: capping spend, throttling busy callers, and deciding who may use which models.
Before You Begin
You’ll need:- A Barndoor account with admin privileges.
- An LLM Gateway with at least one provider and one model route — see Using the LLM Gateway.
- Nothing extra for spending budgets: Barndoor prices requests from its managed default catalog automatically. Add your own prices under LLM Management → Model Pricing only to override those defaults or to price a model the catalog doesn’t cover. See Managing Model Pricing.
Key Concepts
Budgets and rate limits share the same two independent dimensions. Model access policies use the first one.Scope: who a rule applies to
- User, API Key, AI Agent left blank: each user, key, or agent gets their own allowance equal to the limits you set.
- Group, Role left blank: each group or role gets one allowance, shared by everyone in it.
Target: what a rule counts
By default a budget or rate limit counts All targets. Set a Target to count only matching traffic:model — before the gateway routes it — not the model it ended up on. A routing policy target therefore counts every request for that policy, pooled across all of its slots. To cap a specific underlying model regardless of which route reached it, target LLM Provider with an Upstream model instead.How Limits Compose
Governance runs on/v1/chat/completions, /v1/completions, /v1/embeddings, /v1/responses, and /v1/messages. (/v1/models and /v1/messages/count_tokens are not metered.) Checks run in a fixed order; the first denial stops the request.
bd-… key is valid, active, and not revoked- Usage is recorded after the upstream responds, from the token counts the provider reports. Tokens counted are input (including cache reads and cache writes) plus output (which includes reasoning tokens). The pre-check enforces the limit; the recording keeps the counter accurate.
- Every applicable rule is checked, and the most restrictive result wins. A user covered by an org budget and a user budget is checked against both, and both are debited.
- A more specific rule overrides a broader one of the same scope type and target. For example, a User: Ada budget replaces the All users budget for Ada alone, and a Limit to group budget replaces the All users budget for that group’s members. This lets you raise one person’s or one group’s allowance above the default. Rules of different scope types (say, Organization and User) don’t override each other — both apply.
- Rules with a Target fail over instead of hard-blocking. When a targeted budget or rate limit is exhausted, the gateway removes just the matching routes from the request’s route plan and tries the remaining ones. The caller sees a
429only when every eligible route is blocked. See Failover, Cooldowns, and Route Health. - Controls fail open on a transient outage. If the usage store can’t be reached within 2 seconds, budgets and rate limits are skipped for that request rather than blocking live traffic. Model access is the exception — see Model Access.
Budgets
Budgets cap how much a scope may consume in a calendar period. A budget can cap tokens, spending, or both — whichever limit is hit first triggers the action.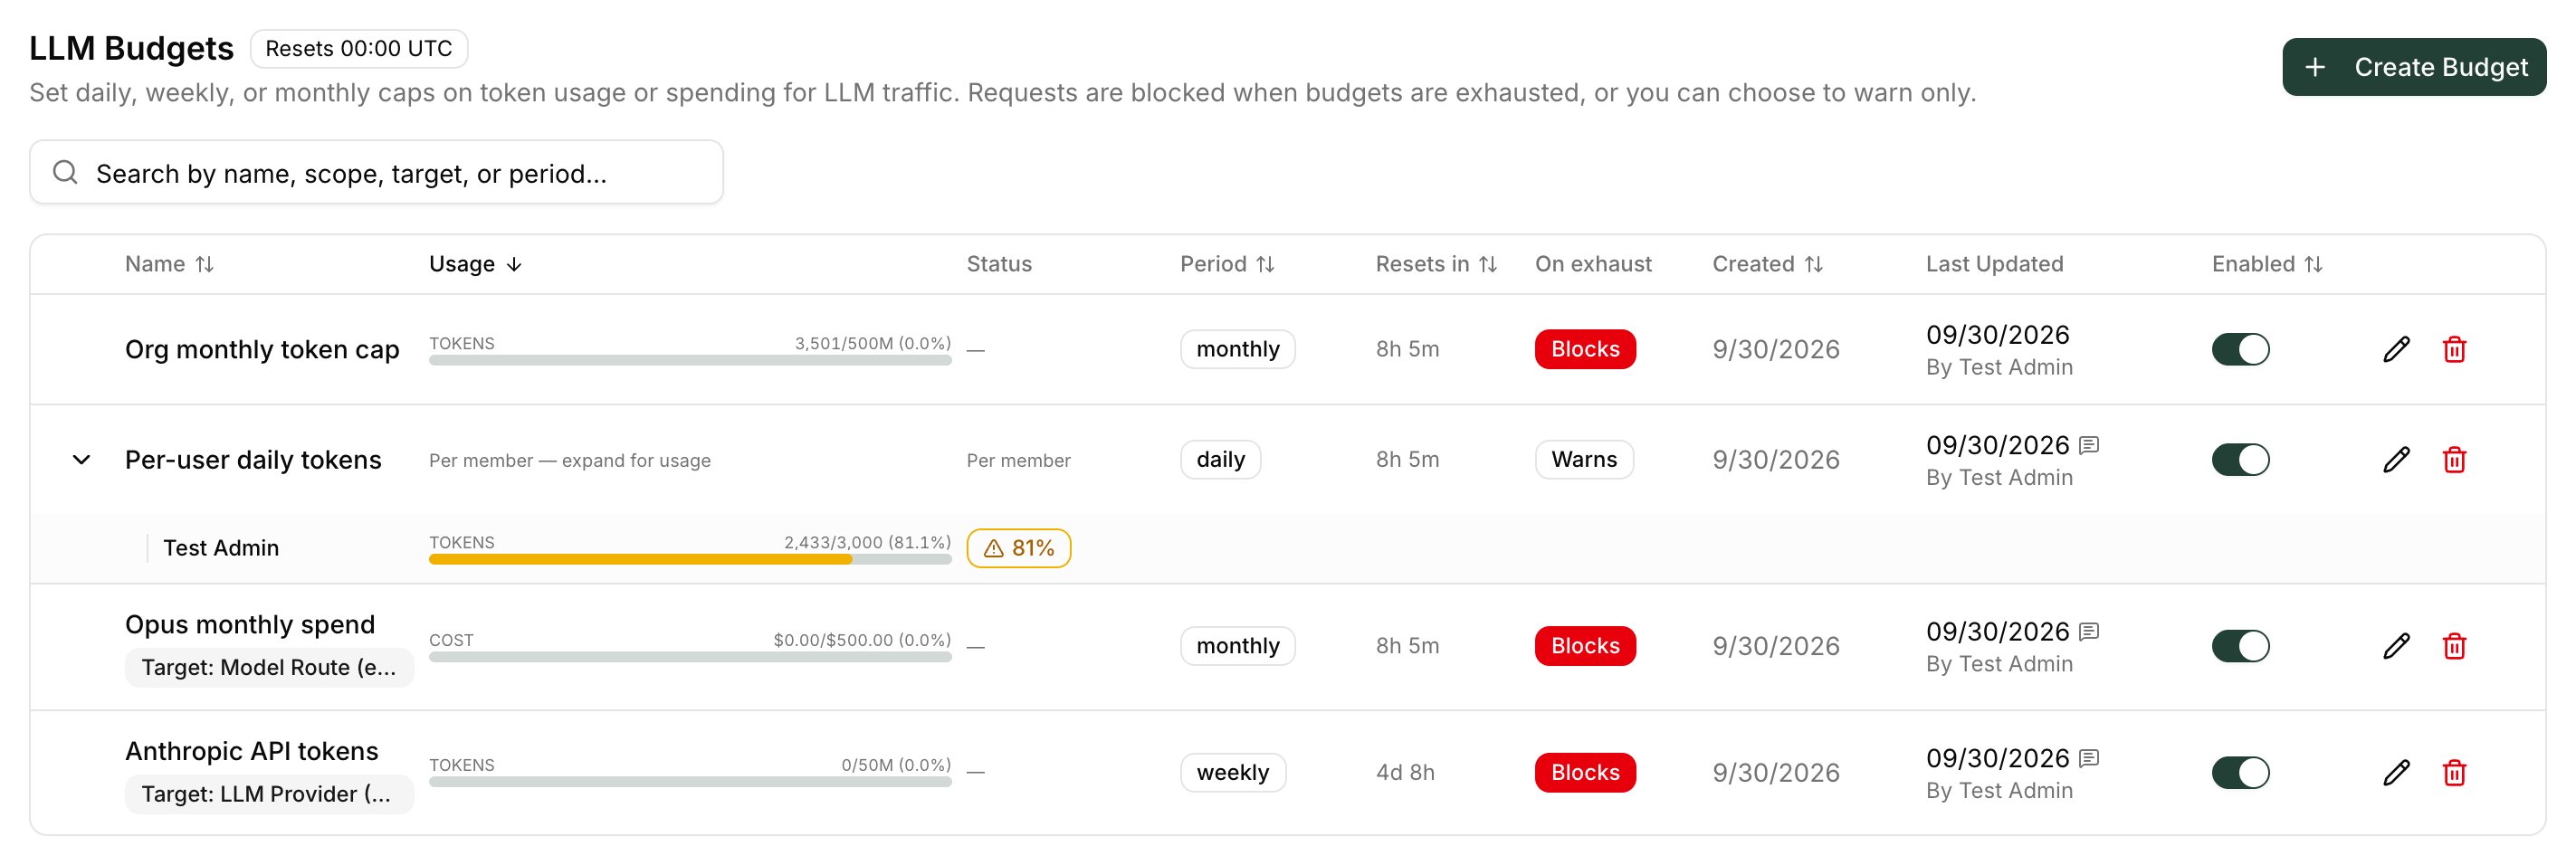
- Status shows an amber
NN%pill once usage crosses one of the budget’s alert thresholds, and a red Exhausted pill at 100%. - Per-member budgets (a blank entity at any scope other than Organization) have no single usage figure. Their row reads Per member — expand for usage; click the chevron at the left of the row to see each member’s usage and breach status.
Creating a budget
Open LLM Management → Budgets and click Create Budget
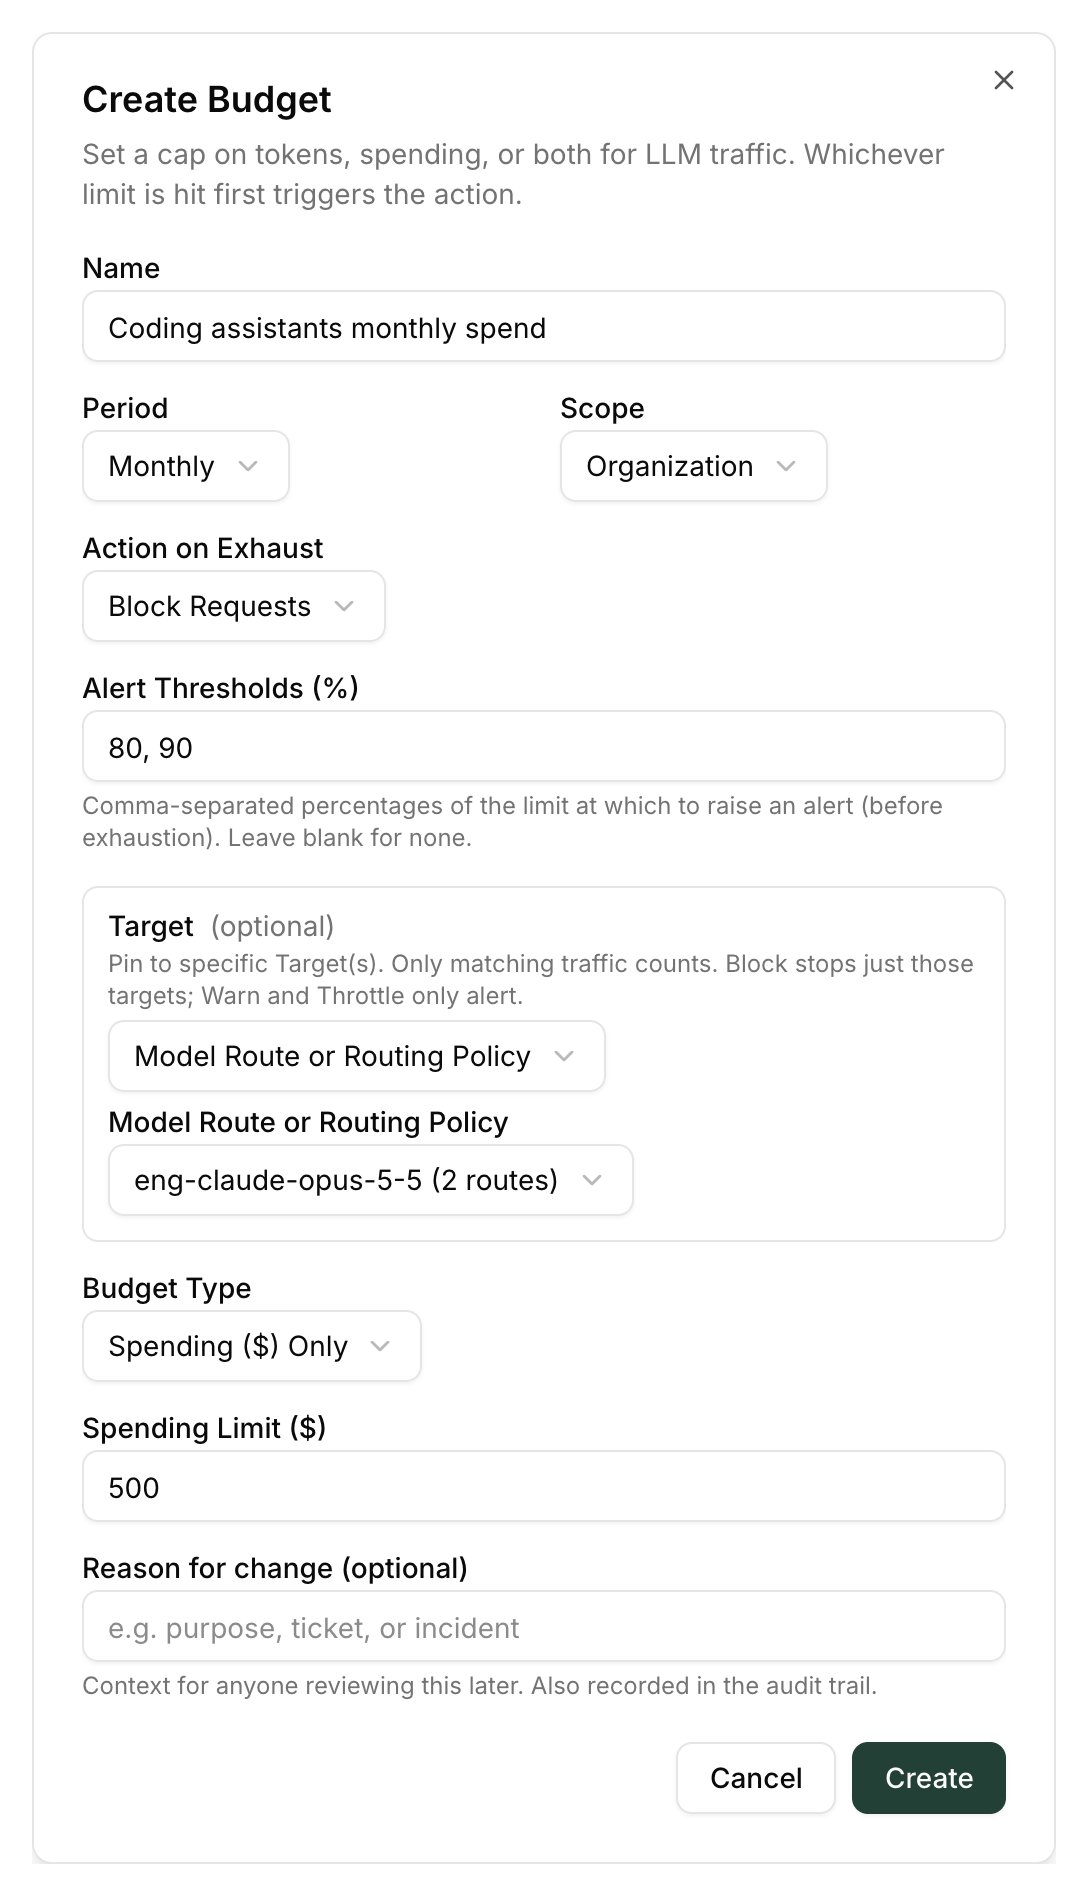
Name, period, and scope
- Name — shown in the denial message callers receive and in alerts, so make it recognizable (for example
Engineering monthly). - Period — Daily, Weekly, or Monthly (default).
- Scope — see Scope. Pick an entity, or leave it on All … for per-member allowances. For a User scope left on All users, optionally set Limit to group.
Action on Exhaust and alerts
- Action on Exhaust — Block Requests (default) returns
429once the limit is reached. Warn Only keeps serving requests and only raises alerts. - Alert Thresholds (%) — comma-separated percentages of the limit at which to raise an alert, for example
80, 90(the default). Leave blank for none.
Target (optional)
Budget type and limits
- Budget Type — Tokens Only, Spending ($) Only (default), or Both (first hit).
- Token Limit — total tokens allowed in the period.
- Spending Limit ($) — a USD cap, costed from model pricing.
- Reason for change (optional) — a note recorded in the audit trail.
Click Create
How budgets are counted and reset
- Tokens — input tokens (including cache reads and writes) plus output tokens, as reported by the provider.
- Spending — the request’s cost from Model Pricing, including cache and long-context rates. Requests that cost $0 (unpriced models, providers that don’t calculate token cost) don’t move a spending counter.
- Reset — every period boundary is UTC, with no per-organization override: Daily at 00:00 UTC, Weekly on Monday at 00:00 UTC, Monthly on the 1st at 00:00 UTC. The Resets in column shows the countdown, and its tooltip gives the exact UTC instant.
Alerts
Barndoor raises admin alerts from each budget’s own thresholds:- Threshold alert (warning) — when usage crosses one of the configured percentages.
- Exhausted alert (critical) — on a Block Requests budget, as soon as the request that crosses 100% completes. That request is still allowed to finish; the next one is blocked.
When a caller hits a budget
A Block Requests budget with no Target returns:Spending monthly budget exhausted (budget: Engineering monthly) (100% used).
When a budget with a Target has removed every eligible route, the 429 has the same type and a message naming each blocked route, for example:
tokens_used is often slightly above the limit in the message. The gateway checks the counter before forwarding and debits actual usage after the provider responds, so the request that crosses the limit finishes and the next one is denied. The percentage is rounded, so 1,001,234 / 1,000,000 prints as 100%.Rate Limits
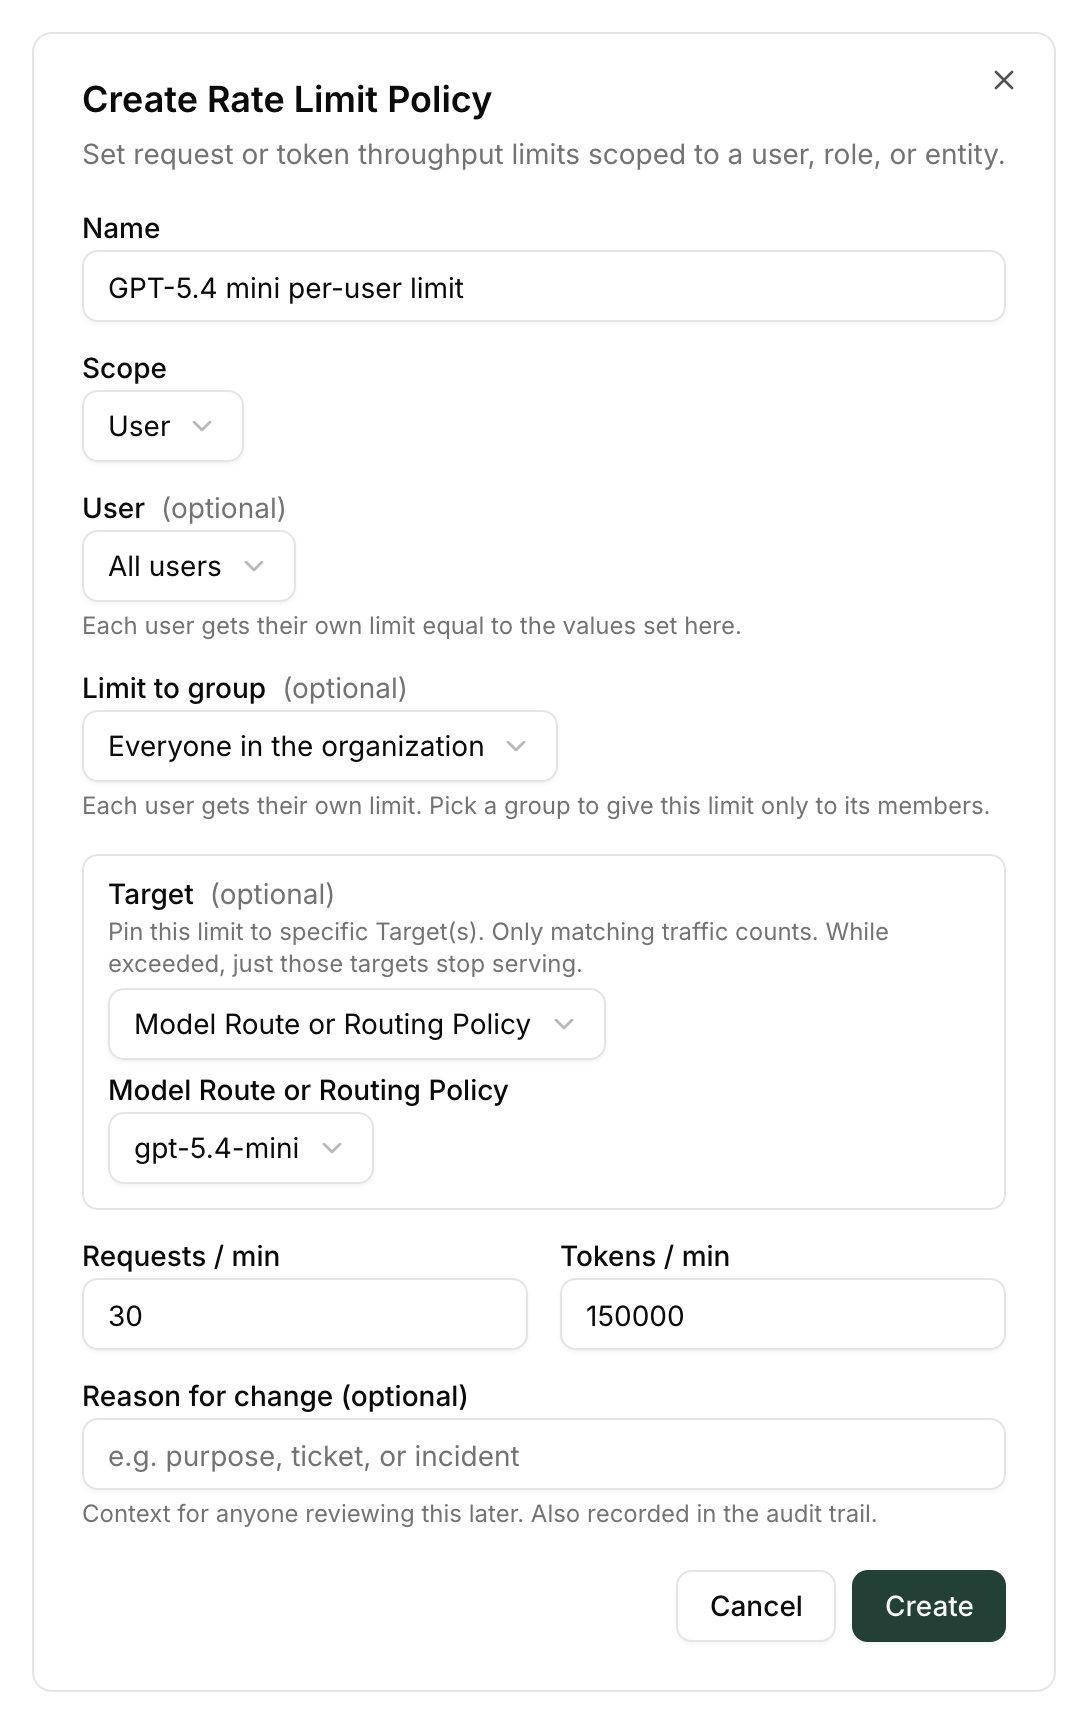
Rate limits cap throughput on a rolling 60-second window. Use them to smooth bursts and stop one noisy caller or runaway loop from crowding out everyone else. (Use budgets to control total consumption over a day, week, or month.)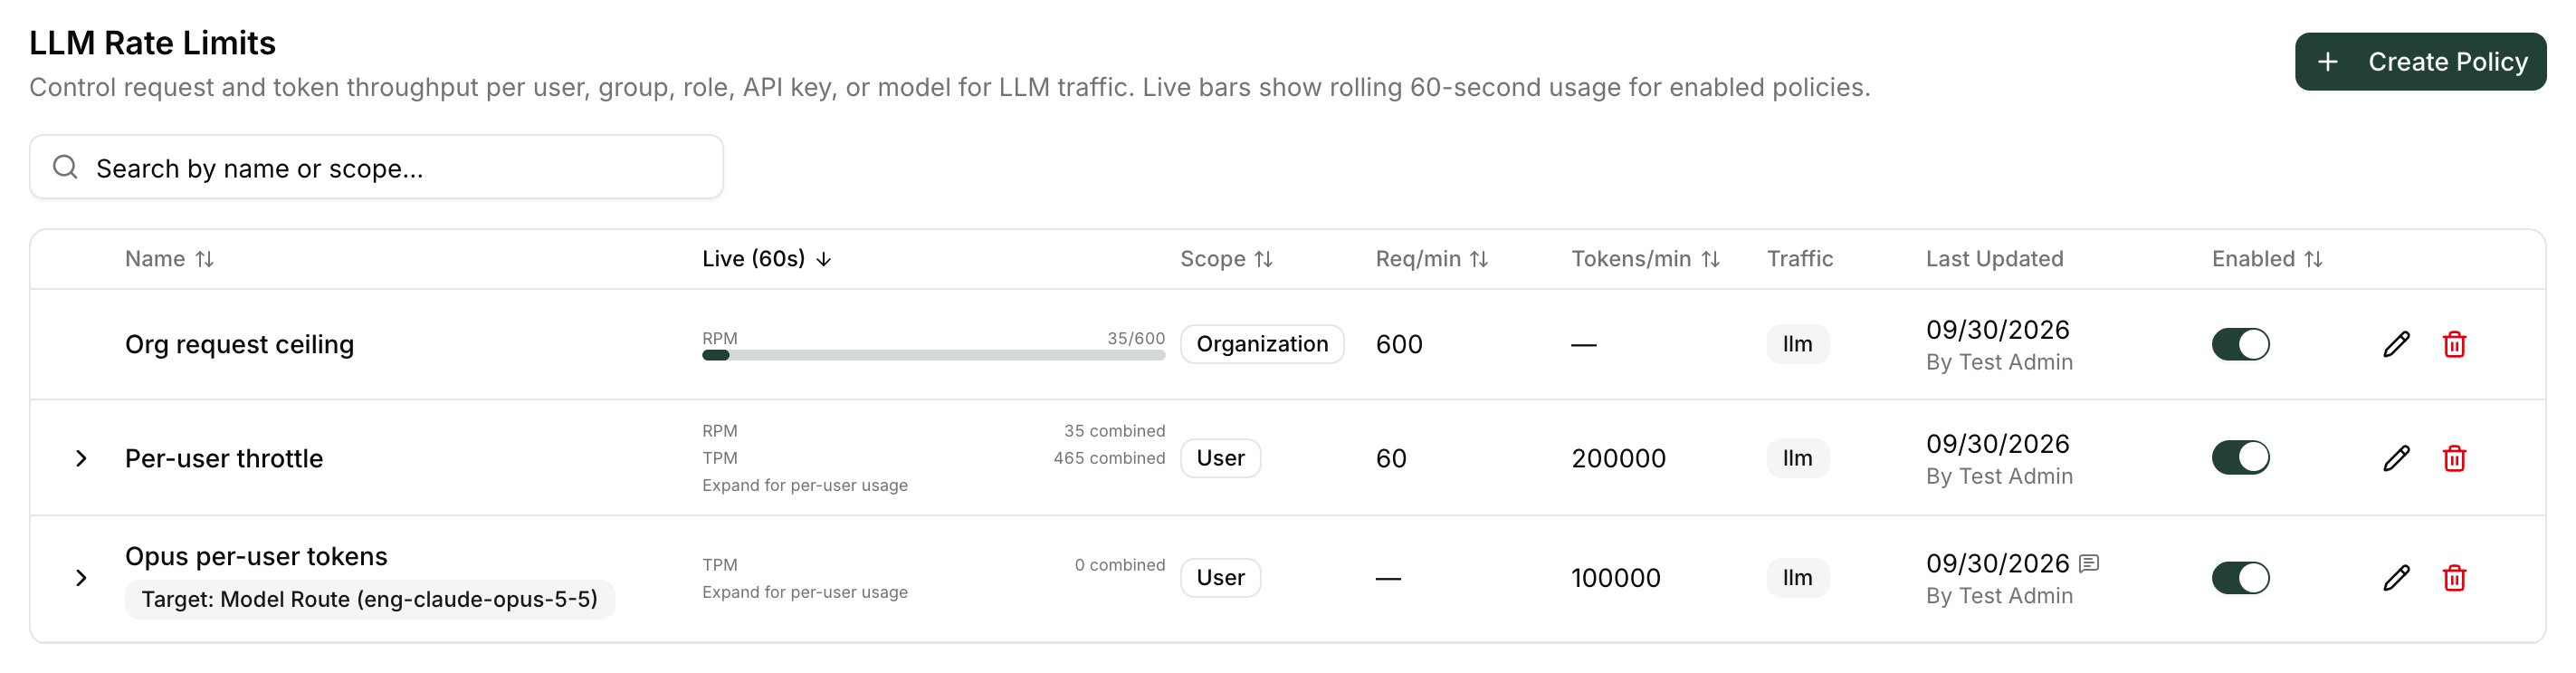
Creating a rate limit
Open LLM Management → Rate Limits and click Create Policy
Name and scope
- Name — appears in the denial message.
- Scope — see Scope, including Limit to group for a User scope left on All users.
Target (optional)
Limits
Click Create
When a caller hits the limit
429 rate_limit_error with Retry-After: 60 and a message like All routes for model 'gpt-5.5' are blocked by rate limits: ….
Retry-After is always the full window length, 60 seconds: waiting that long is guaranteed to clear the window, though callers often succeed sooner as older requests age out. The OpenAI and Anthropic SDKs honor it automatically.Model Access
Model access policies decide whether a caller may use a route at all. The section has two parts: an org-wide posture and a list of Model Access Policies.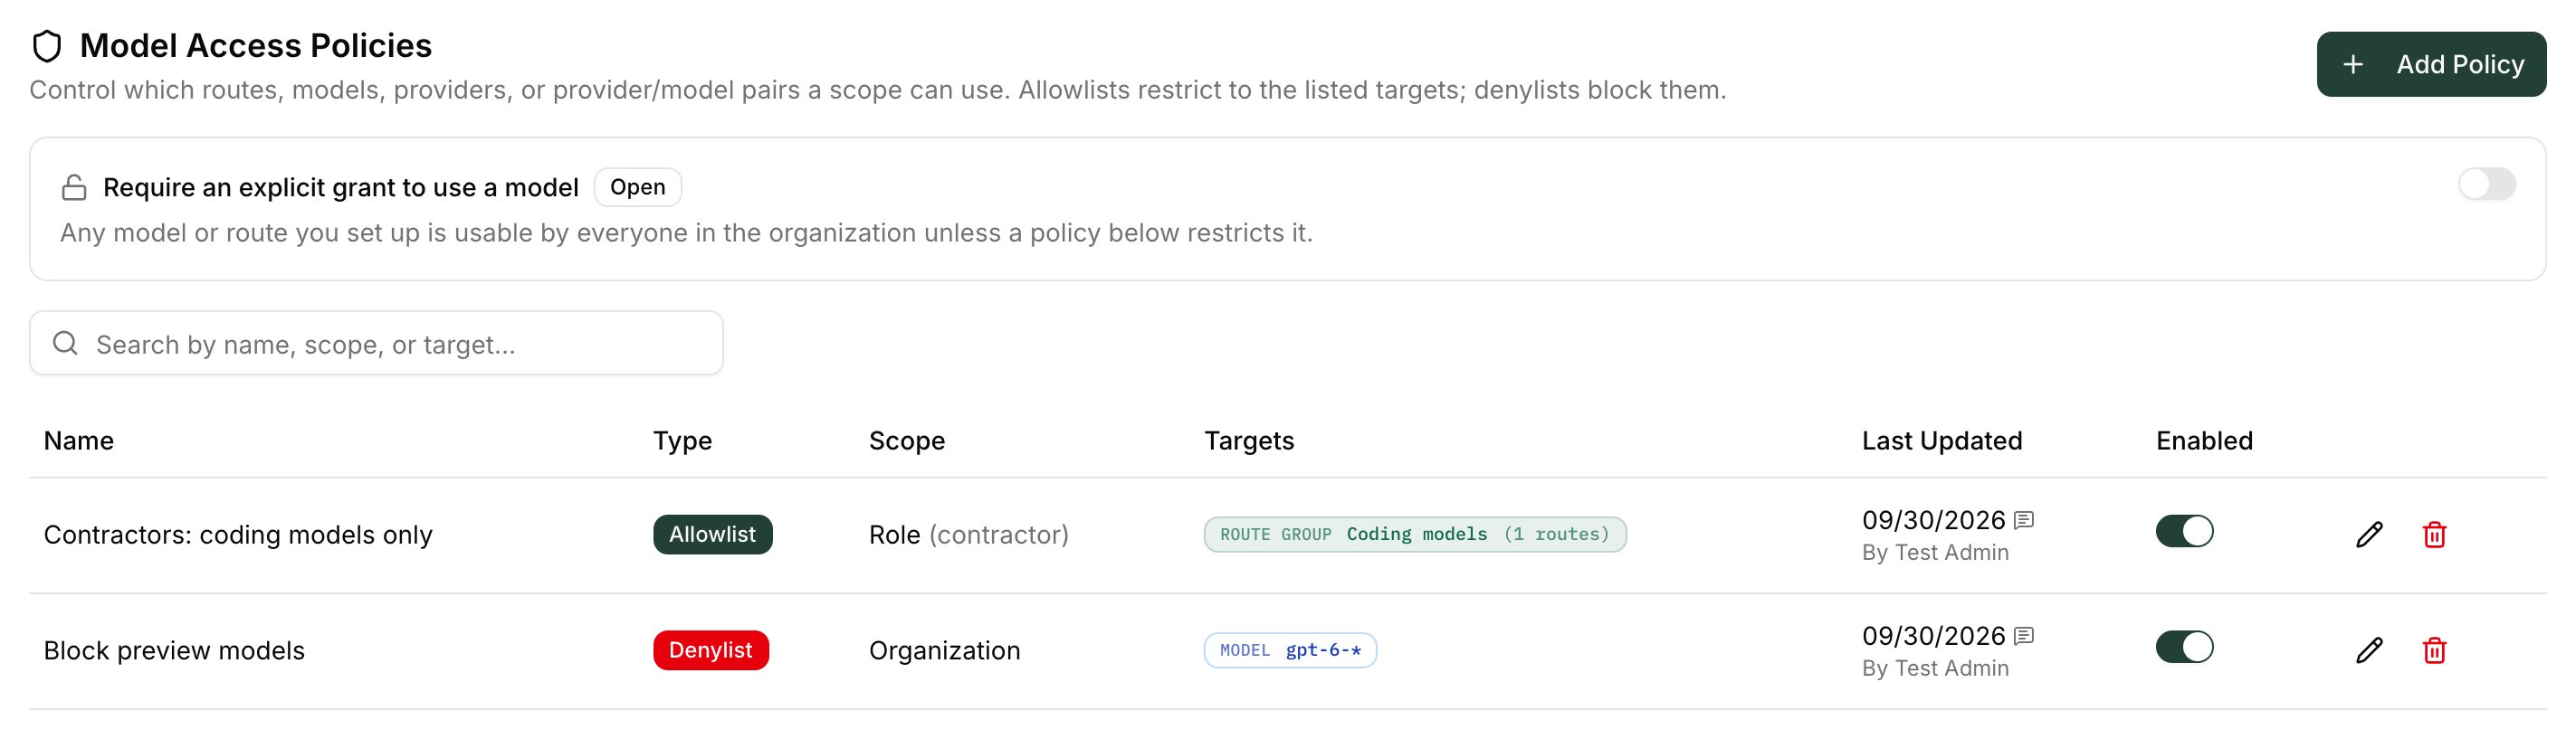
Posture: open or locked down
The card at the top of the section, Require an explicit grant to use a model, sets what happens to a route that no policy mentions:Creating a policy
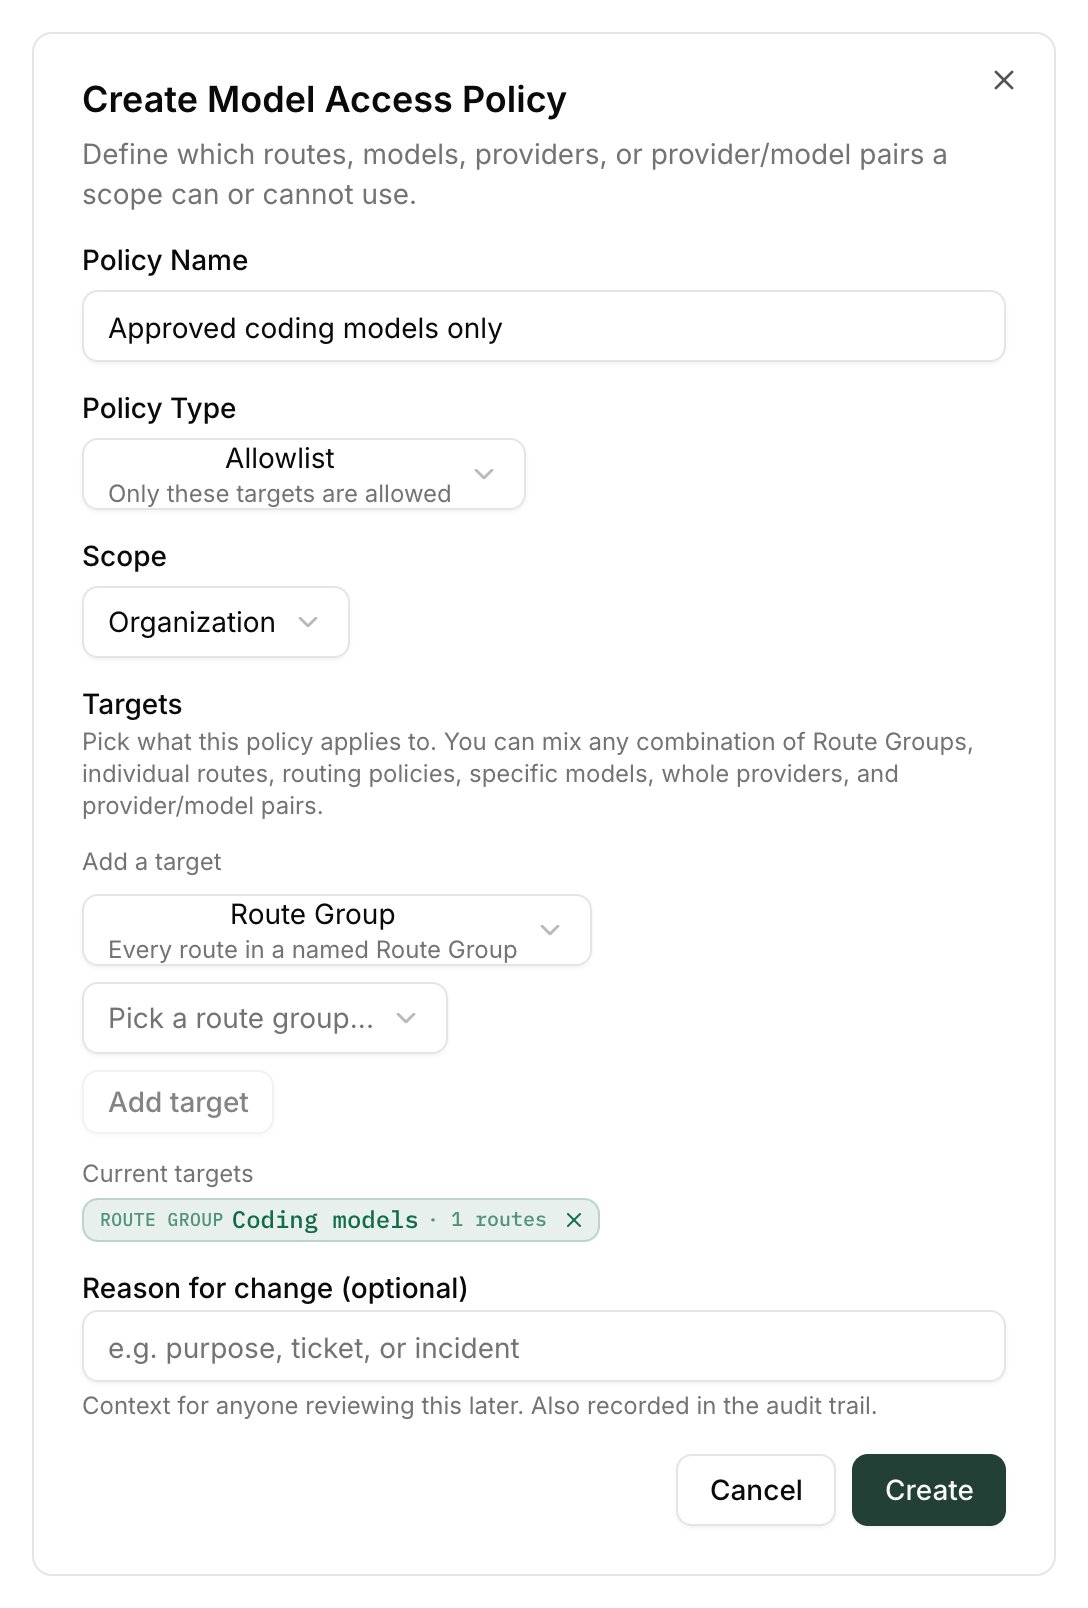
Open LLM Management → Model Access and click Add Policy
Name, policy type, and scope
- Name — appears in the denial message.
- Policy Type — Allowlist (only these targets are allowed) or Denylist (these targets are blocked).
- Scope — Organization, Group, Role, User, API Key, or AI Agent. Leaving the entity blank applies the policy to every entity of that type.
Add targets
* wildcard (for example claude-*).Save
How policies combine
Model access has no “more specific overrides broader” rule — every policy whose scope matches the caller is evaluated together:- If any matching denylist matches the route, the route is denied.
- Otherwise, if any allowlist applies to the caller, at least one of them must grant the route.
- Otherwise the posture decides: allowed when Open, denied when Locked down.
403 only when no route survives.
When a caller is denied
503 service_unavailable_error (“Model access posture for this organization is temporarily unavailable…”), never silently allowed. A matching denylist or granting allowlist is still honored during such an outage.Governance settings
Three org-wide switches sit alongside the controls. Each takes effect on the next request.What callers see when something is denied
{ "error": { "message", "type", "code" } }, so common LLM SDKs surface them as ordinary errors. On /v1/messages, rate-limit denials use Anthropic’s envelope instead: { "type": "error", "error": { "type", "message" } }.
Troubleshooting
A user keeps getting 429s — which rule is responsible?
A user keeps getting 429s — which rule is responsible?
error.message: it names the rule — (policy: …) for a rate limit, (budget: …) for a budget, or a list of blocked routes for a targeted rule. Open that rule to check its configuration and live usage. For a per-member rule, expand the row to find the user.A budget reset later than I expected
A budget reset later than I expected
Everyone in a group is sharing one allowance, but I wanted one each
Everyone in a group is sharing one allowance, but I wanted one each
An AI Agent budget or rate limit never moves
An AI Agent budget or rate limit never moves
My model access policy isn't firing
My model access policy isn't firing
claude-* works, *-mini doesn’t.A spending budget stays at $0
A spending budget stays at $0
I want to know who's close to a budget
I want to know who's close to a budget
80, 90) to be alerted before the budget blocks anyone. The Status column shows breached thresholds at a glance, and Reporting → LLM Usage Dashboard shows consumption trends.Frequently Asked Questions
When should I use a budget vs a rate limit?
When should I use a budget vs a rate limit?
Can I give one user more than the default allowance?
Can I give one user more than the default allowance?
Do controls apply to embeddings?
Do controls apply to embeddings?
Are warn-only budgets useful?
Are warn-only budgets useful?
How can I test a policy without disrupting other users?
How can I test a policy without disrupting other users?
Need Help?
Reach out to [email protected] with:- The name of the budget, rate limit, or policy involved.
- The exact
error.messagereturned to the caller (if any). - The scope and target of the rule.