Overview
This guide walks you through configuring Microsoft Entra ID as an OIDC Identity Provider for Barndoor. Once complete, your users will be able to sign in to Barndoor with their Entra ID credentials and their group memberships will flow through for automatic role mapping.- Admin access to your Barndoor account
- Admin access to a Microsoft Entra ID tenant (Global Administrator or Application Administrator role)
- Your Entra Tenant ID handy (find it on the Entra Overview page)
Part 1 — Configure the application in Entra
You’ll do all the Entra-side work first, then come back and configure Barndoor with the values you collect along the way.Step 1: Create the Enterprise App
Open Entra Enterprise Apps
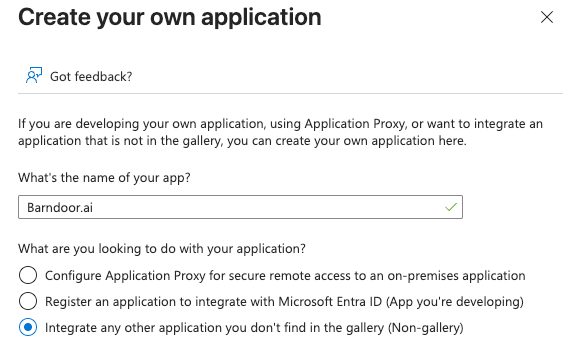
Fill in the registration form
- Input Name: Anything you’d like (e.g.
Barndoor.ai) - App Type: Choose the non-gallery option
- Click
Create.
Go to the app registration
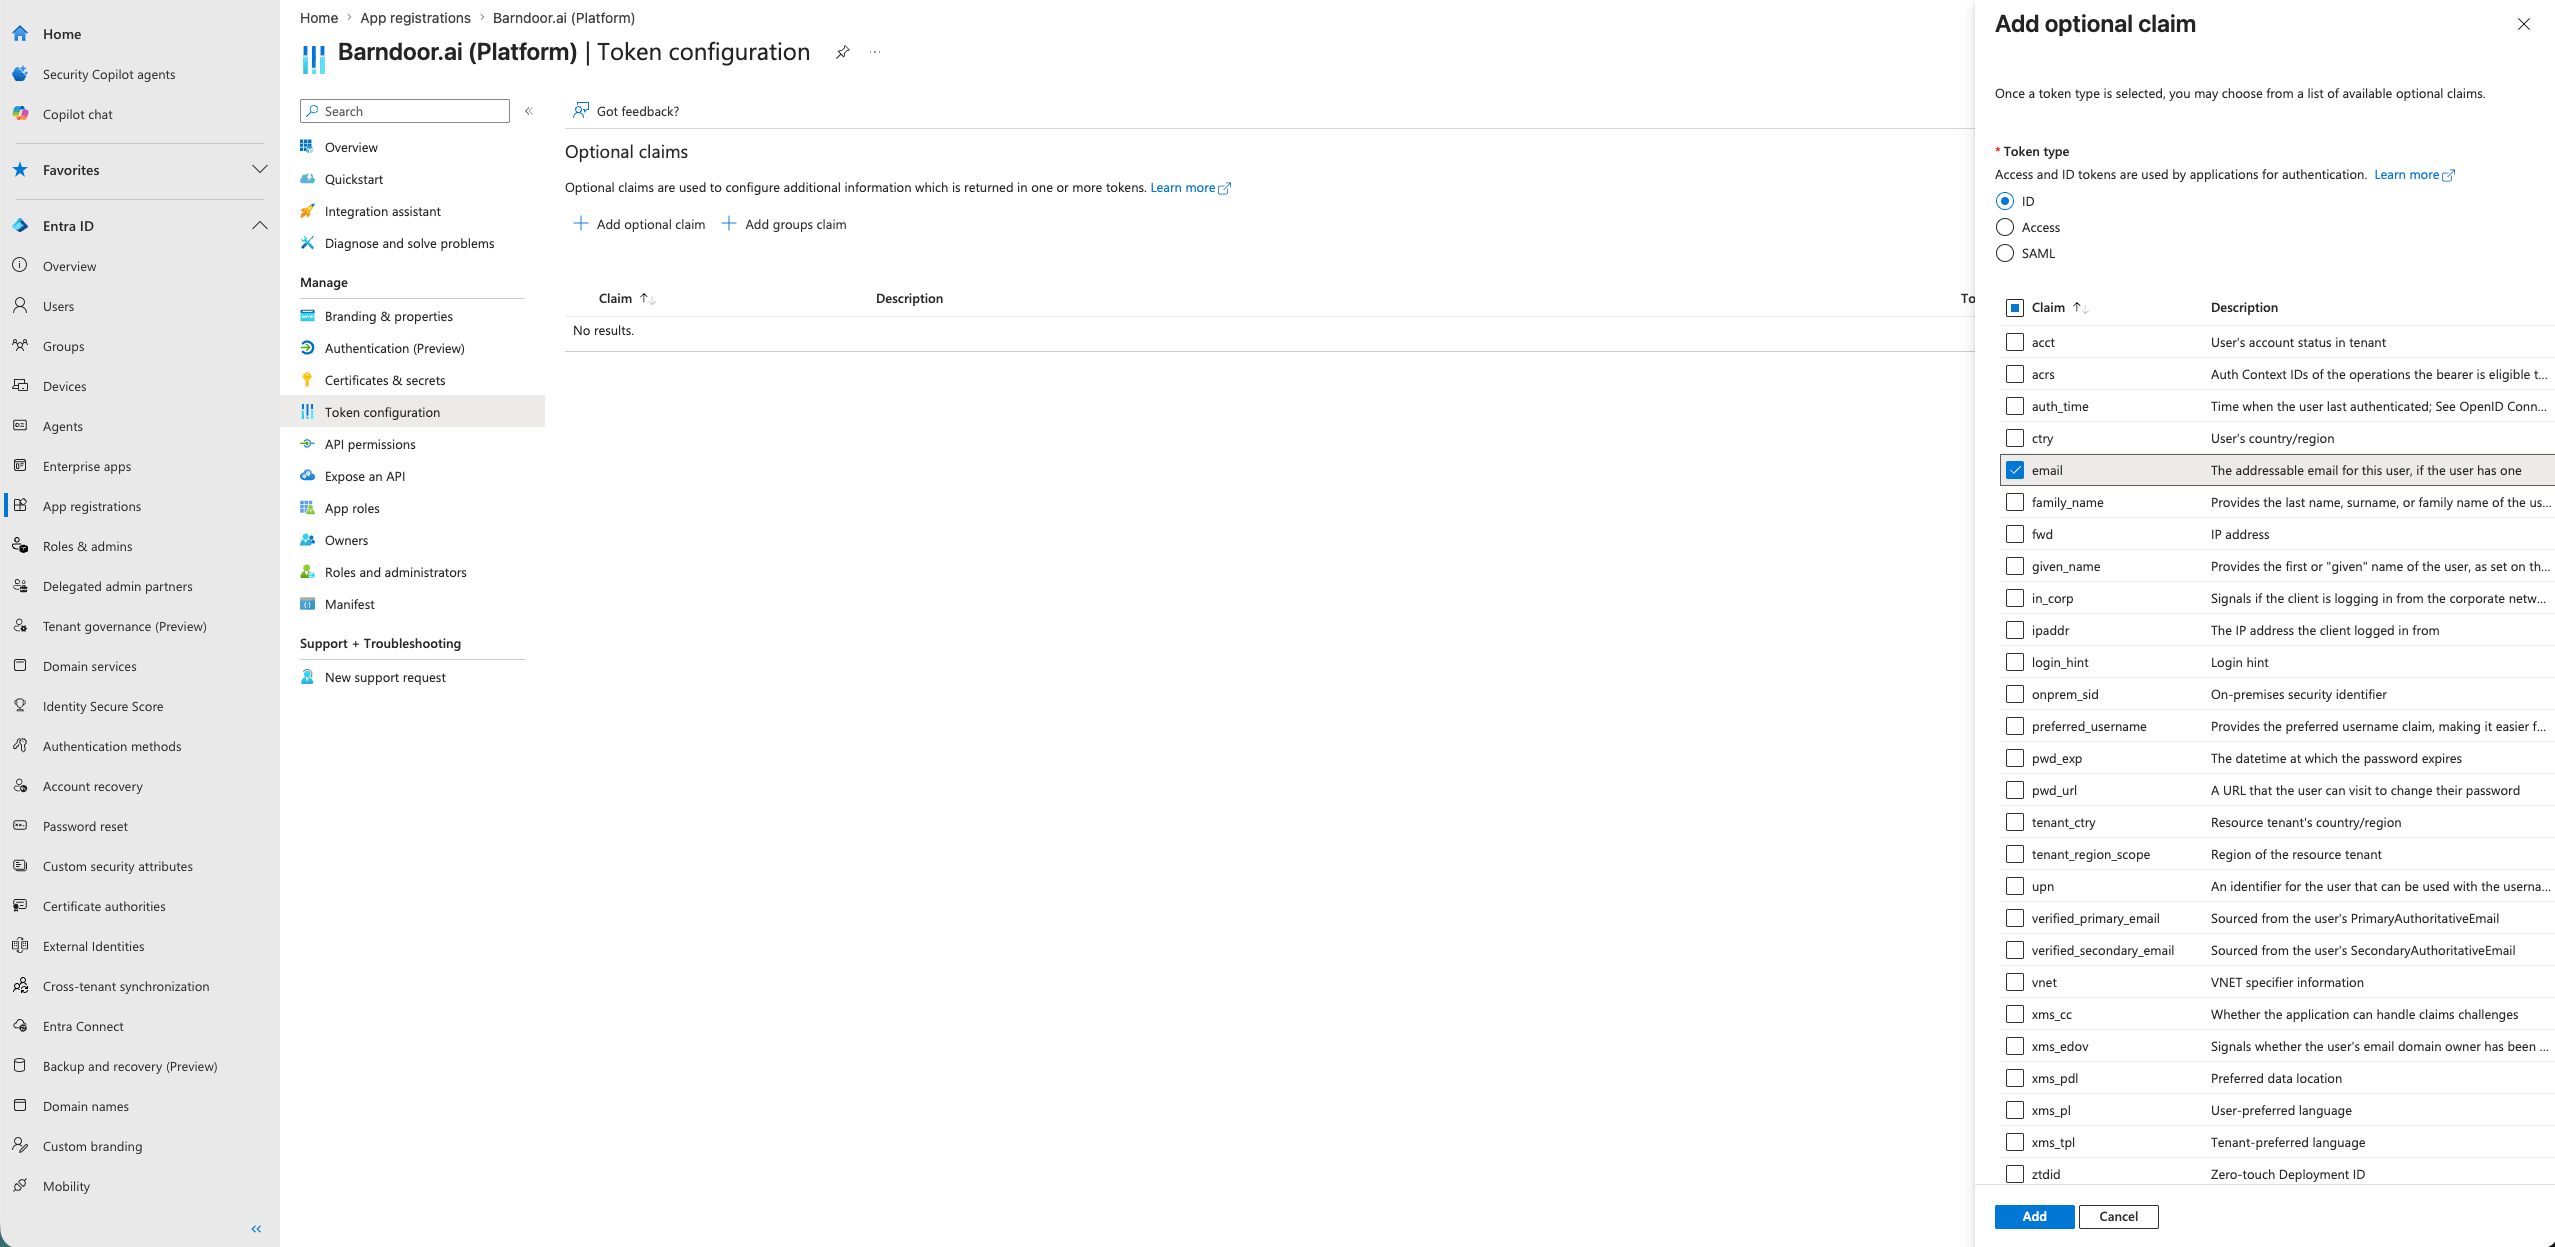
Step 2: Add the email claim to the ID token
Open Token configuration
Add the email claim
- Token type: ID (this is the one that matters for Barndoor)
- Check the email claim and click Add.
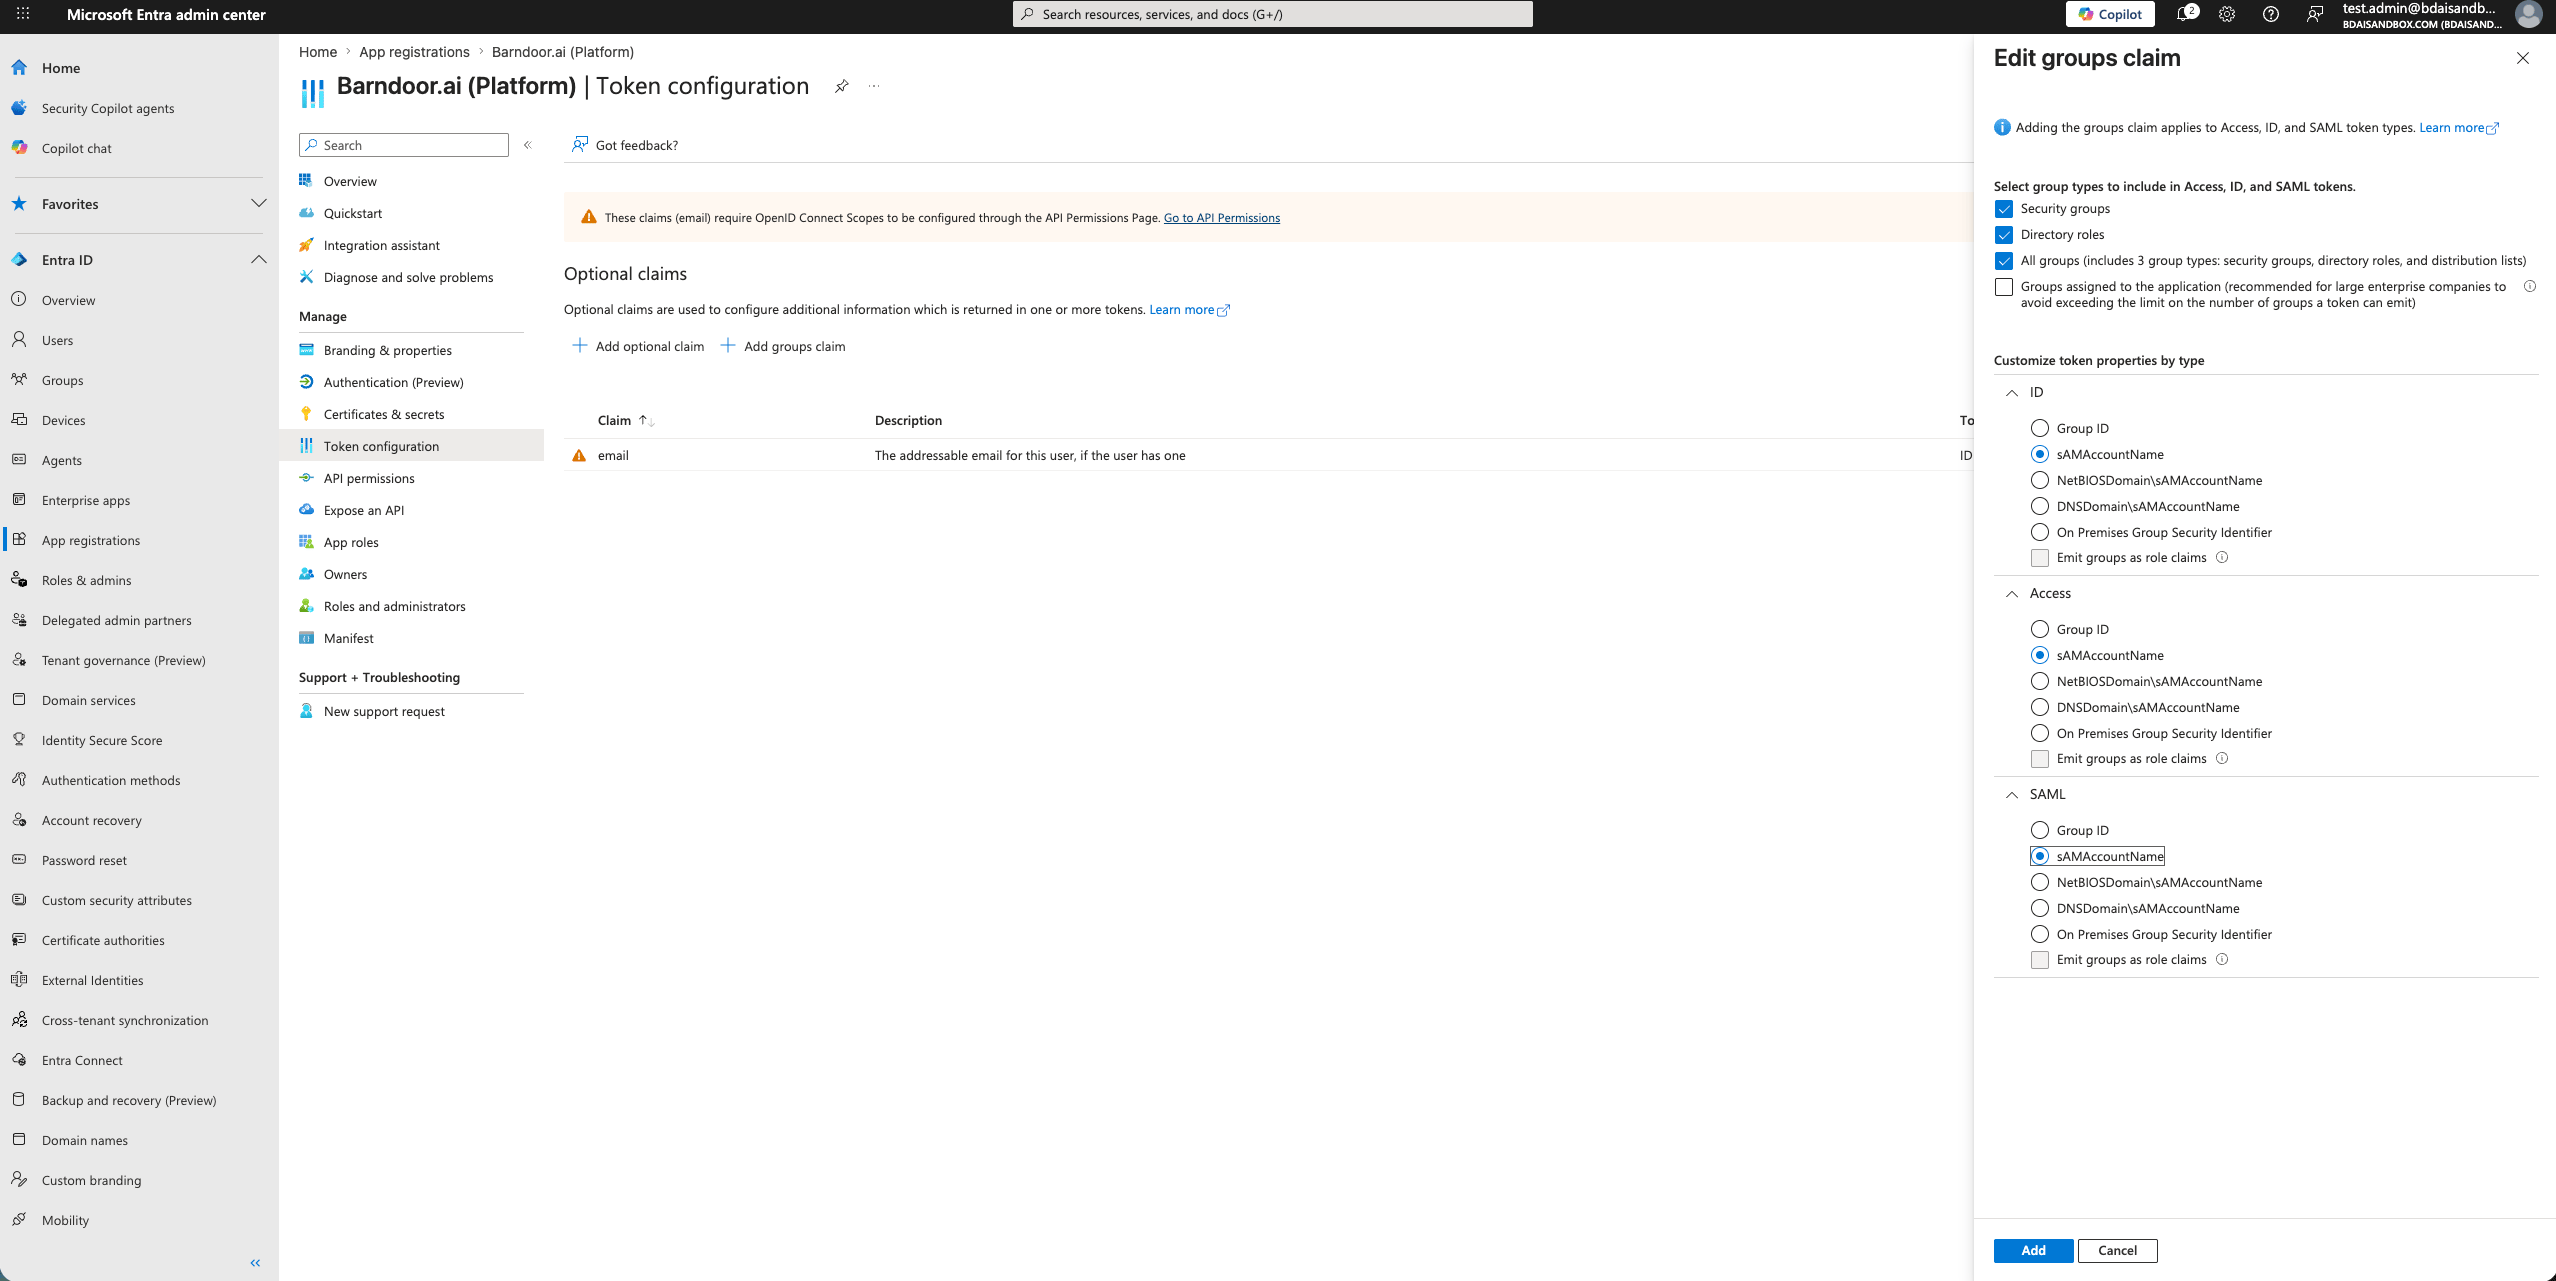
Step 3: Add the groups claim
Add groups claim
Choose which groups to include
- Security groups or All groups — simple, includes every group the user is in.
- Groups assigned to the application — recommended for larger tenants; only sends groups that have been explicitly assigned to the Barndoor app. This keeps the token small and limits exposure.
Set the group identifier to sAMAccountName
Step 4: Edit the manifest (two changes the UI can’t make)
There are two adjustments Entra’s UI doesn’t surface that you must make in the raw manifest.Open the manifest editor
optionalClaims block.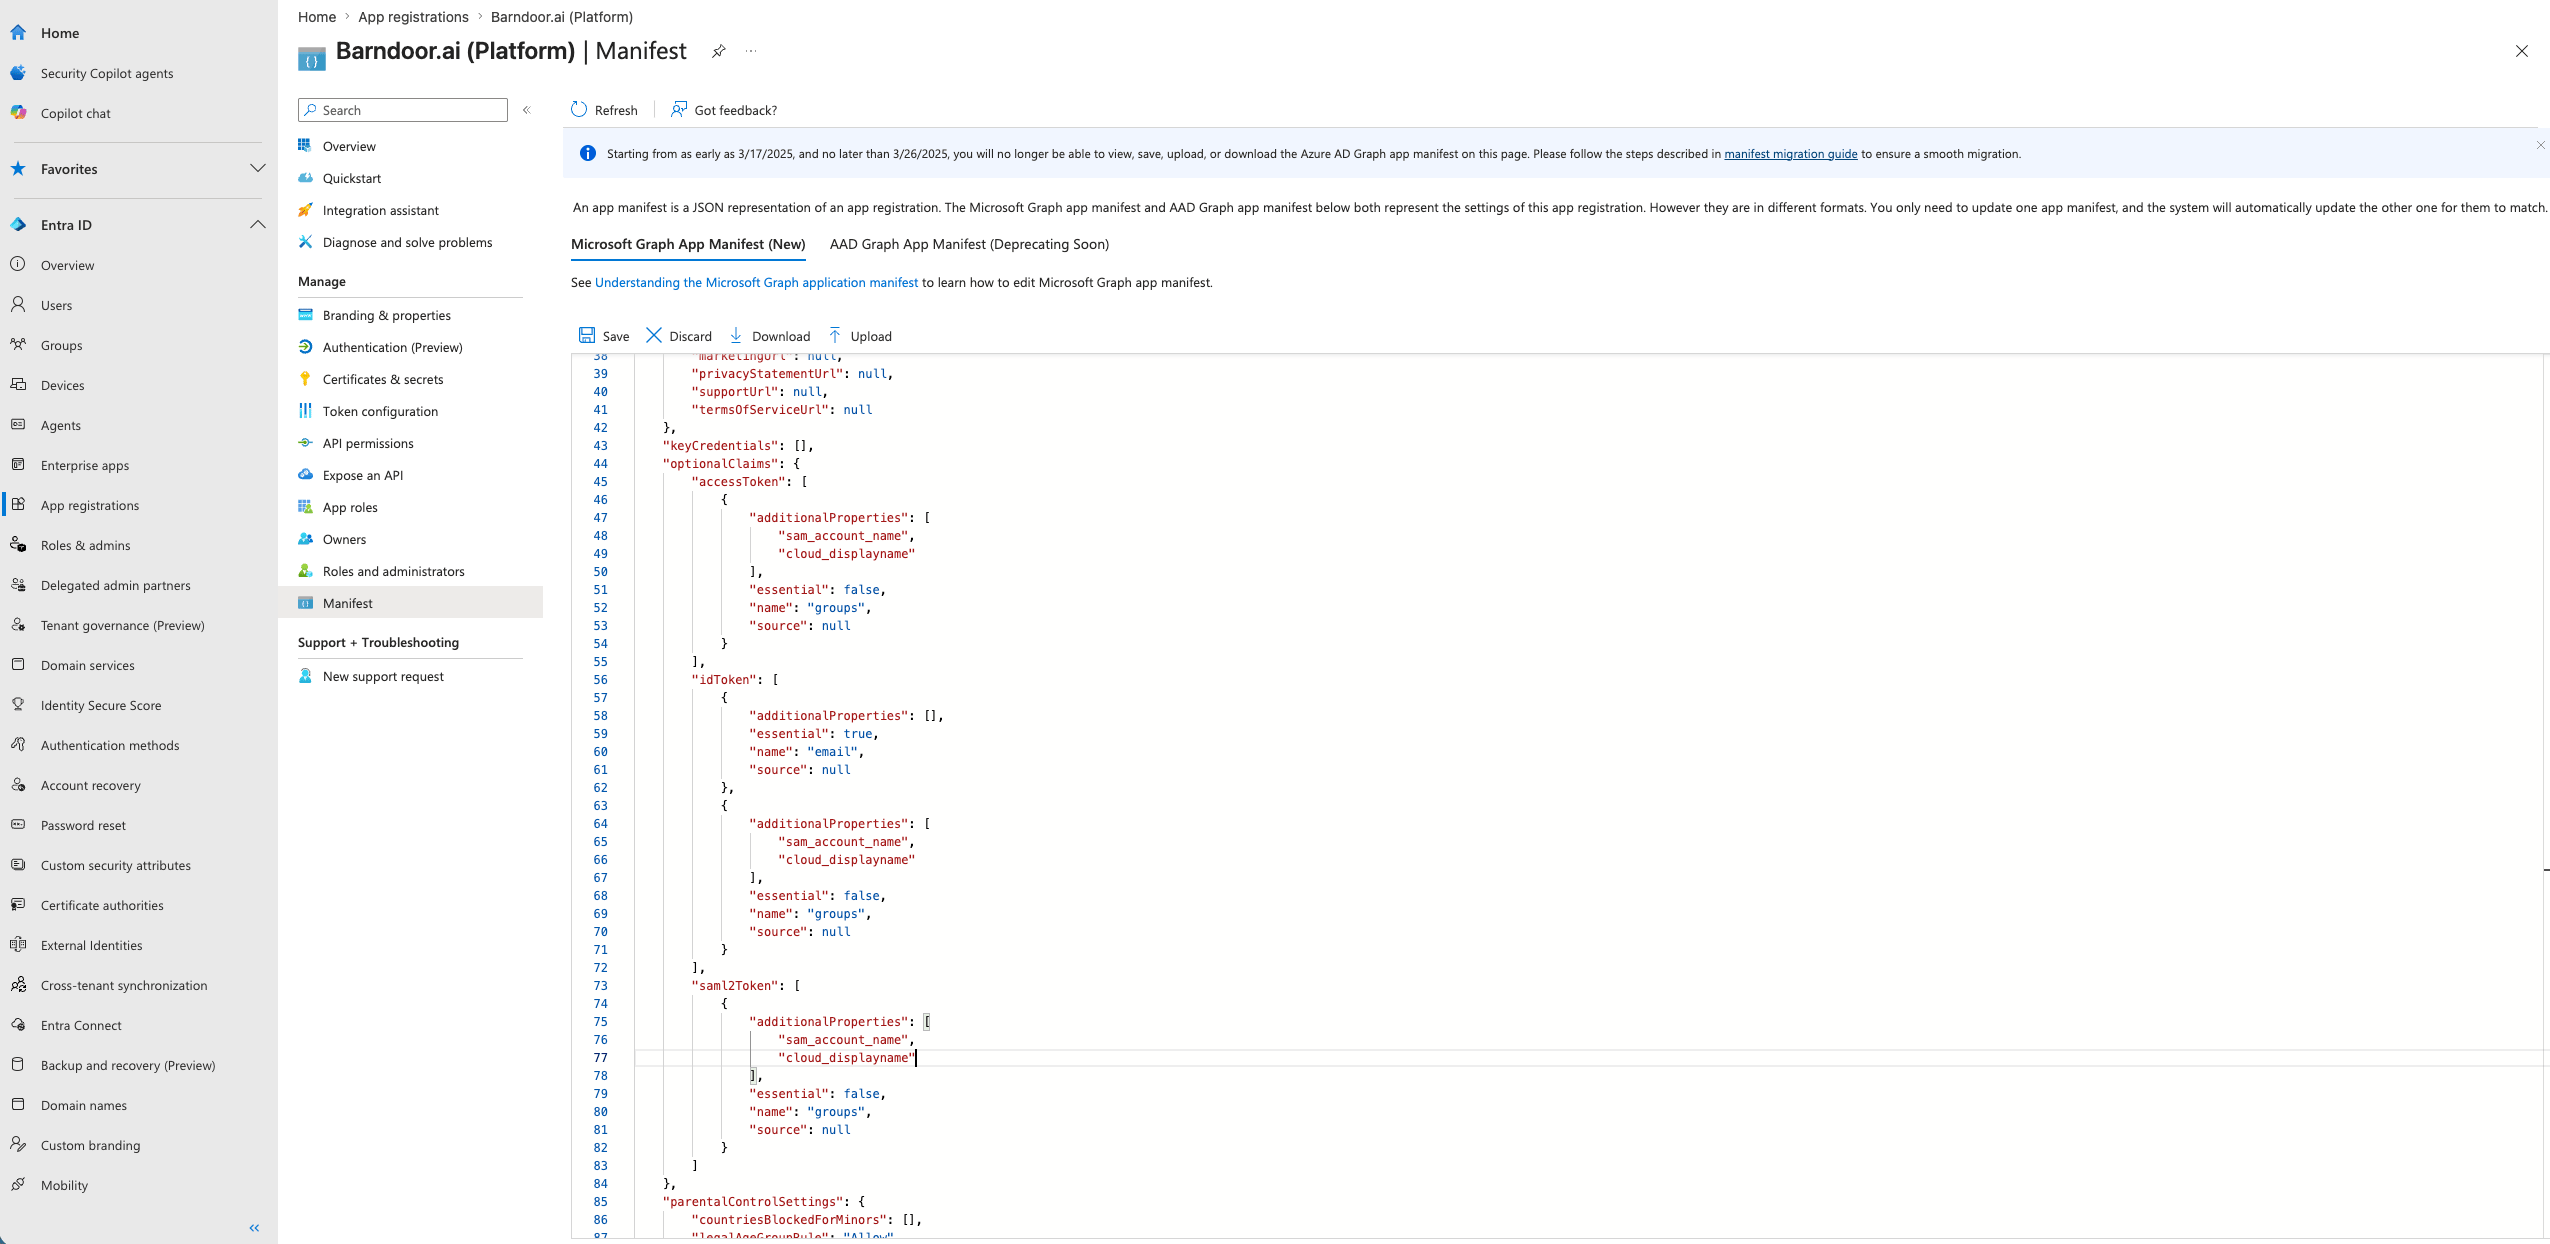
Mark the email claim as essential (ID token only)
email entry under idToken and set essential to true:Add cloud_displayname for groups
sam_account_name listed) and add cloud_displayname to additionalProperties. Do this in all three of idToken, accessToken, and saml2Token:Save the manifest
Step 5: Grant API permissions
Add Microsoft Graph delegated permissions
emailoffline_accessopenidprofile
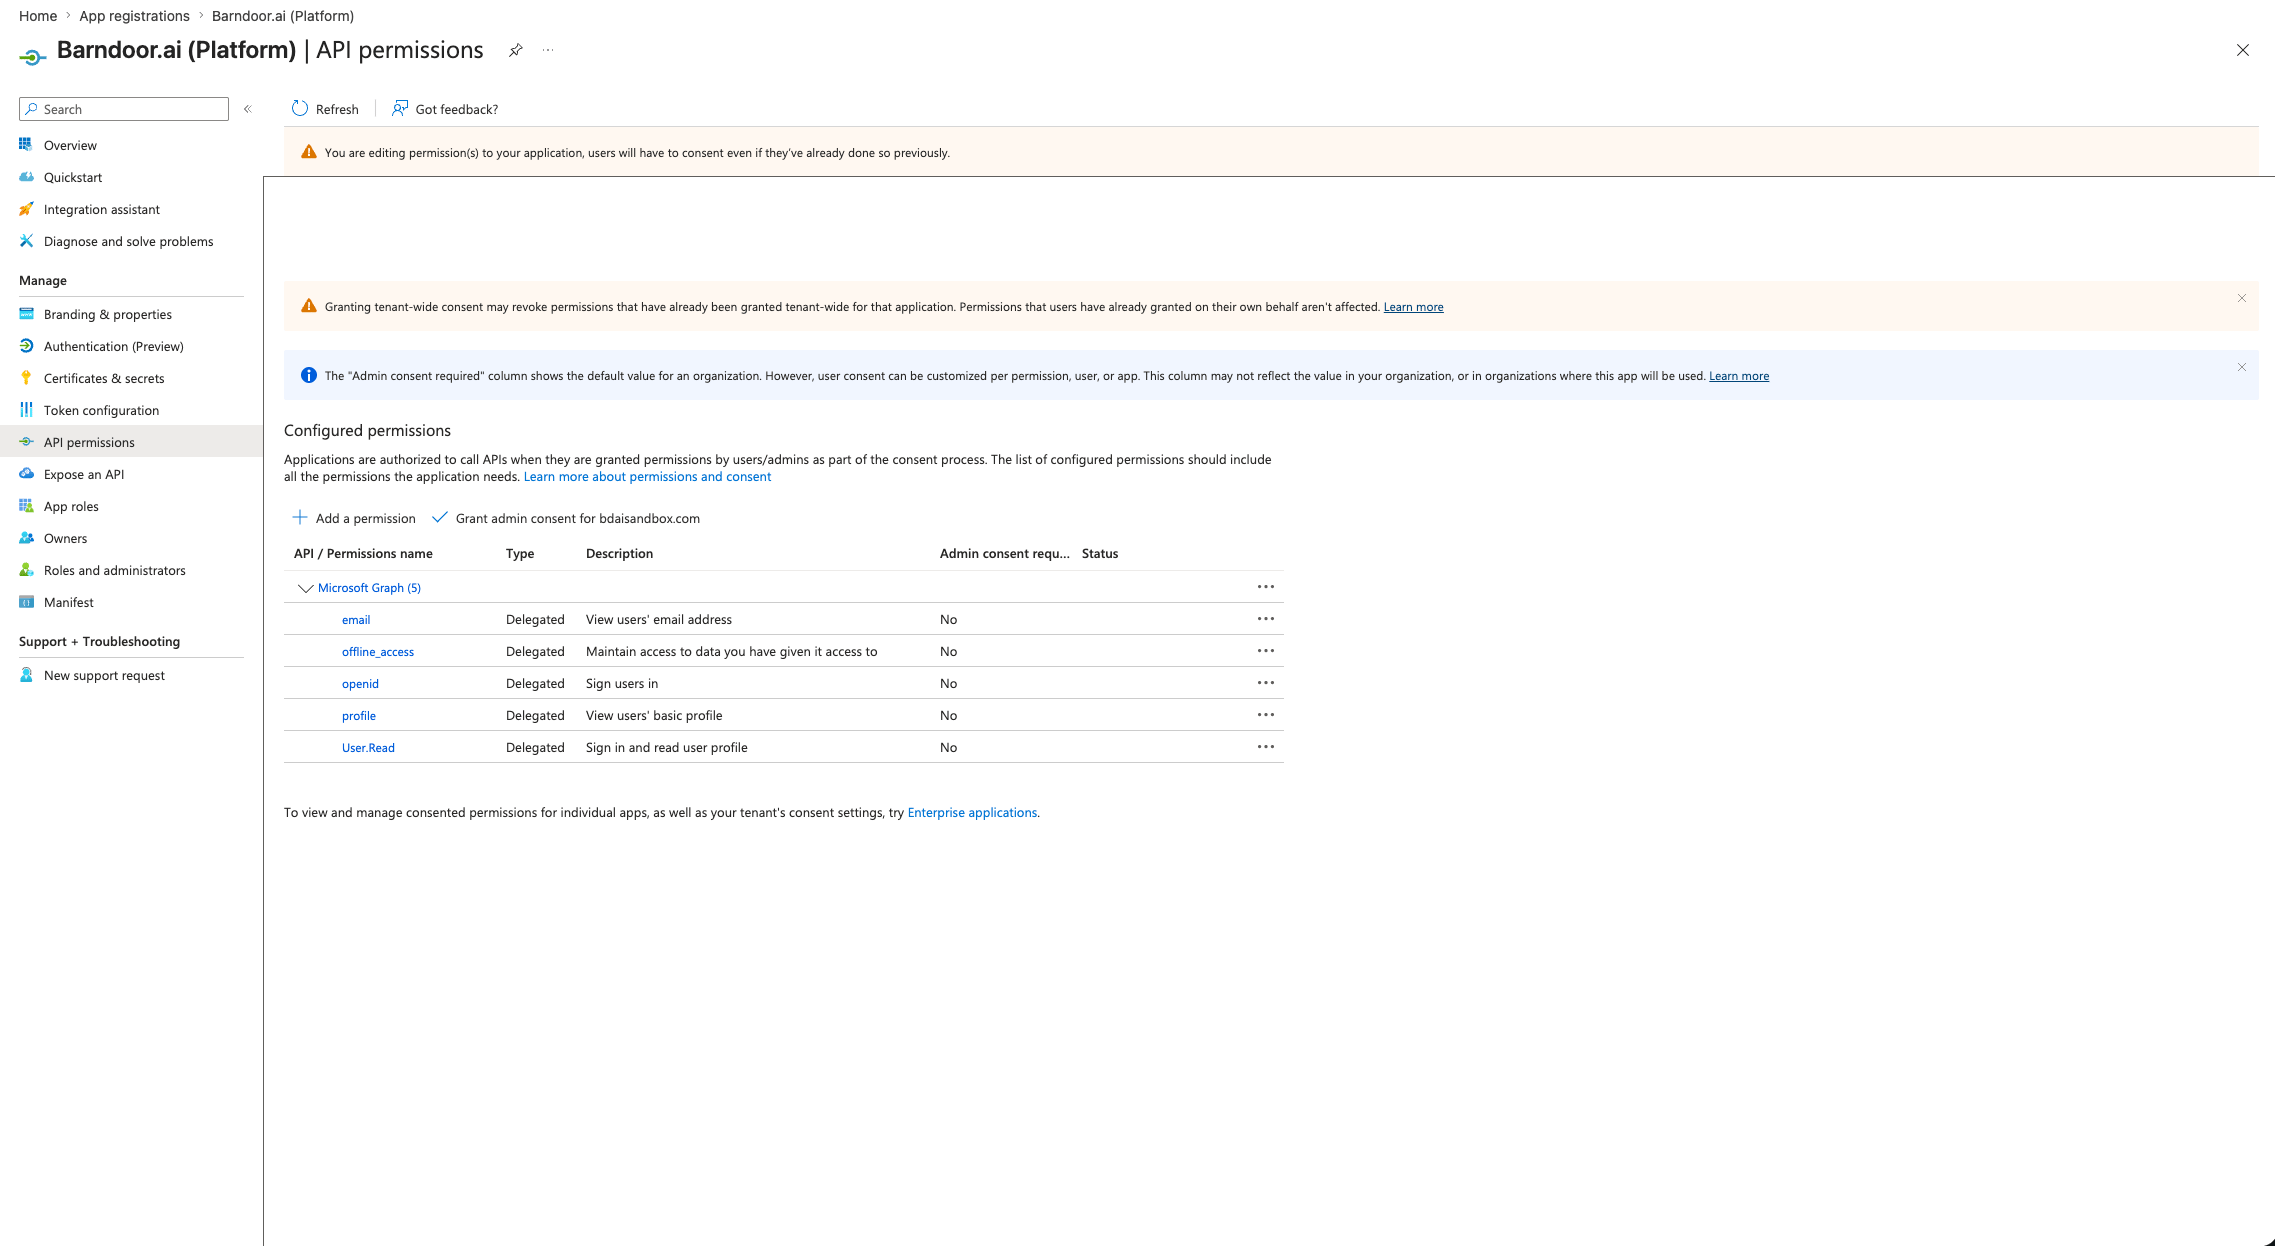
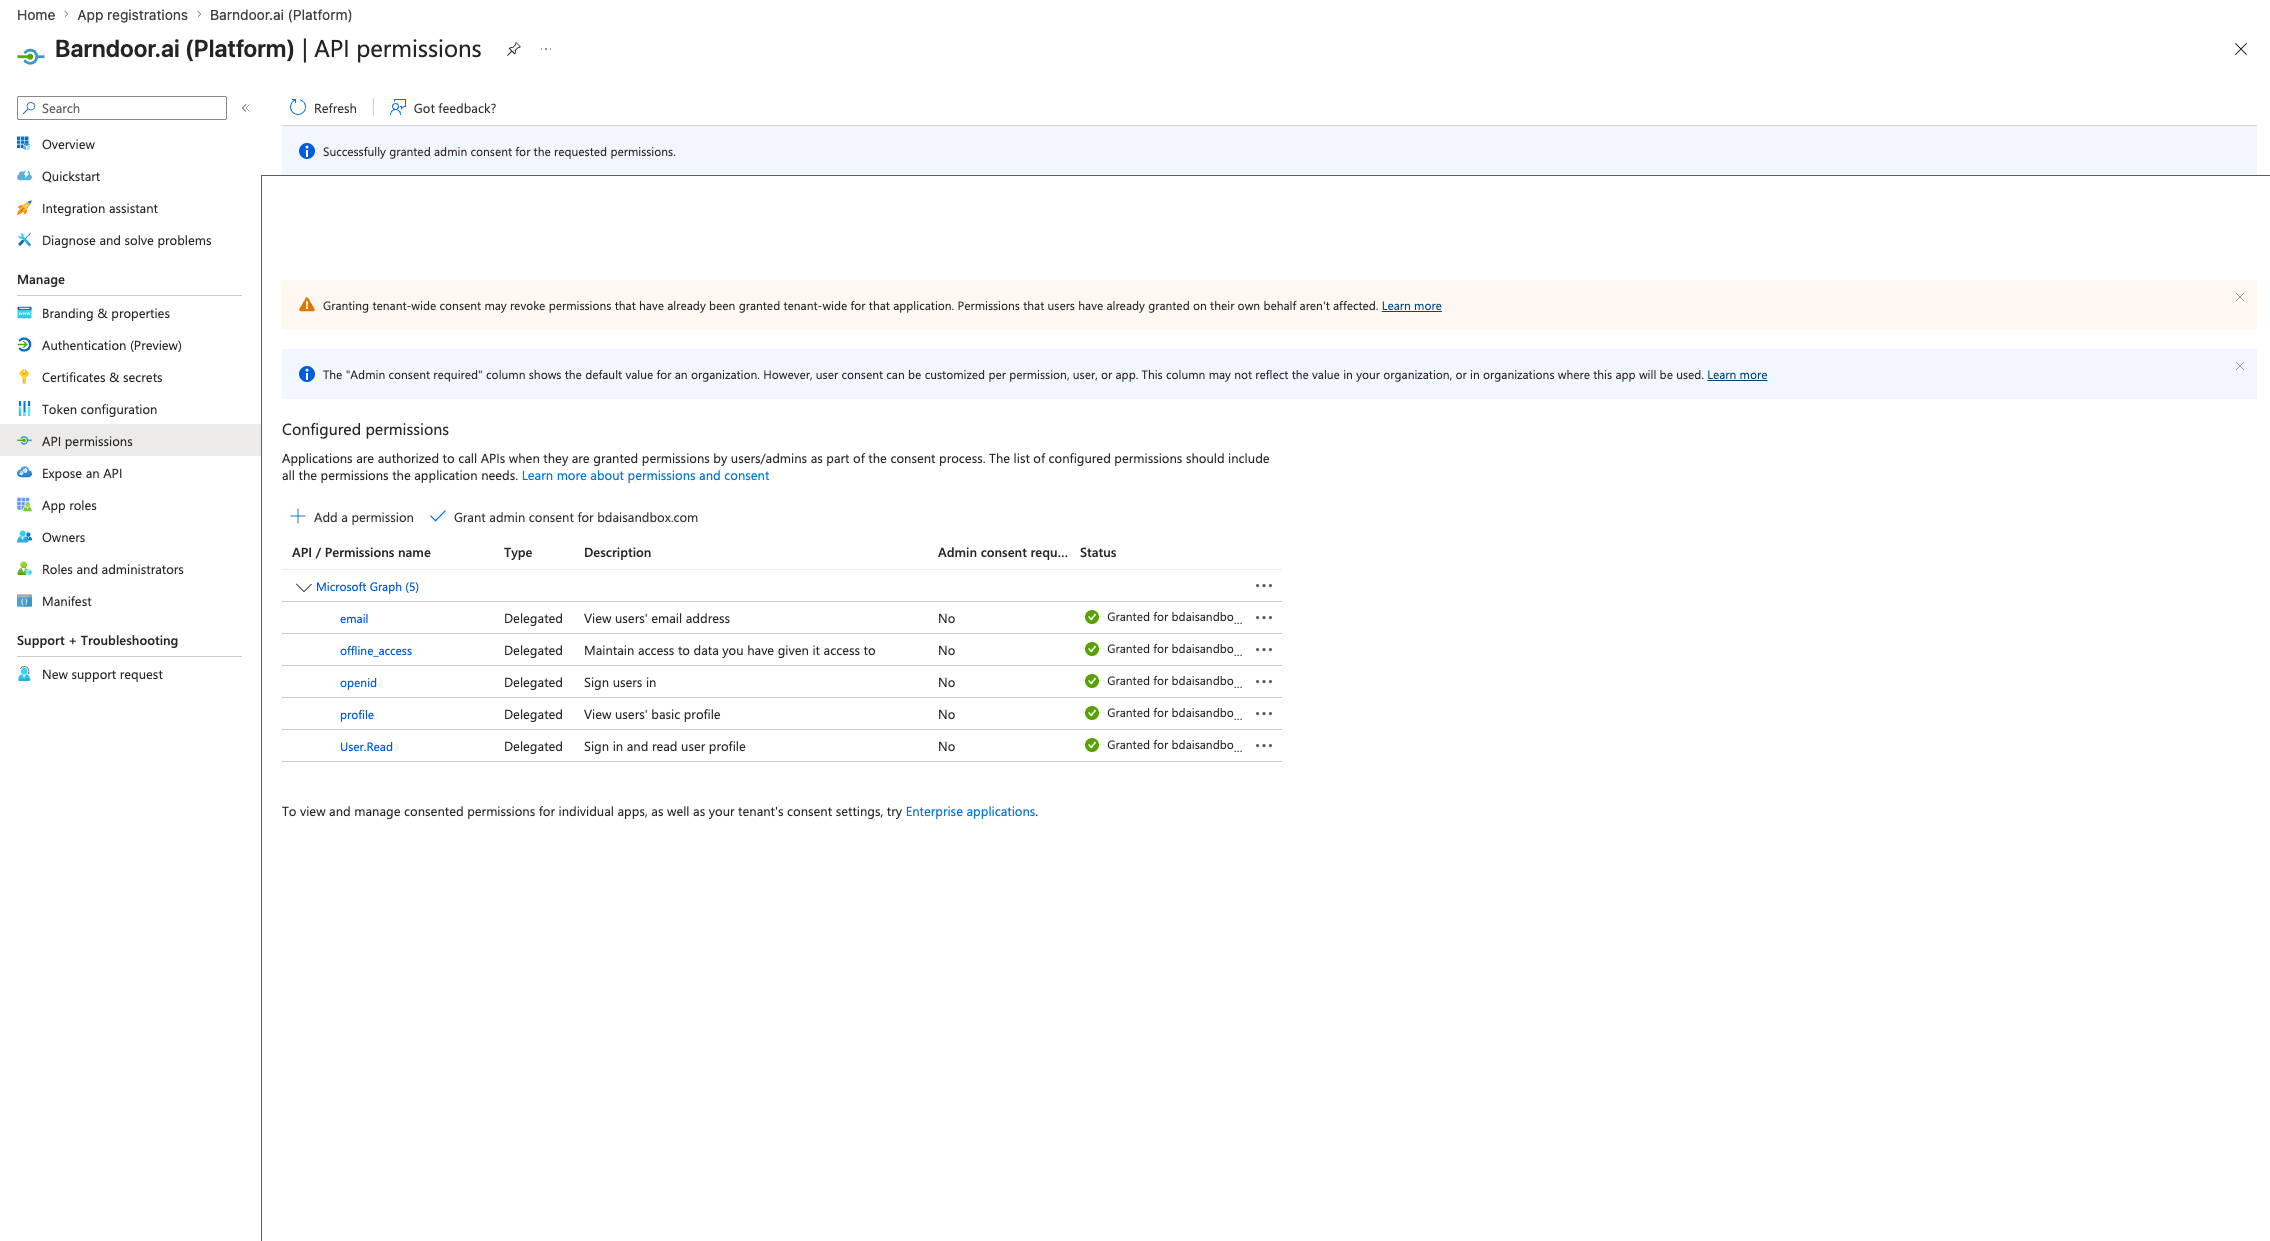
Grant admin consent
Step 6: Create a client secret
Generate a new client secret
- Description: e.g.
Barndoor SSO - Expires: Max the value (
24 monthsat time of writing). Entra requires an expiration.
Copy the Value immediately
Value column (not the Secret ID) to your clipboard.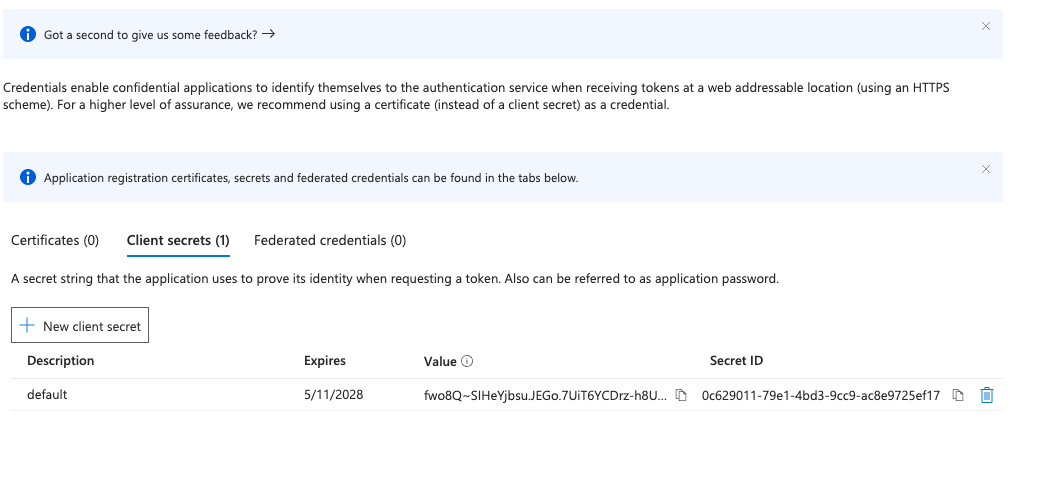
Step 7: Collect the remaining values
You’ll need three more values from Entra before switching over to Barndoor.Get the Application (client) ID
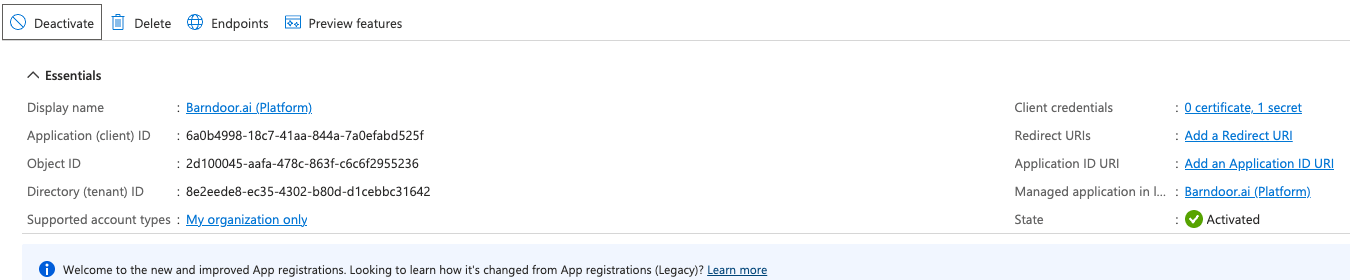
Get the Issuer URL from Endpoints

issuer. It should be the format of https://login.microsoftonline.com/{tenant-id}/v2.0.
Part 2 — Configure the IdP in Barndoor
Step 8: Open the Barndoor IdP setup form
Navigate to Identity Provider settings
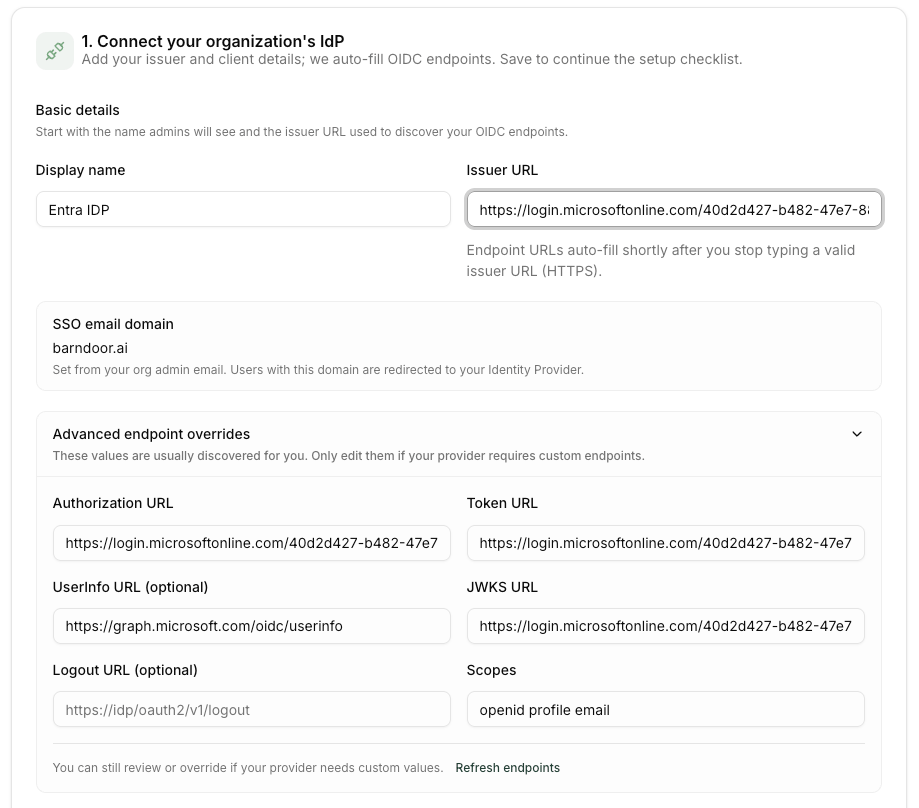
Fill in the basic fields
- Display name: Whatever you’d like (e.g.
Entra — Acme Corp) - Client ID: The Application (client) ID from Entra Overview (Step 7)
- Client Secret: The secret Value you copied in Step 6
Step 9: Set the Issuer URL to trigger OIDC discovery
Entra publishes one URL in its metadata, but stamps a different URL into theiss claim of every token it issues. Barndoor verifies the iss claim against the issuer URL you provide, so the two must match exactly — including a trailing slash.
Use the Issuer URL to perform OIDC discovery
Save the connection
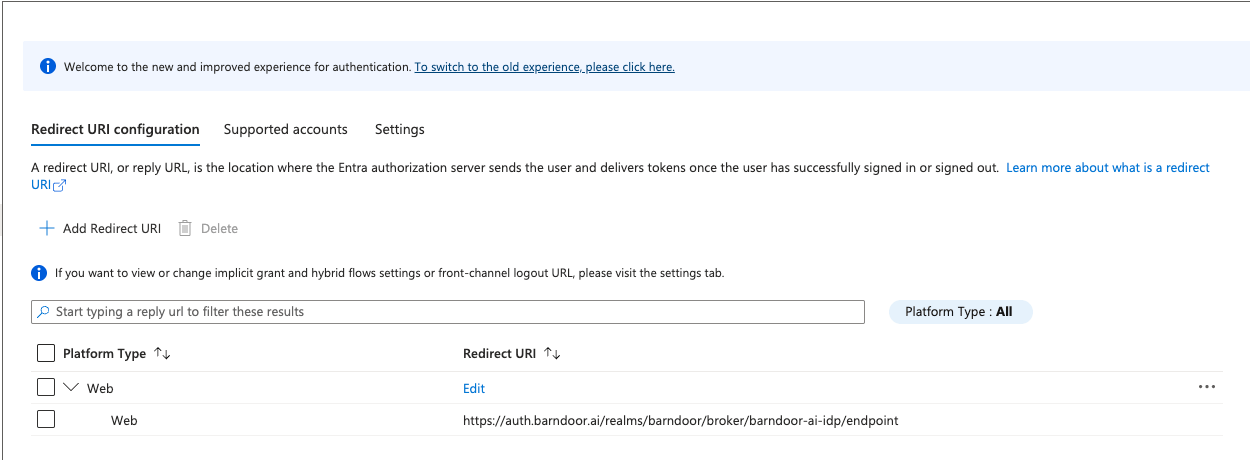
Step 10: Register the Redirect URI back in Entra
Copy the Redirect URI from Barndoor
https://auth.barndoor.ai/realms/.../broker/<your-idp-name>/endpoint. Click the copy icon.Add it to Entra's Authentication settings
Step 11: Test SSO end-to-end
Trigger the Test SSO flow
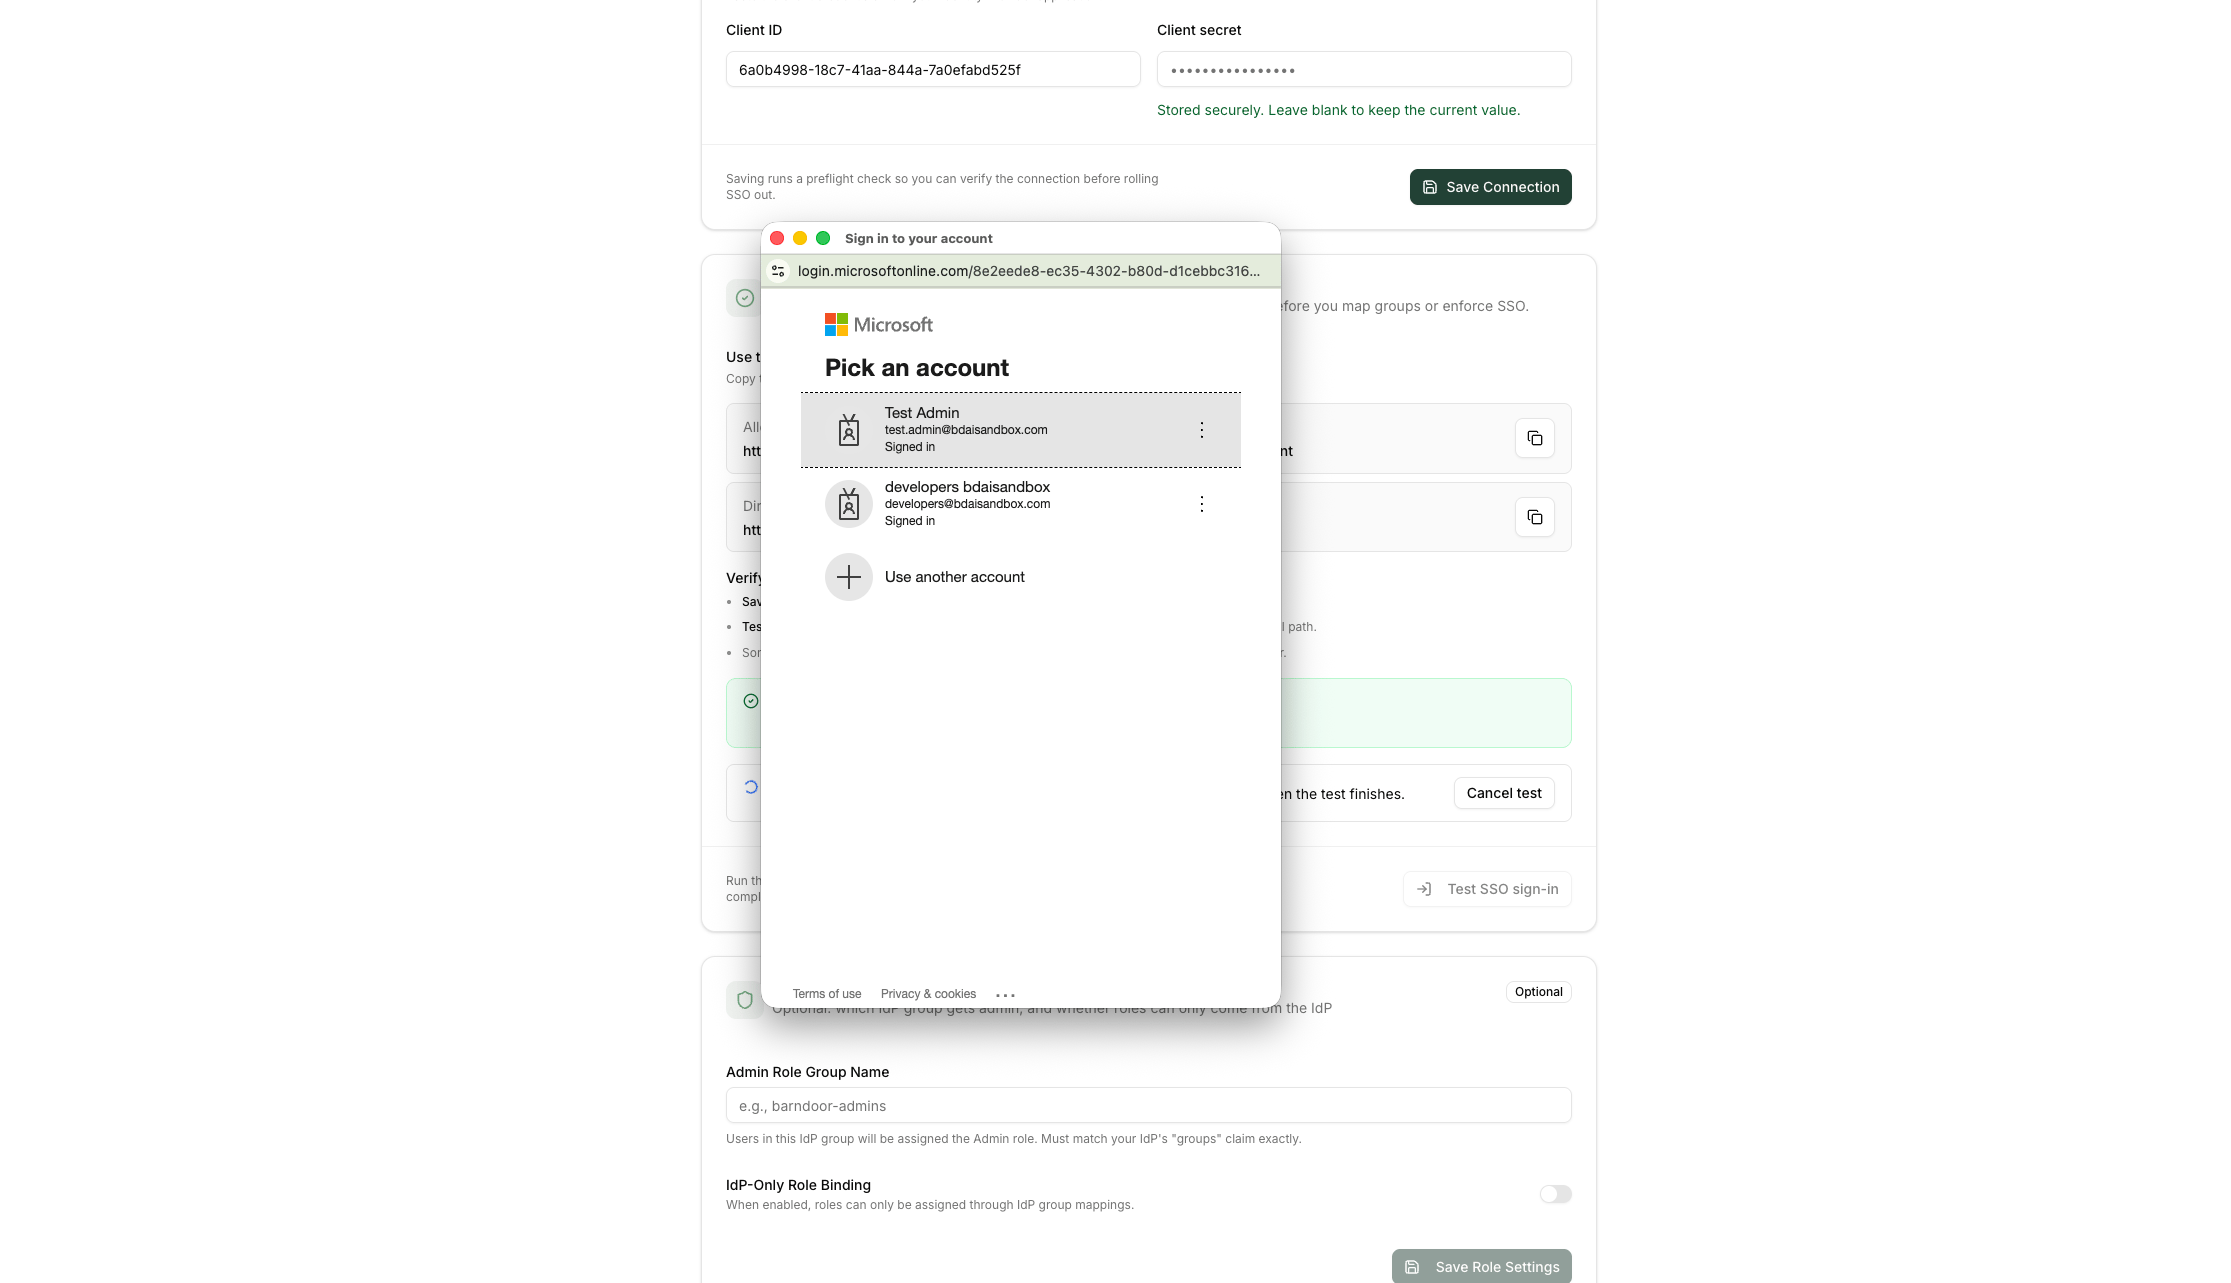
Sign in with an Entra user
groups claim configured in earlier steps.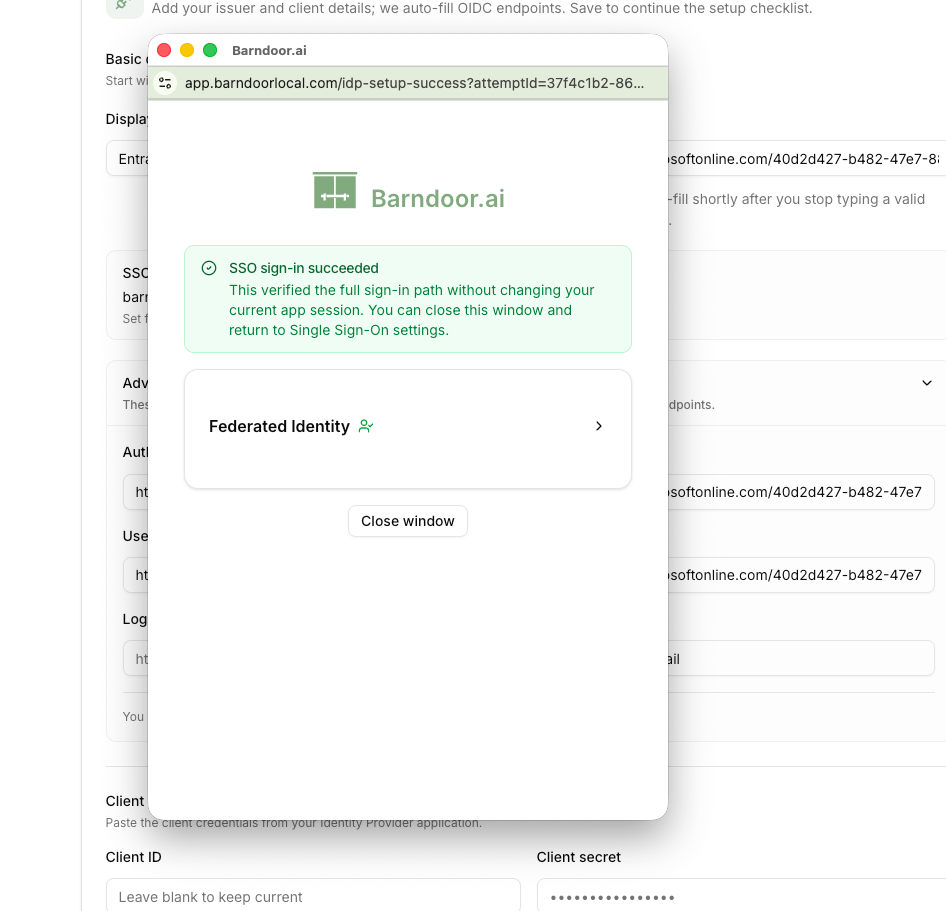
Step 12 (optional): Map Entra groups to Barndoor roles
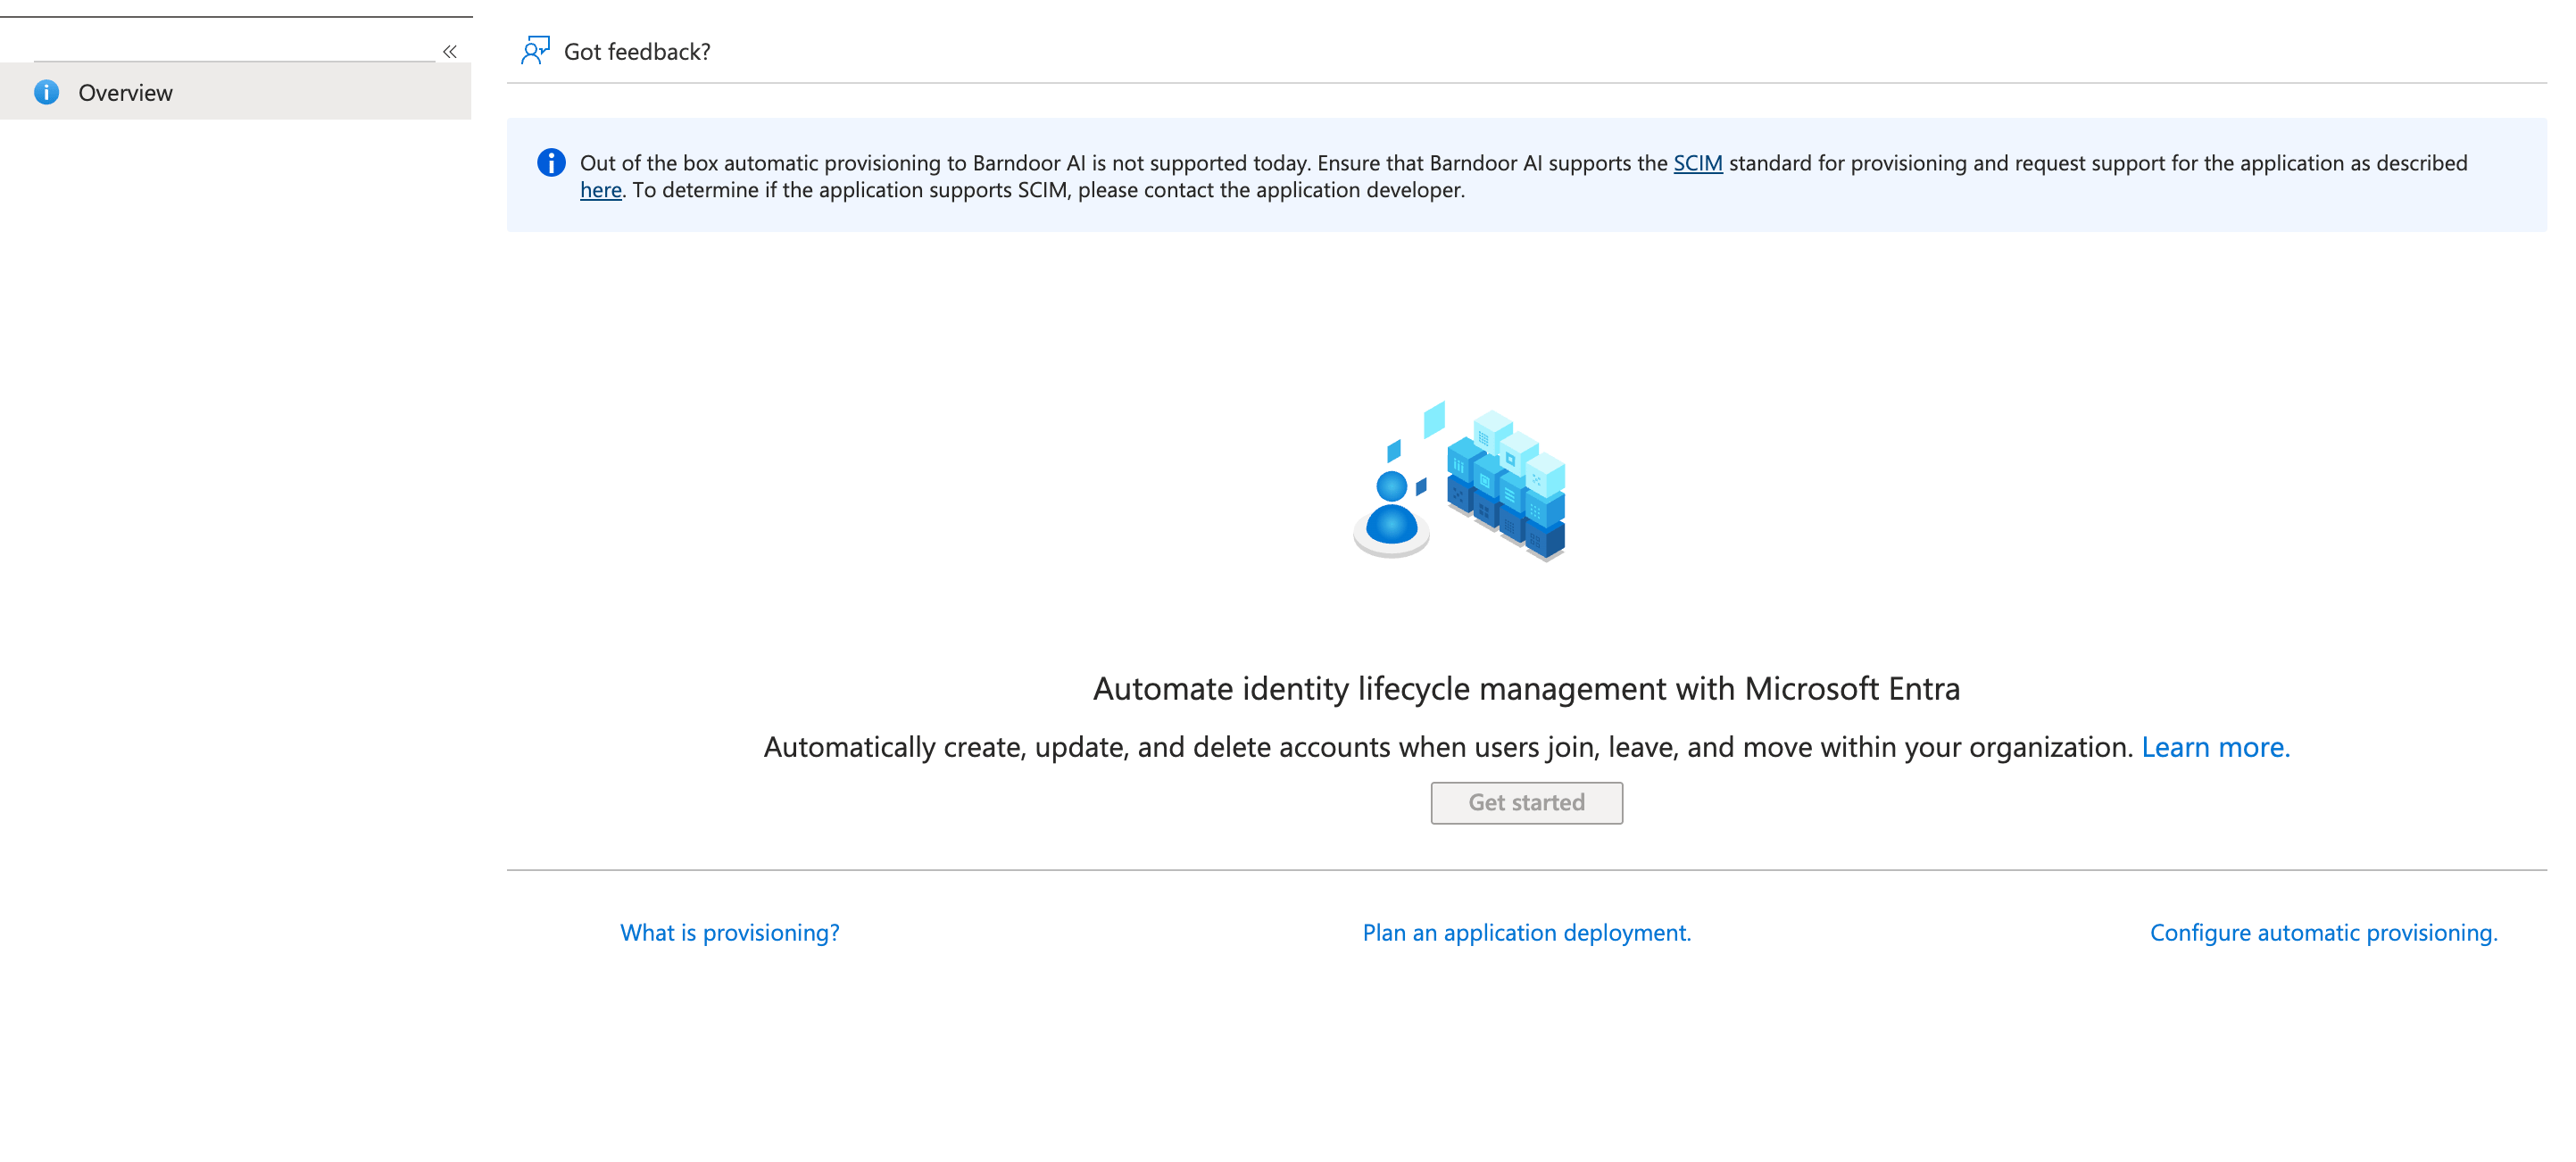
Once SSO works, you can map Entra groups to Barndoor’s Admin role using the standard role-mapping flow — see Connect your IdP — Step 3: Configure Role Mapping.Part 3 — SCIM provisioning
SCIM (System for Cross-domain Identity Management) is an open standard that lets Entra automatically push user and group changes to Barndoor — when someone joins, changes roles, or leaves your organization, Entra provisions, updates, or deprovisions their Barndoor access without anyone touching Barndoor directly. SCIM provisioning is the recommended way to manage users in Barndoor. While SSO (Parts 1–2) handles authentication at login time, SCIM keeps your user directory continuously in sync — ensuring access is granted and, just as importantly, revoked promptly as your team changes.Step 13: Configure SCIM Provisioning
Enable SCIM Provisioning in Barndoor
- Click
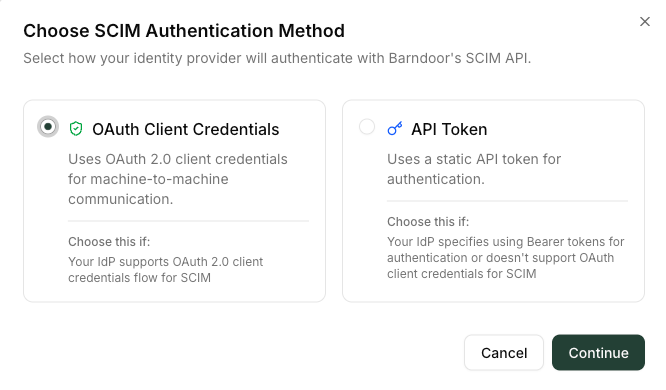
Configure SCIM Provisioning - Choose an authentication method (OAuth - Client Credentials OR API Token) then click ‘Continue’
- Copy the sensitive values from the next dialog. You can only view these once and will need them in the next step
- The SCIM Provisioning card will now show a list of relevant endpoints needed to setup SCIM provisioning in Entra
Configure SCIM Provisioning in Entra
- OAuth Client Credentials
- Select ‘OAuth2 client credentials grant’ as the method for authentication
- Fill in Tenant URL with the
SCIM Base URLendpoint found on the SCIM Provisioning card in Barndoor - Fill in OAuth token endpoint with the
Token Endpointendpoint found on the SCIM Provisioning card in Barndoor - Fill in the Client ID and Client Secret values with the same sensitive values from the previous step
- API Token
- Select ‘Bearer authentication’ as the method for authentication
- Fill in Tenant URL with the
SCIM Base URLendpoint found on the SCIM Provisioning card in Barndoor - Fill in the Secret Token with the same API Token from the previous step
Test Connection to ensure authentication is setup properly. If successful, finish by clicking Create.
Assign Users and Groups to sync with Barndoor
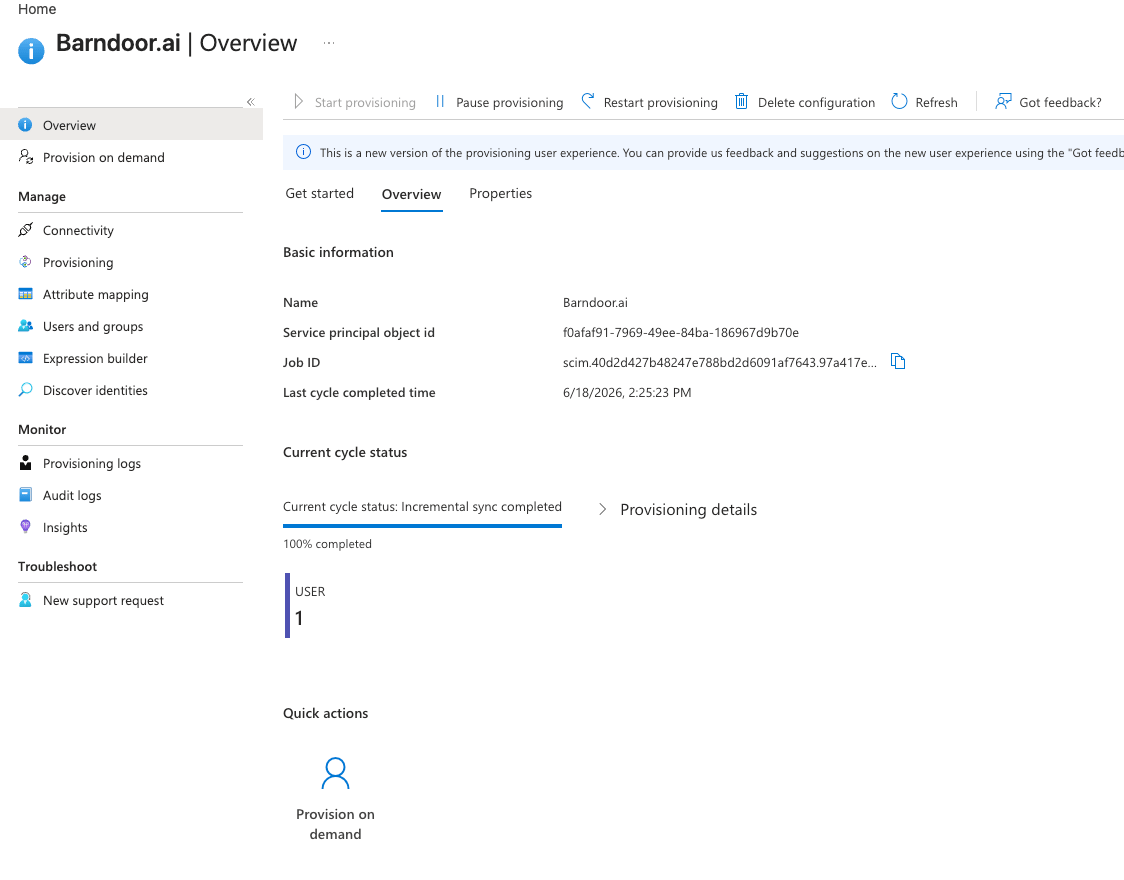
- Find
Provisioningin the sidebar and ensure provisioning mode is set to ‘automatic’ and Provisioning Status is ‘On’ - Optionally, modify attribute mappings to meet your requirements. Entra defaults are a good starting point.
- Find ‘Users and Groups’ in the sidebar and add users and groups you would like to synchronize with Barndoor.
- Finally, select ‘Overview’ and click ‘Start Provisioning’ to start and initial sync of users and groups.
Part 4 — Roll out SSO enforcement
After your IdP connection is saved and SSO sign-in works, the Roll out SSO enforcement section on the Identity Provider page lets you require SSO for every member of your organization. Until you enforce SSO, users can still sign in with Barndoor passwords in addition to your IdP.What changes when you enforce SSO
When you confirm enforcement, Barndoor:- Requires all organization members to sign in through your IdP
- Permanently clears saved Barndoor passwords for every member
- Leaves password sign-in enabled only for the break-glass admin email you configure
- Terminates all active sessions, including the administrator who enabled enforcement
Prerequisites
Both items in Before you can enforce SSO must be complete before Enforce SSO is enabled:Test SSO sign-in
Configure break-glass admin email
- The address must use your organization’s IdP email domain (shown as
@your-domainin the dialog) - It must not already belong to an existing Barndoor user
- You cannot use your own administrator email as the break-glass account
Enable organization-wide SSO
Review the rollout card
Acknowledge each consequence
- Future logins will be exclusively via IdP SSO
- All Barndoor passwords will be permanently cleared
- Only your break-glass email will be able to sign in via password going forward
- All active sessions—including your current one—will be terminated
Confirm enforcement
Set up the break-glass account
When enforcement completes, Barndoor provisions a dedicated Barndoor Break Glass administrator account at the email you configured and sends a setup email to that mailbox. The recipient must:- Open the setup email and follow the link to set a password
- At first sign-in, complete the email one-time passcode (OTP) sent to that mailbox—the same second factor used during an IdP outage
Manage break-glass access after enforcement
After SSO is enforced, the rollout card shows SSO enforcement as active and lets you manage the break-glass email:- Resend invite — If the break-glass account has not finished password setup, resend the setup email from the break-glass dialog
- Change break-glass email — Opens a destructive change flow. Enter the new address, check the acknowledgement that the current account will lose password sign-in, then click Save. The new mailbox must complete password and OTP setup before it can be used
Sign in with break-glass during an IdP outage
If your IdP is unavailable and you need emergency administrator access:- On the Barndoor sign-in page, choose password sign-in (not SSO)
- Enter the break-glass email address and password
- Complete the email one-time passcode sent to that mailbox
Remove the SSO connection (optional)
To disconnect IdP integration before or after enforcement, open the actions menu (⋯) on the rollout card and choose Remove SSO. Confirm when prompted.SSO enforcement troubleshooting
Test SSO sign-in pop-up blocked or closes early
Test SSO sign-in pop-up blocked or closes early
- Browser blocked pop-ups for the Barndoor site
- The sign-in window was closed before authentication finished
Break-glass email rejected on Save
Break-glass email rejected on Save
- Address is outside your organization’s IdP email domain
- Address already belongs to an existing Barndoor user
- You entered your own administrator email
@—the domain is shown in the dialog.Break-glass setup email not received
Break-glass setup email not received
Enforcement succeeded with a warning
Enforcement succeeded with a warning
Troubleshooting
Login fails with 'issuer mismatch'
Login fails with 'issuer mismatch'
iss claim Entra stamped into the token.Fix: Ensure the Issuer URL matches exactly the issuer set in the OpenID Metadata document. Including trailing slashes. If you are using the v1 OAuth endpoints, https://sts.windows.net/<tenant-id>/ — including the trailing slash — is the issuer. See Step 9.Test SSO loops or returns silently with no user info
Test SSO loops or returns silently with no user info
- The email claim isn’t in the ID token. Re-check Step 2 and confirm
essential: trueis set in the manifest underidTokenonly (Step 4). - The user signing in doesn’t have an email attribute populated in Entra. Verify on the user’s profile.
Groups appear as UUIDs instead of names
Groups appear as UUIDs instead of names
cloud_displayname additional property — it’s a paid-tier feature.Fix: Either upgrade to Entra ID P1+, configure Barndoor role mapping against Object IDs (Step 3).SSO worked, then suddenly stopped
SSO worked, then suddenly stopped
Redirect URI mismatch on login
Redirect URI mismatch on login