> ## Documentation Index
> Fetch the complete documentation index at: https://docs.barndoor.ai/llms.txt
> Use this file to discover all available pages before exploring further.
# Trial Guide
> Complete guide to set up and configure your Barndoor platform from start to finish
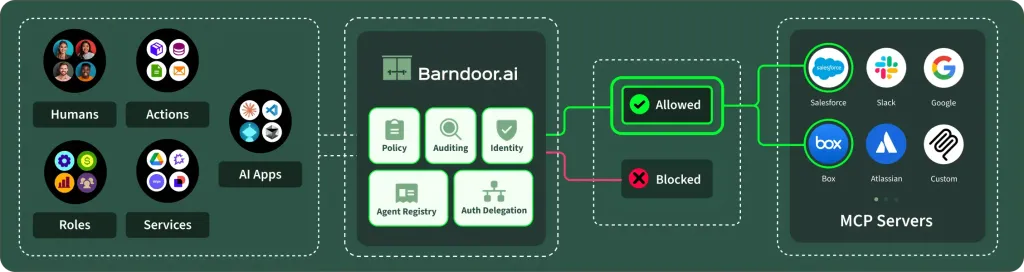 Welcome to Barndoor, where your AI workflows can run safely with context-aware tool routing, action-level policies, and observability.
**In the free trial, you can:**
Securely connect AI apps (Claude, ChatGPT, VSCode), agentic platforms (LangChain, LlamaIndex, CrewAI) and more with [MCP servers](https://modelcontextprotocol.io/docs/learn/server-concepts).
Define exactly which servers and tools your AI apps and agents can access across create, read, update, or delete operations—enforced instantly in live workflows.
Eliminate tool selection friction. Barndoor analyzes live context enabling your AI to execute the right tool at the right time—securely and efficiently.
Eliminate the guesswork from agentic workflows. Get complete end-to-end telemetry on every routing decision and tool execution, making it effortless to monitor performance and maintain security posture.
***
**Estimated Time**: 15-20 minutes
## Prerequisites
Before you begin, ensure you have:
* Admin Access to your Barndoor account. Click [here](https://app.barndoor.ai/auth/signup/trial) if you have not signed up yet.
* Admin credentials for the MCP server you want to connect
* An AI client application or API key ready for testing
***
## Labs
### Summary
To realize full productivity potential, AI needs to take actions in real systems like Salesforce, Jira, GitHub, etc. Barndoor is the control plane for access control between AI and these systems.
Once set up, Barndoor enforces fine grained access controls to the MCP servers of your connected systems.
Welcome to Barndoor, where your AI workflows can run safely with context-aware tool routing, action-level policies, and observability.
**In the free trial, you can:**
Securely connect AI apps (Claude, ChatGPT, VSCode), agentic platforms (LangChain, LlamaIndex, CrewAI) and more with [MCP servers](https://modelcontextprotocol.io/docs/learn/server-concepts).
Define exactly which servers and tools your AI apps and agents can access across create, read, update, or delete operations—enforced instantly in live workflows.
Eliminate tool selection friction. Barndoor analyzes live context enabling your AI to execute the right tool at the right time—securely and efficiently.
Eliminate the guesswork from agentic workflows. Get complete end-to-end telemetry on every routing decision and tool execution, making it effortless to monitor performance and maintain security posture.
***
**Estimated Time**: 15-20 minutes
## Prerequisites
Before you begin, ensure you have:
* Admin Access to your Barndoor account. Click [here](https://app.barndoor.ai/auth/signup/trial) if you have not signed up yet.
* Admin credentials for the MCP server you want to connect
* An AI client application or API key ready for testing
***
## Labs
### Summary
To realize full productivity potential, AI needs to take actions in real systems like Salesforce, Jira, GitHub, etc. Barndoor is the control plane for access control between AI and these systems.
Once set up, Barndoor enforces fine grained access controls to the MCP servers of your connected systems.
 ### What You'll Learn
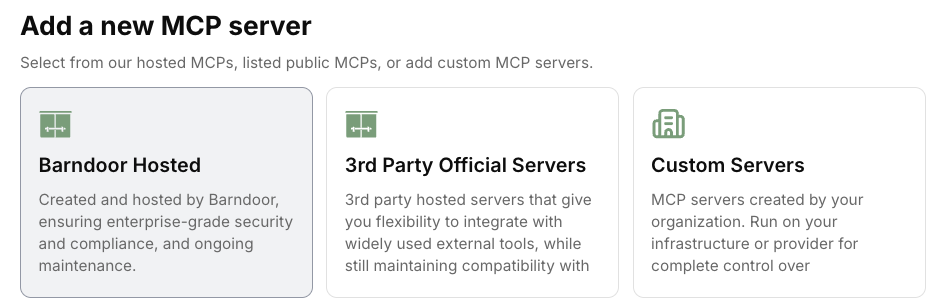
In this lab, you'll discover how register and connect the Barndoor Gateway to an MCP server. Once connnected that server becomes available to your agents.
### Let's Get Started
To evaluate how Barndoor works, first add and connect an MCP server. **Choose your path:**
Configure MCP server now in the Barndoor Dashboard
OR
Learn how to add servers with our comprehensive guide
You can connect multiple MCP servers. Start with one to understand the process, then add more as needed.
### Summary
The Access Control Center is where you **define policies** for how **AI agents and users can interact with connected systems**.
* Create policies that apply to specific agents, user roles and groups, or across your environment.
* Choose which MCP tools are available or add sophisticated **fine-grained access controls**.
* Deeper role, group, or user attribute based policies are available once you've **integrated Barndoor with your identity provider system**.
### What You'll Learn
In this lab, you'll discover how register and connect the Barndoor Gateway to an MCP server. Once connnected that server becomes available to your agents.
### Let's Get Started
To evaluate how Barndoor works, first add and connect an MCP server. **Choose your path:**
Configure MCP server now in the Barndoor Dashboard
OR
Learn how to add servers with our comprehensive guide
You can connect multiple MCP servers. Start with one to understand the process, then add more as needed.
### Summary
The Access Control Center is where you **define policies** for how **AI agents and users can interact with connected systems**.
* Create policies that apply to specific agents, user roles and groups, or across your environment.
* Choose which MCP tools are available or add sophisticated **fine-grained access controls**.
* Deeper role, group, or user attribute based policies are available once you've **integrated Barndoor with your identity provider system**.
 ### What You'll Learn
In this lab, you'll create your first access policy that controls what AI agents can (and cannot) do with your MCP servers. You'll learn how to set up guardrails that keep AI secure while maintaining productivity.
⚠️ **Important**: You must first connect to an MCP server before you can set up policies. If you haven't completed Step 1, go back and add a server first.
### Let's Get Started
Follow these steps to create your first access control policy:
Click [Access Control Center](https://app.barndoor.ai/rules) to begin configuring policies.
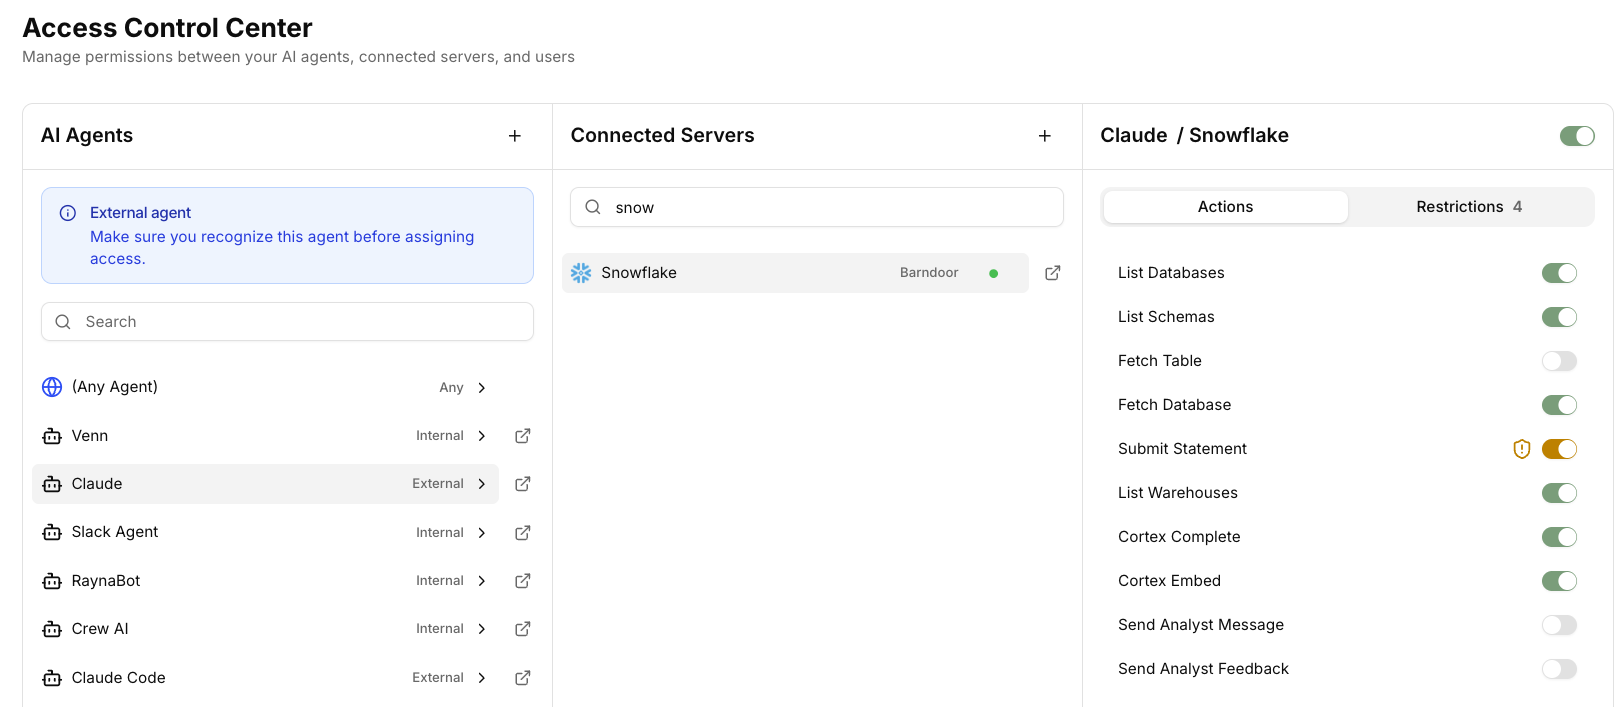
1. Under the **'AI Agents'** column, choose **'Any Agent'**
2. Under the **'Connected Servers'** middle column, select **Notion** or your preferred server to configure agent permissions
Notice all your MCP tools are loaded under the **'Actions'** tab.
Turn on only the MCP tools you want Barndoor to allow through. This controls which tools are available for the agent to use.
Now that we've enabled certain tools, let's add RBAC/ABAC access control policies.
Click the **'Restrictions'** tab to configure a policy.
We have a bunch of pre-built policies in our [MCP Server marketplace](/mcp-servers) you can reuse.
For now, click **'Add Restriction'** and set up a basic user policy:
1. **Name the restriction**: Give it a descriptive name like "disallow\_email"
2. **Choose Action**: Select **'All Actions'** (synonymous with all MCP tools)
3. **Set Match**: Choose **'Any'**
4. **Add Condition**: Select a **User restriction** type that checks if the **Email** is **not equal** to yours
**Optional**: If you've set up a Notion MCP server, [check out this policy](/mcp-servers/notion#policies) that disallows page updates and comments to a specific Notion page. Please note: deeper role, group, or user attribute based policies are available once you’ve integrated Barndoor with your identity provider system.
Here's how the JSON should look:
```json theme={null}
{
"name":"disallow_other_emails",
"effect":"EFFECT_DENY",
"actions":[
"*"
],
"roles":[
"*"
],
"condition":{
"match":{
"all":{
"of":[
{
"expr":"P.attr.email != \"youremai@email.com\""
}
]
}
}
}
}
```
💡 **What this does**: Denies all actions (\*) for users whose email doesn't match yours—a basic example of user-level access control. Be sure to change the sample to match your email used during the Barndoor authorization process in step 3.
**Extra Credit**: Check out our [Policies API](/how-tos/manage-policies) and deeper details on how our policies are constructed.
### Summary
The **Data Control Center** goes a layer deeper: it inspects the actual **data** flowing through MCP tool calls and can **block, redact, tokenize, or alert** on sensitive content in real time.
In this lab you'll stand up the three essentials:
1. A **Protection Profile** that detects PII (SSNs, credit cards, emails, and more).
2. An **MCP Policy** that **redacts** that PII in tool responses.
3. A **Field Control** rule that deterministically strips known-sensitive fields from a specific tool.
### What You'll Learn
In this lab, you'll create your first access policy that controls what AI agents can (and cannot) do with your MCP servers. You'll learn how to set up guardrails that keep AI secure while maintaining productivity.
⚠️ **Important**: You must first connect to an MCP server before you can set up policies. If you haven't completed Step 1, go back and add a server first.
### Let's Get Started
Follow these steps to create your first access control policy:
Click [Access Control Center](https://app.barndoor.ai/rules) to begin configuring policies.
1. Under the **'AI Agents'** column, choose **'Any Agent'**
2. Under the **'Connected Servers'** middle column, select **Notion** or your preferred server to configure agent permissions
Notice all your MCP tools are loaded under the **'Actions'** tab.
Turn on only the MCP tools you want Barndoor to allow through. This controls which tools are available for the agent to use.
Now that we've enabled certain tools, let's add RBAC/ABAC access control policies.
Click the **'Restrictions'** tab to configure a policy.
We have a bunch of pre-built policies in our [MCP Server marketplace](/mcp-servers) you can reuse.
For now, click **'Add Restriction'** and set up a basic user policy:
1. **Name the restriction**: Give it a descriptive name like "disallow\_email"
2. **Choose Action**: Select **'All Actions'** (synonymous with all MCP tools)
3. **Set Match**: Choose **'Any'**
4. **Add Condition**: Select a **User restriction** type that checks if the **Email** is **not equal** to yours
**Optional**: If you've set up a Notion MCP server, [check out this policy](/mcp-servers/notion#policies) that disallows page updates and comments to a specific Notion page. Please note: deeper role, group, or user attribute based policies are available once you’ve integrated Barndoor with your identity provider system.
Here's how the JSON should look:
```json theme={null}
{
"name":"disallow_other_emails",
"effect":"EFFECT_DENY",
"actions":[
"*"
],
"roles":[
"*"
],
"condition":{
"match":{
"all":{
"of":[
{
"expr":"P.attr.email != \"youremai@email.com\""
}
]
}
}
}
}
```
💡 **What this does**: Denies all actions (\*) for users whose email doesn't match yours—a basic example of user-level access control. Be sure to change the sample to match your email used during the Barndoor authorization process in step 3.
**Extra Credit**: Check out our [Policies API](/how-tos/manage-policies) and deeper details on how our policies are constructed.
### Summary
The **Data Control Center** goes a layer deeper: it inspects the actual **data** flowing through MCP tool calls and can **block, redact, tokenize, or alert** on sensitive content in real time.
In this lab you'll stand up the three essentials:
1. A **Protection Profile** that detects PII (SSNs, credit cards, emails, and more).
2. An **MCP Policy** that **redacts** that PII in tool responses.
3. A **Field Control** rule that deterministically strips known-sensitive fields from a specific tool.
 ### What You'll Learn
How to protect sensitive data two complementary ways — by **content detection** (Protection Profiles + MCP Policies) and by **exact field path** (Field Controls) — and how redaction is enforced on live MCP traffic.
⚠️ **Important**: You need at least one MCP server connected (Step 1). A **Protection Profile must exist before you can create an MCP Policy**, so we build the profile first.
### Let's Get Started
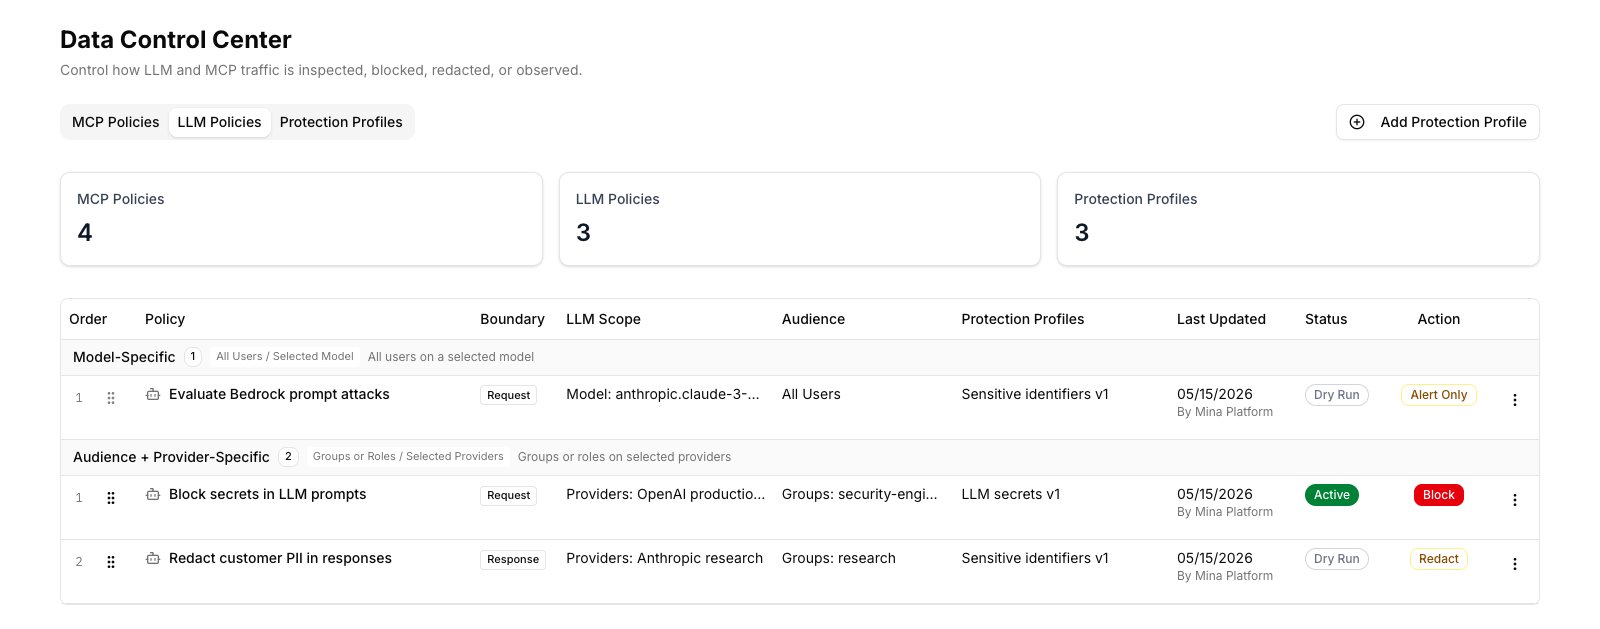
Open your [Barndoor dashboard](https://app.barndoor.ai) and go to the **[Data Control Center](/how-tos/data-control-center/overview)**. It has three tabs: **MCP Policies**, **Field Controls**, and **Protection Profiles**.
#### Part A — Create a PII Protection Profile
Select the **Protection Profiles** tab and click **Add Protection Profile**.
### What You'll Learn
How to protect sensitive data two complementary ways — by **content detection** (Protection Profiles + MCP Policies) and by **exact field path** (Field Controls) — and how redaction is enforced on live MCP traffic.
⚠️ **Important**: You need at least one MCP server connected (Step 1). A **Protection Profile must exist before you can create an MCP Policy**, so we build the profile first.
### Let's Get Started
Open your [Barndoor dashboard](https://app.barndoor.ai) and go to the **[Data Control Center](/how-tos/data-control-center/overview)**. It has three tabs: **MCP Policies**, **Field Controls**, and **Protection Profiles**.
#### Part A — Create a PII Protection Profile
Select the **Protection Profiles** tab and click **Add Protection Profile**.
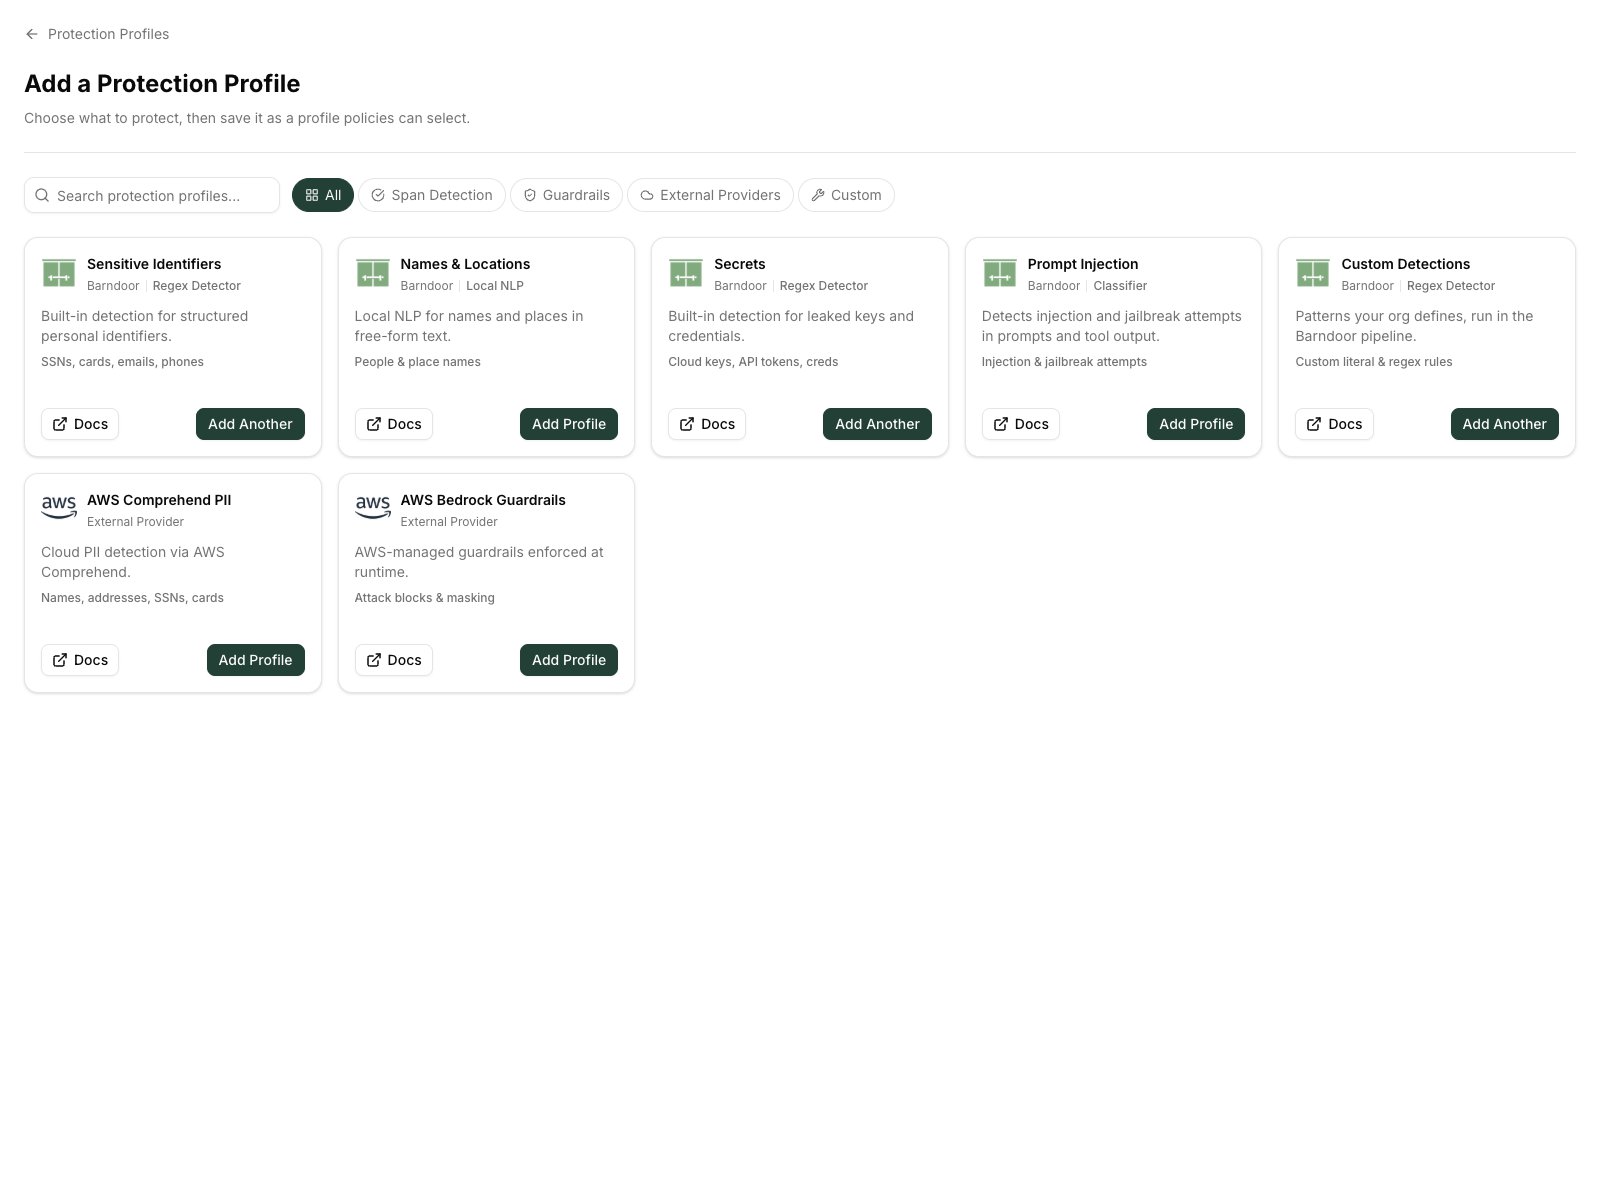 From the catalog, choose **Sensitive Identifiers** — built-in detection for structured personal identifiers (SSNs, cards, emails, phone numbers). No connection needed.
Give it a name like **Sensitive Identifiers v1**. Under **Detection Signals**, click **Select Defaults** to enable Credit Card, SSN, Email, Phone Number, IP Address, Passport Number, Date of Birth, and Address.
From the catalog, choose **Sensitive Identifiers** — built-in detection for structured personal identifiers (SSNs, cards, emails, phone numbers). No connection needed.
Give it a name like **Sensitive Identifiers v1**. Under **Detection Signals**, click **Select Defaults** to enable Credit Card, SSN, Email, Phone Number, IP Address, Passport Number, Date of Birth, and Address.
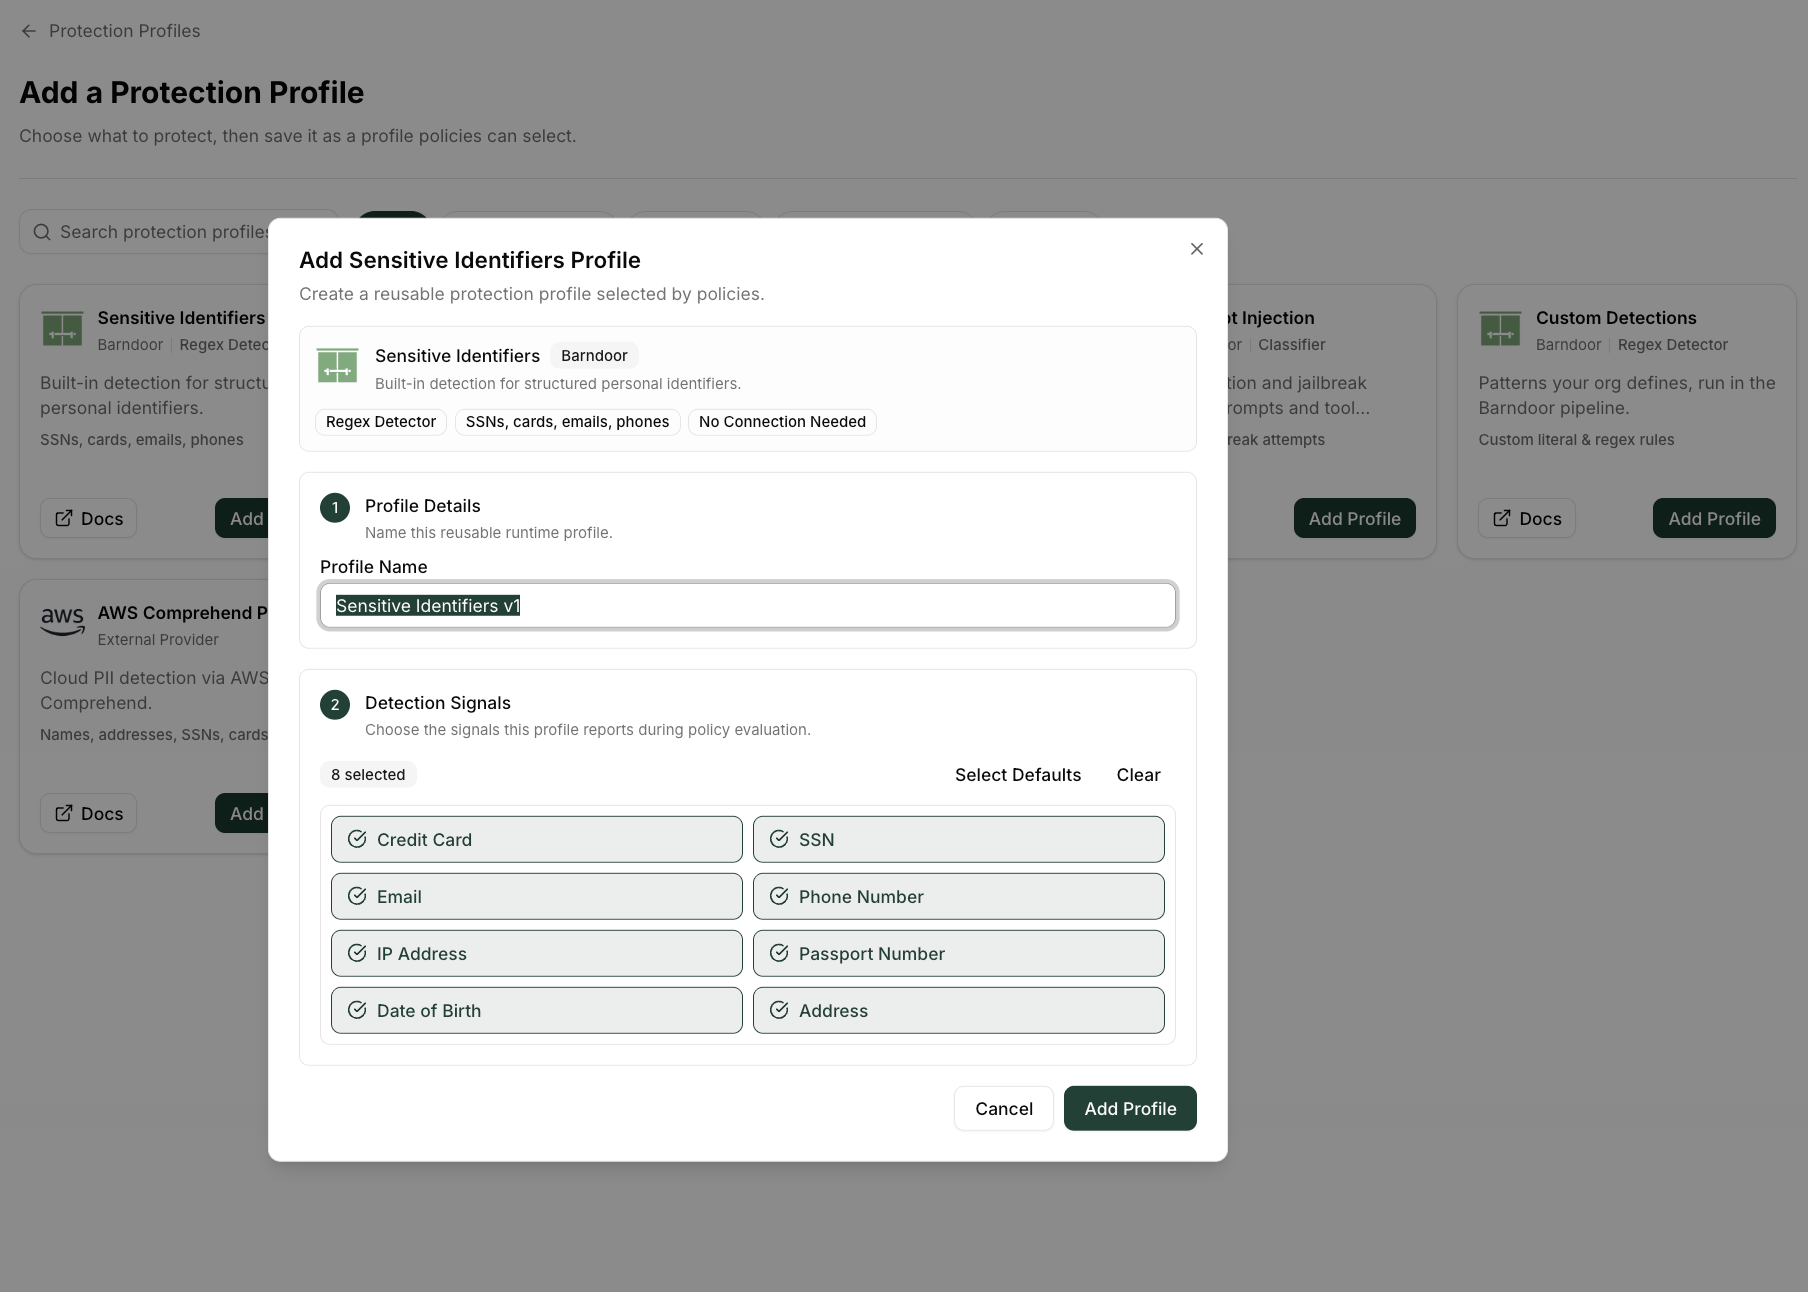 Click **Add Profile**. It now appears in the Protection Profiles list, ready to attach to a policy.
#### Part B — Create an MCP Policy that redacts PII
Switch to the **MCP Policies** tab and click **New MCP Policy** to open the wizard.
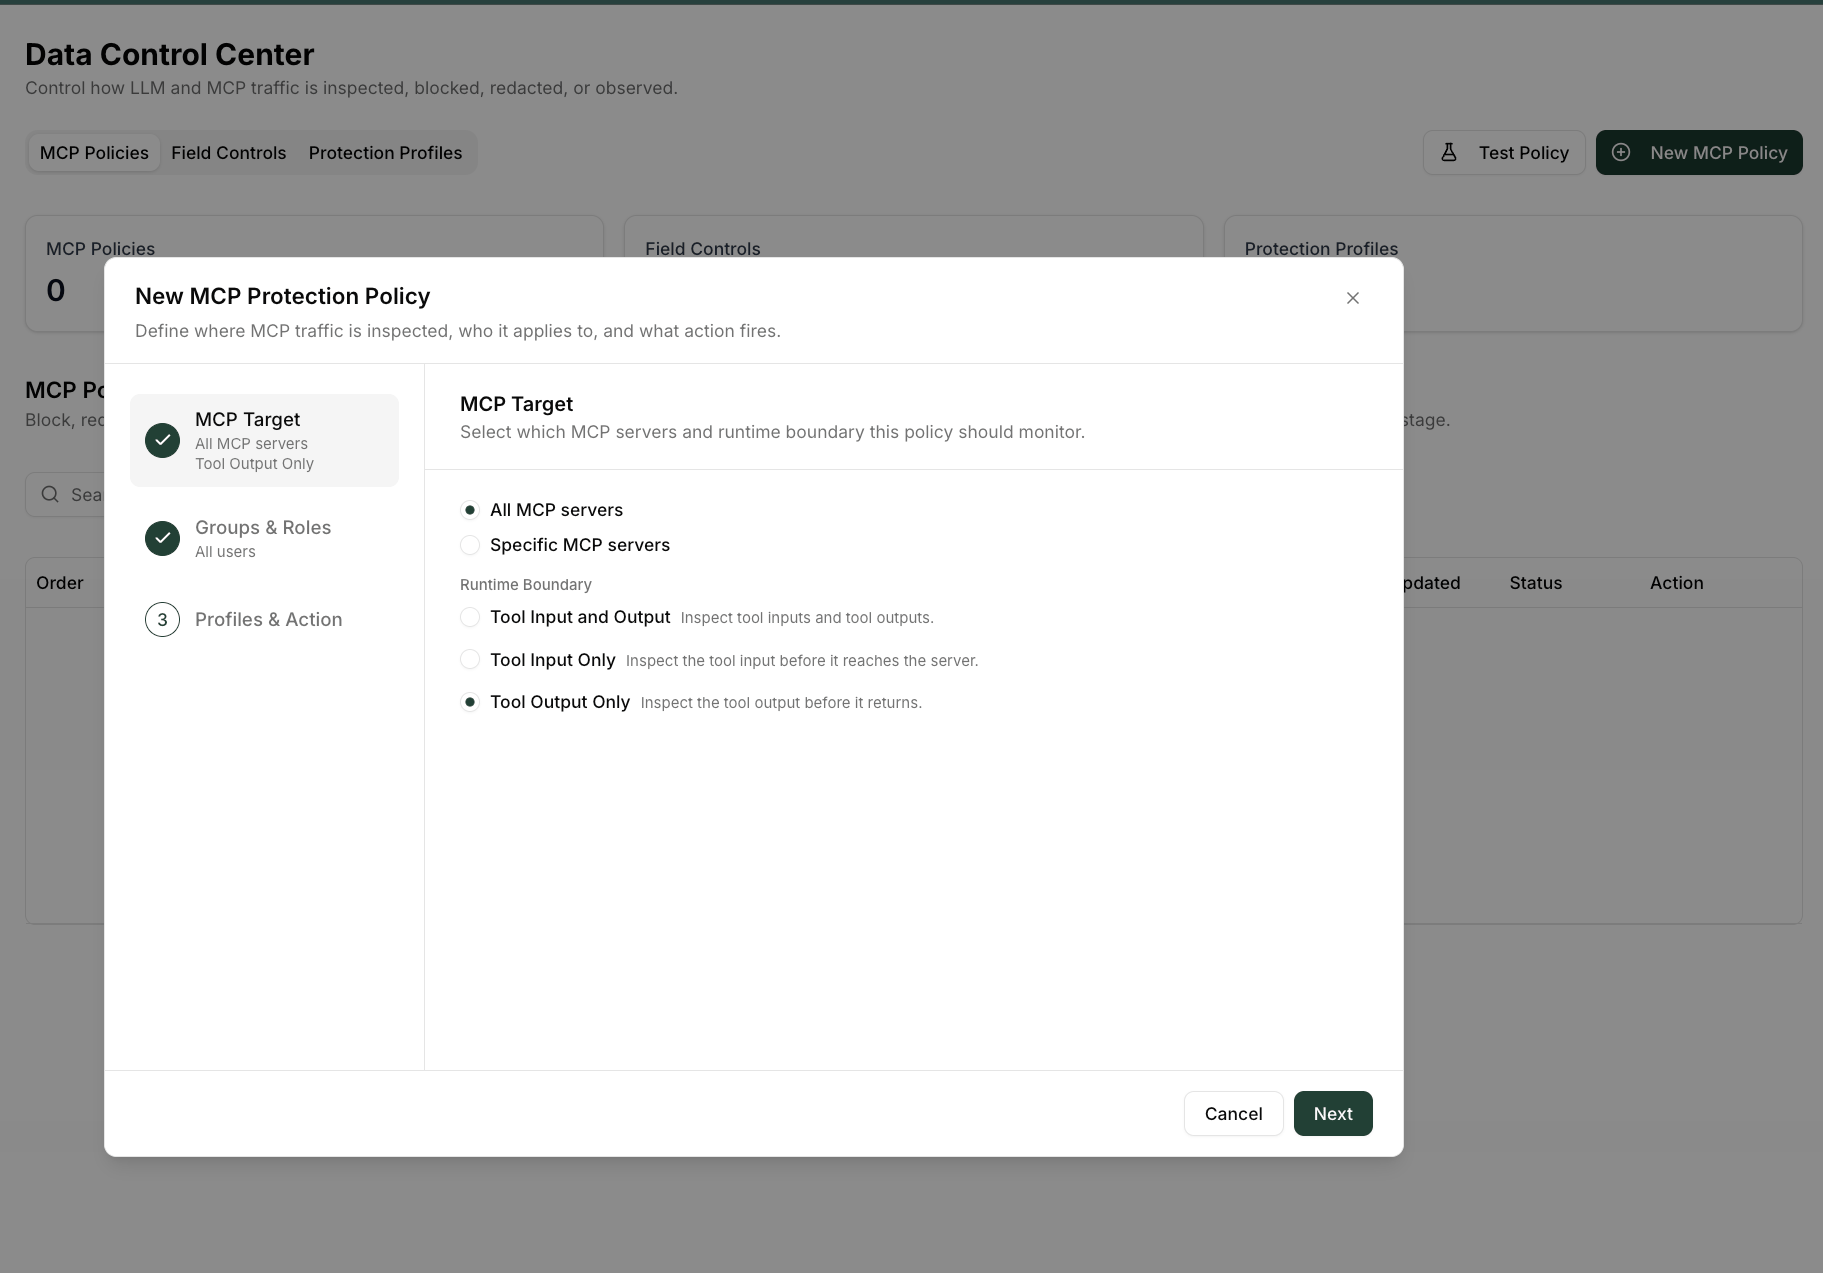
Select **All MCP servers** (or a specific one), then set the **Runtime Boundary** to **Tool Output Only** — inspect what a tool returns before it reaches the agent.
Click **Add Profile**. It now appears in the Protection Profiles list, ready to attach to a policy.
#### Part B — Create an MCP Policy that redacts PII
Switch to the **MCP Policies** tab and click **New MCP Policy** to open the wizard.
Select **All MCP servers** (or a specific one), then set the **Runtime Boundary** to **Tool Output Only** — inspect what a tool returns before it reaches the agent.
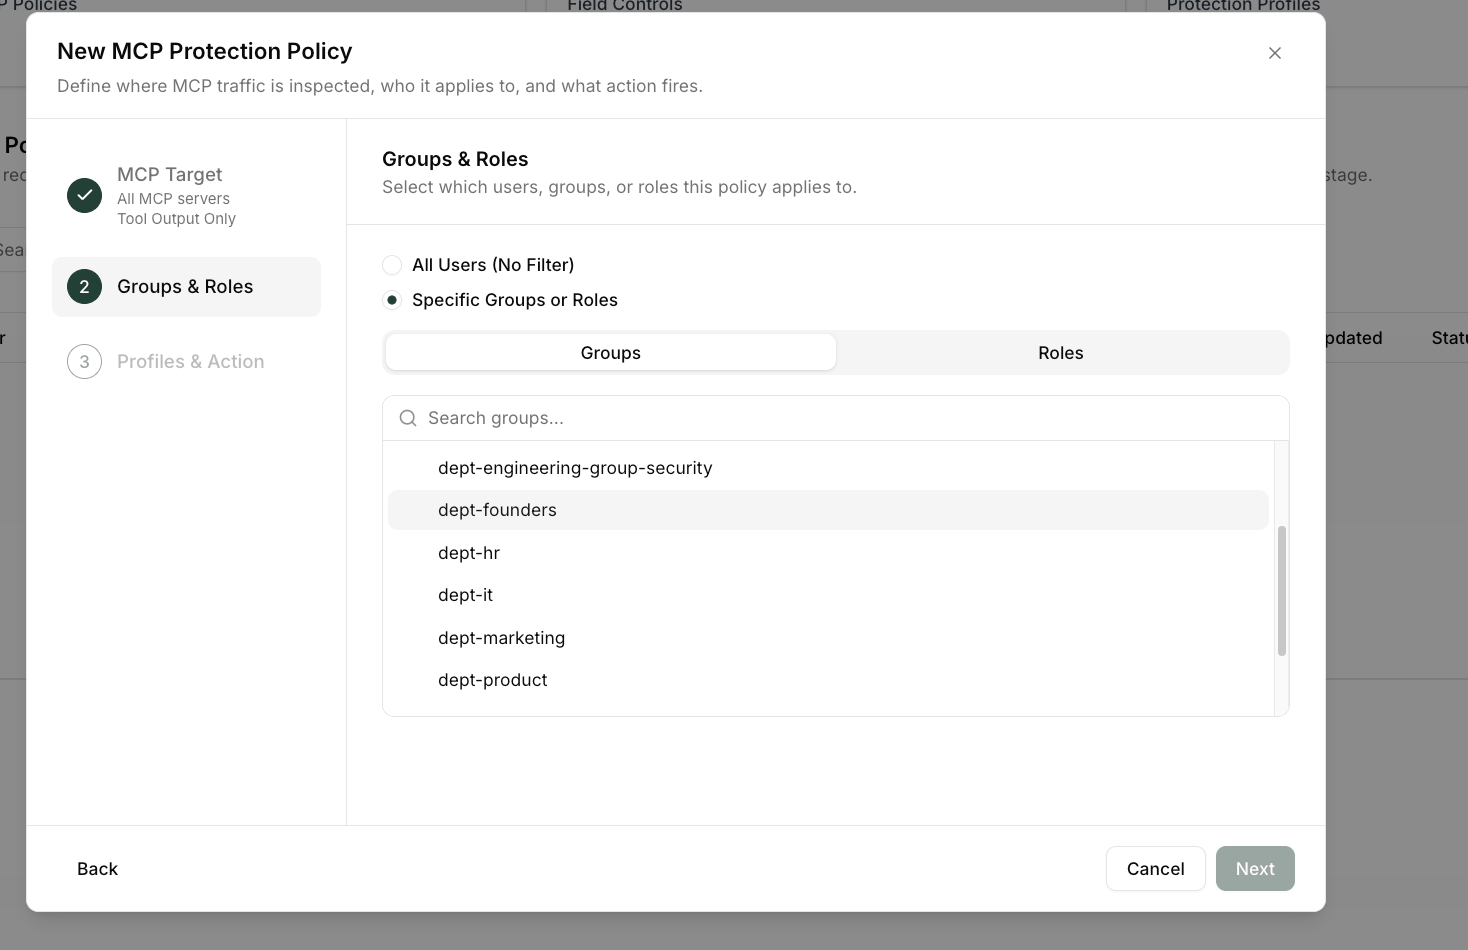
 Choose **All Users (No Filter)** to protect everyone, or **Specific Groups or Roles** (for example, `dept-hr`) to target an audience.
 Name the policy (e.g., **Block PII in and out**), select your **Sensitive Identifiers v1** profile, and set **Action** to **Redact**. Leave **Dry Run** off to enforce immediately — or toggle it on to log detections without changing traffic while you validate.
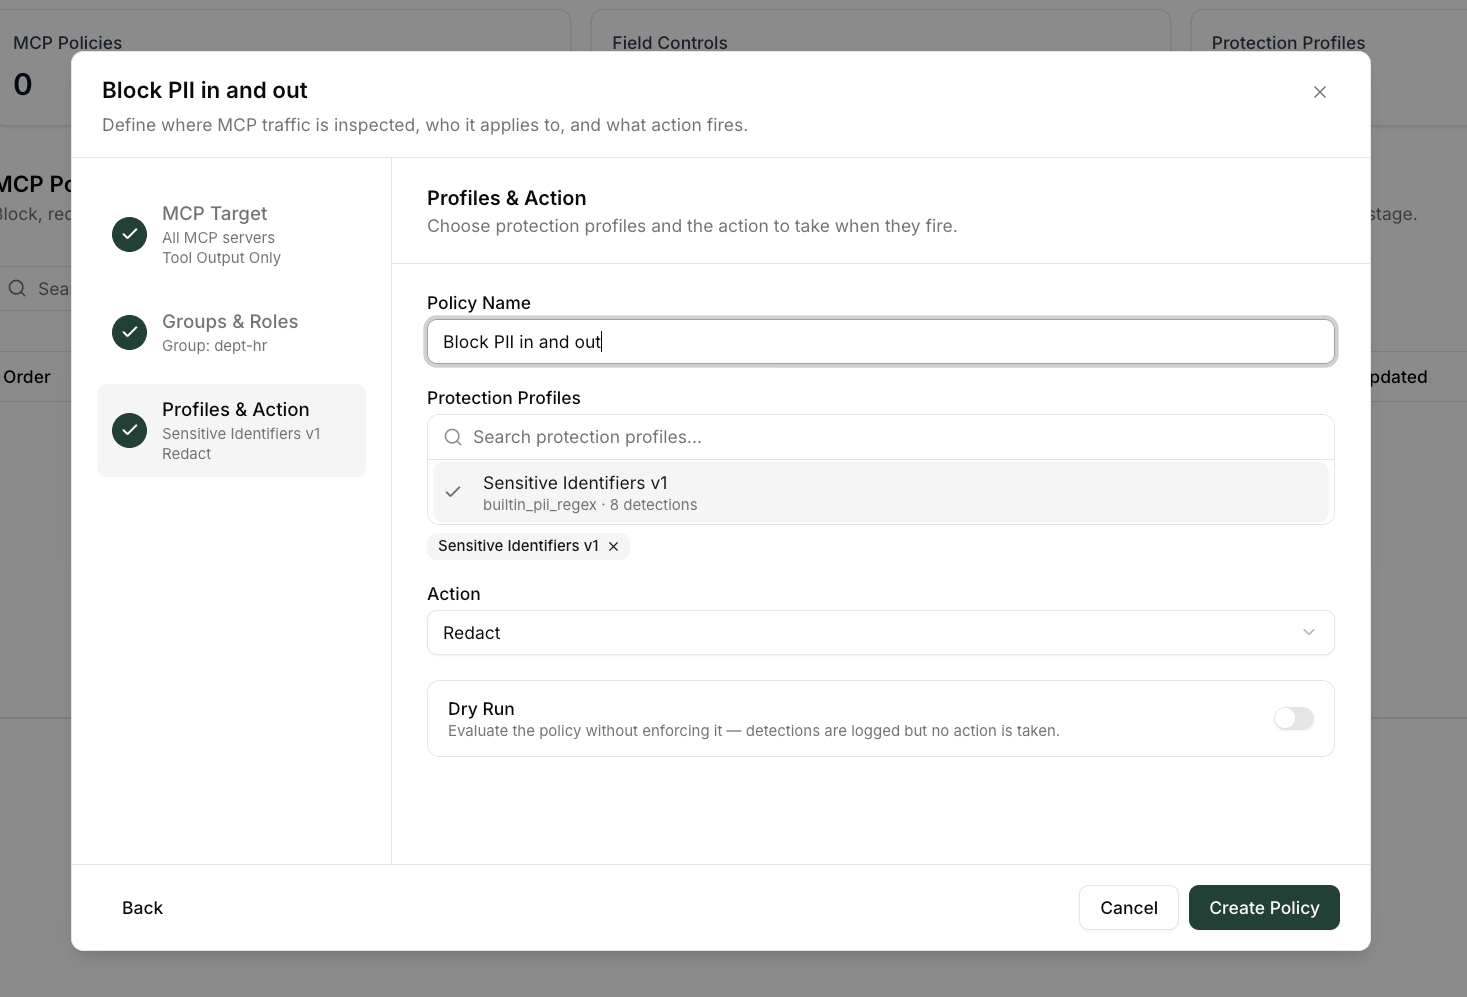 Click **Create Policy**. Detected PII in matching tool responses is now replaced with typed placeholders (e.g., `[EMAIL]`, `[SSN]`).
Want to confirm coverage before enforcing? Turn on **Dry Run**, send some traffic, and review **Detection Activity**. Full detail lives in the [MCP Policies guide](/how-tos/data-control-center/field-control.png).
#### Part C — Add a Field Control (deterministic response redaction)
Field Controls strip **exact JSON fields** from a specific tool's response — use them when you know the precise field paths, independent of content detection.
Switch to the **Field Controls** tab and click **Add Field Control Rule**.
Name the rule (e.g., **Block Atlassian sensitive key value pairs**), choose the **Server** (e.g., Atlassian) and **Tool** (e.g., `getAllProjects`). Optionally scope it with a **Target Group / Role** — leave empty to apply to all users.
Choose how the rule treats the response:
| Behavior | Effect |
| ------------------------------ | ---------------------------------------------------------------------------------------------- |
| **Redact selected fields** | The fields you check are removed; any new fields the tool adds later still pass through |
| **Allow only selected fields** | Only the fields you check pass; anything else (including new fields) is automatically redacted |
Then check the exact fields in the field tree.
Click **Create Policy**. Detected PII in matching tool responses is now replaced with typed placeholders (e.g., `[EMAIL]`, `[SSN]`).
Want to confirm coverage before enforcing? Turn on **Dry Run**, send some traffic, and review **Detection Activity**. Full detail lives in the [MCP Policies guide](/how-tos/data-control-center/field-control.png).
#### Part C — Add a Field Control (deterministic response redaction)
Field Controls strip **exact JSON fields** from a specific tool's response — use them when you know the precise field paths, independent of content detection.
Switch to the **Field Controls** tab and click **Add Field Control Rule**.
Name the rule (e.g., **Block Atlassian sensitive key value pairs**), choose the **Server** (e.g., Atlassian) and **Tool** (e.g., `getAllProjects`). Optionally scope it with a **Target Group / Role** — leave empty to apply to all users.
Choose how the rule treats the response:
| Behavior | Effect |
| ------------------------------ | ---------------------------------------------------------------------------------------------- |
| **Redact selected fields** | The fields you check are removed; any new fields the tool adds later still pass through |
| **Allow only selected fields** | Only the fields you check pass; anything else (including new fields) is automatically redacted |
Then check the exact fields in the field tree.
 Click **Add Rule**. It enforces on the next matching tool call.
**Extra Credit**: Go deeper with the Data Control Center guides — [Protection Profiles](/how-tos/data-control-center/protection-profiles), [MCP Policies](/how-tos/data-control-center/mcp-policies), and [Field Controls](/how-tos/data-control-center/field-controls).
### Summary
When you connect an account, Barndoor uses OAuth 2.0 to perform a secure handshake [on behalf of the user](https://datatracker.ietf.org/doc/html/rfc8693) with the provider.
After you log in, the provider (e.g., Salesforce) sends Barndoor an access token.
Barndoor securely stores this JWT token and uses it whenever an MCP server tool call needs to act on your behalf — for example, retrieving Salesforce data or updating records. The JWT token will live for 60 minutes and can always be refreshed.
Tokens can be revoked at any time through your provider’s account settings or through our API/SDK.
### What You'll Learn
In this lab, you'll learn how to create and configure user accounts that will interact with your MCP servers through Barndoor's access control policies.
### Let's Get Started
Choose your own destiny:
* Follow the buttons below to access the Barndoor account management interface
* Check out our extensive documentation on account configuration
Connect Barndoor on behalf of a user
OR:
Connect user accounts to Barndoor
### Summary
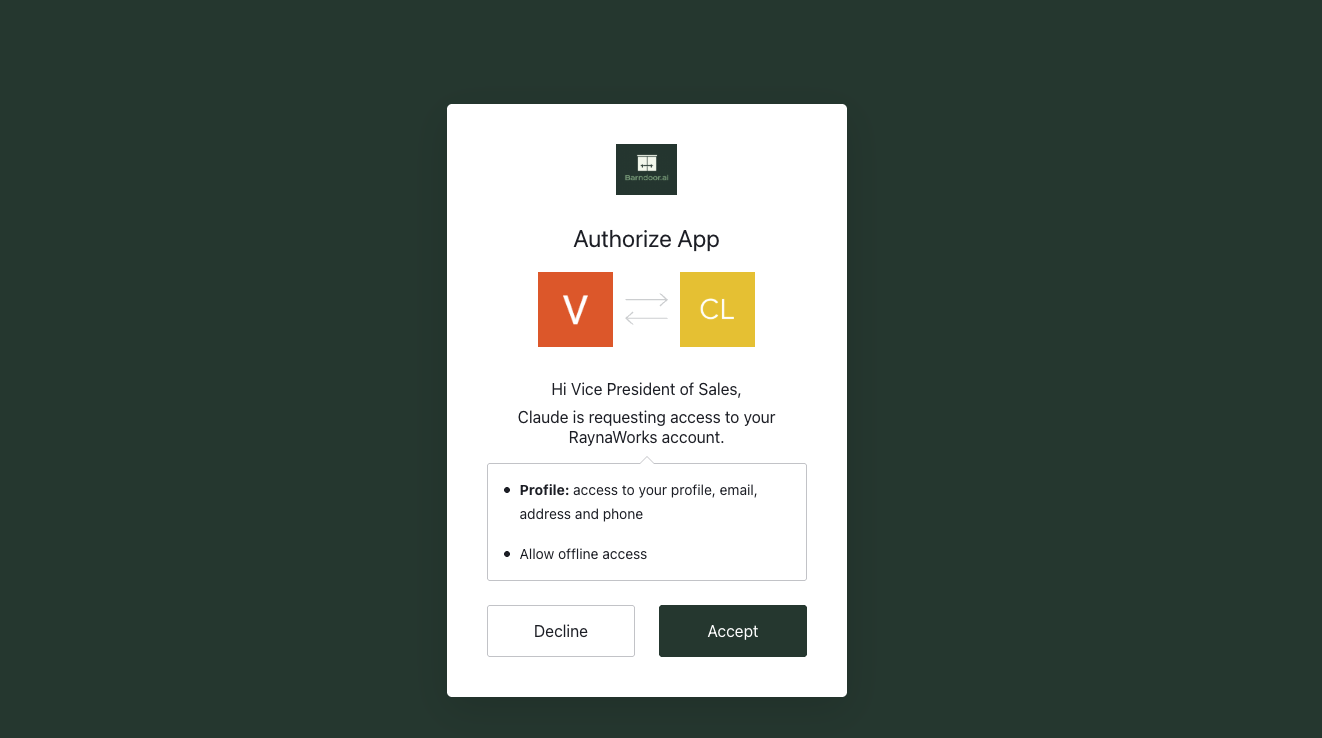
Connect your preferred AI chat client (Claude, ChatGPT, Cursor, VS Code) to Barndoor so AI agents can interact with your MCP servers through governed access controls. For a comprehensive walkthrough, see the [Connecting Barndoor to Agents guide](/how-tos/connecting-barndoor-to-agents).
Click **Add Rule**. It enforces on the next matching tool call.
**Extra Credit**: Go deeper with the Data Control Center guides — [Protection Profiles](/how-tos/data-control-center/protection-profiles), [MCP Policies](/how-tos/data-control-center/mcp-policies), and [Field Controls](/how-tos/data-control-center/field-controls).
### Summary
When you connect an account, Barndoor uses OAuth 2.0 to perform a secure handshake [on behalf of the user](https://datatracker.ietf.org/doc/html/rfc8693) with the provider.
After you log in, the provider (e.g., Salesforce) sends Barndoor an access token.
Barndoor securely stores this JWT token and uses it whenever an MCP server tool call needs to act on your behalf — for example, retrieving Salesforce data or updating records. The JWT token will live for 60 minutes and can always be refreshed.
Tokens can be revoked at any time through your provider’s account settings or through our API/SDK.
### What You'll Learn
In this lab, you'll learn how to create and configure user accounts that will interact with your MCP servers through Barndoor's access control policies.
### Let's Get Started
Choose your own destiny:
* Follow the buttons below to access the Barndoor account management interface
* Check out our extensive documentation on account configuration
Connect Barndoor on behalf of a user
OR:
Connect user accounts to Barndoor
### Summary
Connect your preferred AI chat client (Claude, ChatGPT, Cursor, VS Code) to Barndoor so AI agents can interact with your MCP servers through governed access controls. For a comprehensive walkthrough, see the [Connecting Barndoor to Agents guide](/how-tos/connecting-barndoor-to-agents).
 ### What You'll Learn
In this lab, you'll configure an AI client to connect to Barndoor's MCP gateway. Once connected, the AI will be able to use your MCP tools while respecting the policies you've configured.
### Let's Get Started
Choose your AI client below and follow the connection steps. Most clients can be connected in under 5 minutes.
* Check out our [comprehensive connection guide](/how-tos/connecting-barndoor-to-agents) for detailed instructions
**What you need:**
* Active Claude account (Pro or Team plan)
* Your Barndoor MCP URL: `https://{{your-org}}.platform.barndoor.ai/mcp/{{servername}}`. To locate this, simply view the details for any of your configured servers [here](https://app.barndoor.ai/servers)
**Quick Steps:**
1. Open Claude → **Settings** → **Connectors** tab
2. Click **"Add custom connector"**
3. Enter your Barndoor MCP URL
4. Click **Connect** to authorize
📚 [Detailed Claude guide](https://support.claude.com/en/articles/11175166-getting-started-with-custom-connectors-using-remote-mcp)
**What you need:**
* ChatGPT Plus or Enterprise account
* Your Barndoor MCP URL: `https://{{your-org}}.platform.barndoor.ai/mcp/{{servername}}`
**Quick Steps:**
1. Go to ChatGPT → **Settings** → **Apps** → **Create App**
2. Provide app name, description, and your Barndoor MCP URL
3. Click **Create** and test the connection
📚 [Detailed ChatGPT guide](https://developers.openai.com/apps-sdk/deploy/connect-chatgpt/)
**What you need:**
* Cursor IDE installed
* Your Barndoor MCP URL: `https://{{your-org}}.platform.barndoor.ai/mcp/{{servername}}`
**Quick Steps:**
1. **Cursor** → **Settings** (or `Cmd/Ctrl + ,`)
2. Navigate to **Extensions** → **MCP**
3. Add your Barndoor server configuration
4. Restart Cursor
```json theme={null}
{
"mcpServers": {
"barndoor": {
"url": "https://{{your-org}}.platform.barndoor.ai/mcp/{{servername}}"
}
}
}
```
**What you need:**
* VS Code with MCP support
* Your Barndoor MCP URL: `https://{{your-org}}.platform.barndoor.ai/mcp/{{servername}}`
**Quick Steps:**
1. Open Command Palette (`Cmd/Ctrl + Shift + P`)
2. Select **Preferences: Open Settings (JSON)**
3. Add MCP server configuration
4. Reload VS Code window
```json theme={null}
{
"mcp.servers": [
{
"name": "Barndoor",
"url": "https://{{your-org}}.platform.barndoor.ai/mcp/{{servername}}"
}
]
}
```
**Connection Issues?** Verify your Barndoor URL is correct and that you've completed Steps 1-3 (MCP server connected, policies configured, account created).
### Summary
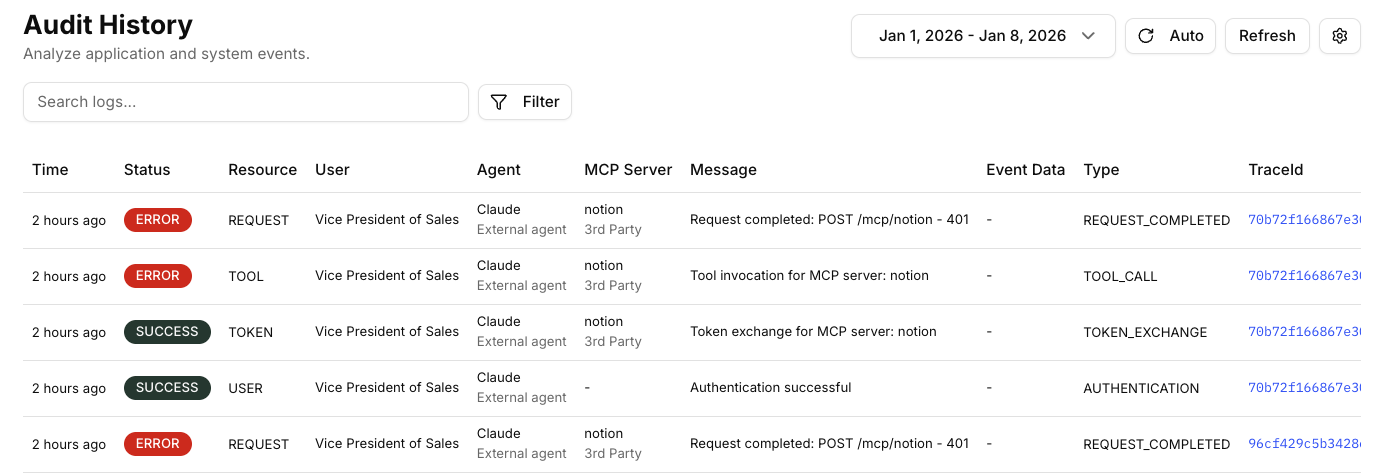
Use the **Audit Center** to monitor overall behavior and spot unusual patterns, or dive into **Audit History** for detailed, event-by-event records. Track who accessed what, when it happened, and whether policies allowed or blocked the action.
### What You'll Learn
In this lab, you'll configure an AI client to connect to Barndoor's MCP gateway. Once connected, the AI will be able to use your MCP tools while respecting the policies you've configured.
### Let's Get Started
Choose your AI client below and follow the connection steps. Most clients can be connected in under 5 minutes.
* Check out our [comprehensive connection guide](/how-tos/connecting-barndoor-to-agents) for detailed instructions
**What you need:**
* Active Claude account (Pro or Team plan)
* Your Barndoor MCP URL: `https://{{your-org}}.platform.barndoor.ai/mcp/{{servername}}`. To locate this, simply view the details for any of your configured servers [here](https://app.barndoor.ai/servers)
**Quick Steps:**
1. Open Claude → **Settings** → **Connectors** tab
2. Click **"Add custom connector"**
3. Enter your Barndoor MCP URL
4. Click **Connect** to authorize
📚 [Detailed Claude guide](https://support.claude.com/en/articles/11175166-getting-started-with-custom-connectors-using-remote-mcp)
**What you need:**
* ChatGPT Plus or Enterprise account
* Your Barndoor MCP URL: `https://{{your-org}}.platform.barndoor.ai/mcp/{{servername}}`
**Quick Steps:**
1. Go to ChatGPT → **Settings** → **Apps** → **Create App**
2. Provide app name, description, and your Barndoor MCP URL
3. Click **Create** and test the connection
📚 [Detailed ChatGPT guide](https://developers.openai.com/apps-sdk/deploy/connect-chatgpt/)
**What you need:**
* Cursor IDE installed
* Your Barndoor MCP URL: `https://{{your-org}}.platform.barndoor.ai/mcp/{{servername}}`
**Quick Steps:**
1. **Cursor** → **Settings** (or `Cmd/Ctrl + ,`)
2. Navigate to **Extensions** → **MCP**
3. Add your Barndoor server configuration
4. Restart Cursor
```json theme={null}
{
"mcpServers": {
"barndoor": {
"url": "https://{{your-org}}.platform.barndoor.ai/mcp/{{servername}}"
}
}
}
```
**What you need:**
* VS Code with MCP support
* Your Barndoor MCP URL: `https://{{your-org}}.platform.barndoor.ai/mcp/{{servername}}`
**Quick Steps:**
1. Open Command Palette (`Cmd/Ctrl + Shift + P`)
2. Select **Preferences: Open Settings (JSON)**
3. Add MCP server configuration
4. Reload VS Code window
```json theme={null}
{
"mcp.servers": [
{
"name": "Barndoor",
"url": "https://{{your-org}}.platform.barndoor.ai/mcp/{{servername}}"
}
]
}
```
**Connection Issues?** Verify your Barndoor URL is correct and that you've completed Steps 1-3 (MCP server connected, policies configured, account created).
### Summary
Use the **Audit Center** to monitor overall behavior and spot unusual patterns, or dive into **Audit History** for detailed, event-by-event records. Track who accessed what, when it happened, and whether policies allowed or blocked the action.
 ### What You'll Learn
In this lab, you'll learn how to access Barndoor's audit logs to review AI interactions with your MCP servers. You'll see:
* **Who & what**: User, agent, or service activity
* **When & where**: Time and affected system
* **Outcome**: Policy decision result and full activity trace log
### Let's Get Started
Click [here](https://app.barndoor.ai/audit/history) to begin
Click the **Filters** button (or filter icon) in the Audit History interface.
In the filters modal, click on **Server** to expand the server source options.
Choose one or more servers from the list (i.e., Notion)
You can use **Select all** or **None** to quickly manage selections.
Click the **Apply** button at the bottom to filter the audit logs.
The interface will show "X filters selected" and display only events related to your chosen server(s).
Now you'll see only the audit events for your selected server(s), making it easy to:
* View audit logs for specific servers, agents, etc.
* Investigate issues with a particular MCP server by clicking into the traceId to see a full stacktrace
* Monitor your inbound MCP calls across all users/agents/servers
### Additional Filter Options
Beyond **Server**, you can also filter by:
* **Agent type**: Which AI agent made the request
* **Event Type**: Type of action attempted
* **Resource**: Specific data or endpoint accessed
* **Status**: Allowed, denied, or blocked actions
* **User**: Individual user or service account
Combine multiple filters to drill down into exactly the activity you need to review!
**Pro tip**: Use the search bar within filters to quickly find specific servers or resources. Clear all filters with the **Clear** button to start fresh.
### Summary
Collaborate with your team by inviting members to your Barndoor tenant. Team members can help manage MCP servers, configure policies, and monitor AI activity across your organization. Non-admin users will be able to login to the Barndoor dashboard and manage their connected accounts.
### What You'll Learn
In this lab, you'll learn how to access Barndoor's audit logs to review AI interactions with your MCP servers. You'll see:
* **Who & what**: User, agent, or service activity
* **When & where**: Time and affected system
* **Outcome**: Policy decision result and full activity trace log
### Let's Get Started
Click [here](https://app.barndoor.ai/audit/history) to begin
Click the **Filters** button (or filter icon) in the Audit History interface.
In the filters modal, click on **Server** to expand the server source options.
Choose one or more servers from the list (i.e., Notion)
You can use **Select all** or **None** to quickly manage selections.
Click the **Apply** button at the bottom to filter the audit logs.
The interface will show "X filters selected" and display only events related to your chosen server(s).
Now you'll see only the audit events for your selected server(s), making it easy to:
* View audit logs for specific servers, agents, etc.
* Investigate issues with a particular MCP server by clicking into the traceId to see a full stacktrace
* Monitor your inbound MCP calls across all users/agents/servers
### Additional Filter Options
Beyond **Server**, you can also filter by:
* **Agent type**: Which AI agent made the request
* **Event Type**: Type of action attempted
* **Resource**: Specific data or endpoint accessed
* **Status**: Allowed, denied, or blocked actions
* **User**: Individual user or service account
Combine multiple filters to drill down into exactly the activity you need to review!
**Pro tip**: Use the search bar within filters to quickly find specific servers or resources. Clear all filters with the **Clear** button to start fresh.
### Summary
Collaborate with your team by inviting members to your Barndoor tenant. Team members can help manage MCP servers, configure policies, and monitor AI activity across your organization. Non-admin users will be able to login to the Barndoor dashboard and manage their connected accounts.
 ### What You'll Learn
In this lab, you'll learn how to invite colleagues to your Barndoor workspace. Once invited, they'll receive an email to join your tenant and can be assigned specific roles and permissions.
### Let's Get Started
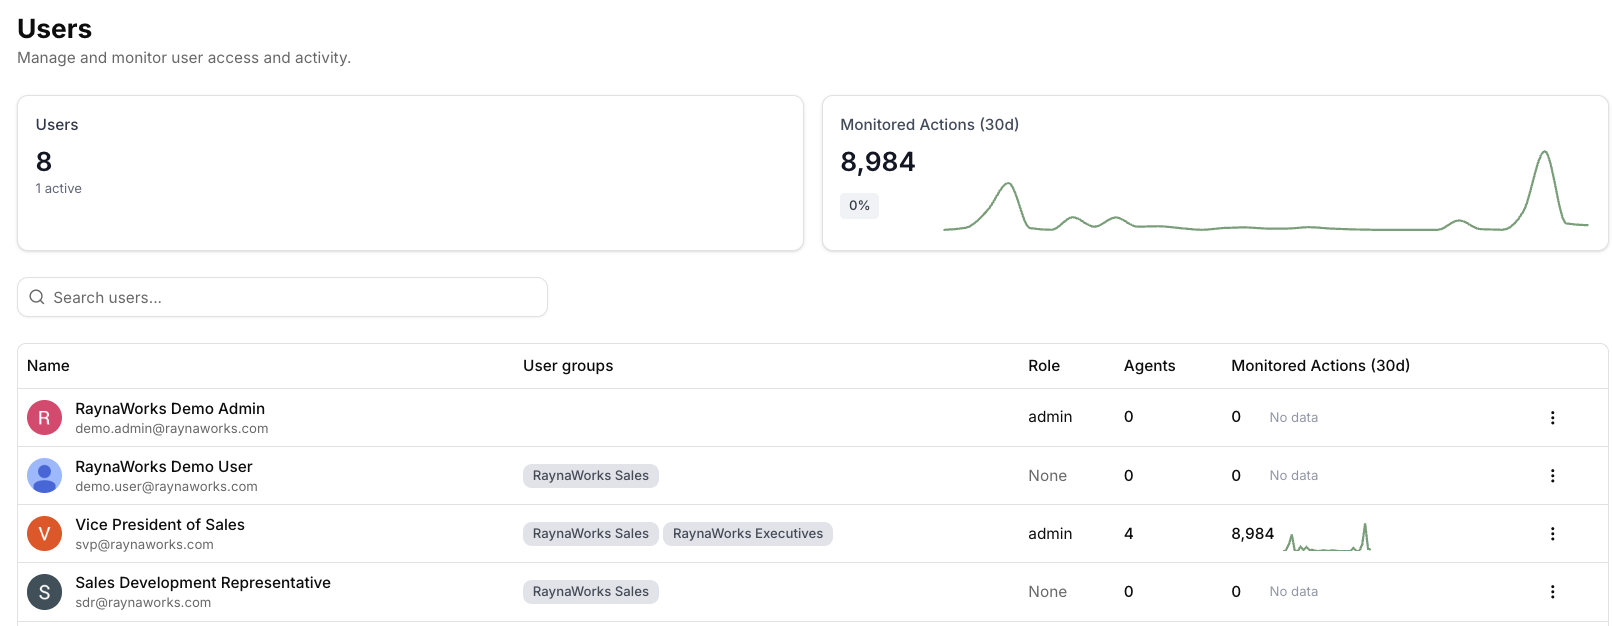
Go to the **Users** section in your [Barndoor dashboard](https://app.barndoor.ai/users). You'll see:
* Total number of active users in your tenant
* Monitored actions over the last 30 days
* A list of current team members
In the top right corner, click the **Invite Team Members** button.
A modal will appear titled "Invite Team Members" with a form for adding invitees.
For each team member you want to invite, enter:
* **First name**: Their first name
* **Last name**: Their last name
* **Email**: Their work email (e.g., `teammate@company.com`)
💡 **Tip**: The form has placeholder text showing the expected format.
Need to invite more people? Click **+ Add another team member** to add additional rows to the form.
You can invite multiple colleagues in one batch—just keep adding rows as needed.
Made a mistake? Click the **trash icon** (🗑️) next to any row to remove that invitee from the list.
Once you've filled out all the information, click the **Send Invites** button at the bottom right of the modal.
✅ **Success!** Your team members will receive email invitations to join your Barndoor tenant.
After sending invites, you'll return to the Users page where you can:
* See pending invitations
* Track which team members have accepted
* Resend invitations if needed
* Manage user roles once they've joined
* Promote a team member to Admin
**What happens next?** Invited team members will receive an email with a link to create their account and join your Barndoor workspace.
**Security best practice**: Only promote trusted team members who need access to manage AI governance. AI Client consumers should be invited as users.
***
## Next Steps
Congratulations! You've successfully completed the Barndoor Trial setup. Here's what you can explore next:
Whether you're building AI-driven applications with OpenAI or performing direct API calls, the SDK simplifies authentication, tool discovery, and data operations with a robust TypeScript and Python interface.
Barndoor provides a robust API that allows developers to securely access their dashboard environment's data and programmatically update settings relevant to their Barndoor Org.
This guide walks you through how to run a CrewAI task using the Barndoor SDK to connect to an MCP server (like Notion), fetch connection parameters, and use the MCP tools within a CrewAI agent.
Check out our MCP server catalog including example policies, available tools and setup instructions
***
## Troubleshooting
**Common causes:**
* Incorrect server URL or credentials
* Firewall blocking Barndoor's IP addresses
* OAuth token expired
**Solution:** Verify your credentials and check network connectivity. Contact your MCP server administrator if issues persist.
**Common causes:**
* Policy not assigned to the account
* Policy priority conflicts with another policy
* Cache delay (policies can take 30-60 seconds to propagate)
**Solution:** Verify policy assignment and wait a minute before testing. Check for conflicting policies.
**What this means:**
The authentication to this service wasn't completed successfully.
**Common causes:**
* Authentication process was interrupted or not completed
* Invalid or expired credentials were provided
* Service connection permissions weren't granted
**Solution:** Return to the server setup and complete the authentication process. Ensure you grant all necessary permissions when prompted.
**Common causes:**
* Invalid or expired API key
* Incorrect API endpoint
* Missing authentication headers
**Solution:** Navigate to your Barndoor account settings >> disconnect >> and reauthorize Barndoor on behalf of your user account.
**Common causes:**
* Time zone mismatch in date filter
* Requests not reaching Barndoor (direct server access)
* Log retention period expired
**Solution:** Adjust date filters and ensure all requests go through Barndoor's proxy.
## Need Help?
Browse our complete documentation
Contact our support team
### What You'll Learn
In this lab, you'll learn how to invite colleagues to your Barndoor workspace. Once invited, they'll receive an email to join your tenant and can be assigned specific roles and permissions.
### Let's Get Started
Go to the **Users** section in your [Barndoor dashboard](https://app.barndoor.ai/users). You'll see:
* Total number of active users in your tenant
* Monitored actions over the last 30 days
* A list of current team members
In the top right corner, click the **Invite Team Members** button.
A modal will appear titled "Invite Team Members" with a form for adding invitees.
For each team member you want to invite, enter:
* **First name**: Their first name
* **Last name**: Their last name
* **Email**: Their work email (e.g., `teammate@company.com`)
💡 **Tip**: The form has placeholder text showing the expected format.
Need to invite more people? Click **+ Add another team member** to add additional rows to the form.
You can invite multiple colleagues in one batch—just keep adding rows as needed.
Made a mistake? Click the **trash icon** (🗑️) next to any row to remove that invitee from the list.
Once you've filled out all the information, click the **Send Invites** button at the bottom right of the modal.
✅ **Success!** Your team members will receive email invitations to join your Barndoor tenant.
After sending invites, you'll return to the Users page where you can:
* See pending invitations
* Track which team members have accepted
* Resend invitations if needed
* Manage user roles once they've joined
* Promote a team member to Admin
**What happens next?** Invited team members will receive an email with a link to create their account and join your Barndoor workspace.
**Security best practice**: Only promote trusted team members who need access to manage AI governance. AI Client consumers should be invited as users.
***
## Next Steps
Congratulations! You've successfully completed the Barndoor Trial setup. Here's what you can explore next:
Whether you're building AI-driven applications with OpenAI or performing direct API calls, the SDK simplifies authentication, tool discovery, and data operations with a robust TypeScript and Python interface.
Barndoor provides a robust API that allows developers to securely access their dashboard environment's data and programmatically update settings relevant to their Barndoor Org.
This guide walks you through how to run a CrewAI task using the Barndoor SDK to connect to an MCP server (like Notion), fetch connection parameters, and use the MCP tools within a CrewAI agent.
Check out our MCP server catalog including example policies, available tools and setup instructions
***
## Troubleshooting
**Common causes:**
* Incorrect server URL or credentials
* Firewall blocking Barndoor's IP addresses
* OAuth token expired
**Solution:** Verify your credentials and check network connectivity. Contact your MCP server administrator if issues persist.
**Common causes:**
* Policy not assigned to the account
* Policy priority conflicts with another policy
* Cache delay (policies can take 30-60 seconds to propagate)
**Solution:** Verify policy assignment and wait a minute before testing. Check for conflicting policies.
**What this means:**
The authentication to this service wasn't completed successfully.
**Common causes:**
* Authentication process was interrupted or not completed
* Invalid or expired credentials were provided
* Service connection permissions weren't granted
**Solution:** Return to the server setup and complete the authentication process. Ensure you grant all necessary permissions when prompted.
**Common causes:**
* Invalid or expired API key
* Incorrect API endpoint
* Missing authentication headers
**Solution:** Navigate to your Barndoor account settings >> disconnect >> and reauthorize Barndoor on behalf of your user account.
**Common causes:**
* Time zone mismatch in date filter
* Requests not reaching Barndoor (direct server access)
* Log retention period expired
**Solution:** Adjust date filters and ensure all requests go through Barndoor's proxy.
## Need Help?
Browse our complete documentation
Contact our support team