> ## Documentation Index
> Fetch the complete documentation index at: https://docs.barndoor.ai/llms.txt
> Use this file to discover all available pages before exploring further.
# Connect Microsoft Entra ID as your IdP
> Step-by-step guide for configuring Microsoft Entra ID (formerly Azure AD) as an OIDC Identity Provider with SCIM Provisioning
## Overview
This guide walks you through configuring **Microsoft Entra ID** as an OIDC Identity Provider for Barndoor. Once complete, your users will be able to sign in to Barndoor with their Entra ID credentials and their group memberships will flow through for automatic role mapping.
**Prerequisites**:
* Admin access to your Barndoor account
* Admin access to a Microsoft Entra ID tenant (Global Administrator or Application Administrator role)
* Your Entra **Tenant ID** handy (find it on the Entra Overview page)
For the generic, IdP-agnostic version of this flow (Okta, Google Workspace, JumpCloud, etc.), see the [Connect your IdP](/how-tos/idp-setup) guide.
***
## Part 1 — Configure the application in Entra
You'll do all the Entra-side work first, then come back and configure Barndoor with the values you collect along the way.
### Step 1: Create the Enterprise App
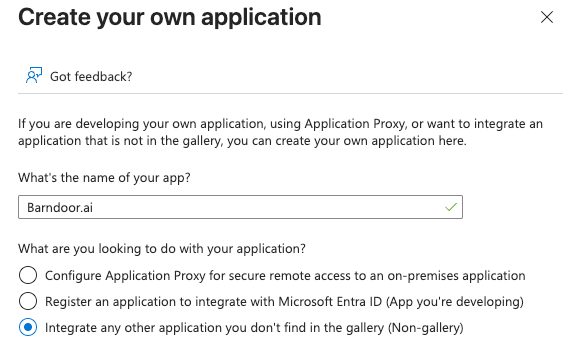
In the [Microsoft Entra admin center](https://entra.microsoft.com), go to **Identity** → **Applications** → **Enterprise Apps**, then click **+ New application**, then click **+ Create your own application**.
* **Input Name**: Anything you'd like (e.g. `Barndoor.ai`)
* **App Type**: Choose the non-gallery option
* **Click `Create`**.
 The following steps will involve configuring the app registration for this enterprise app. Go to **Identity** → **Applications** → **App registrations**, then find and click your newly created app.
***
### Step 2: Add the email claim to the ID token
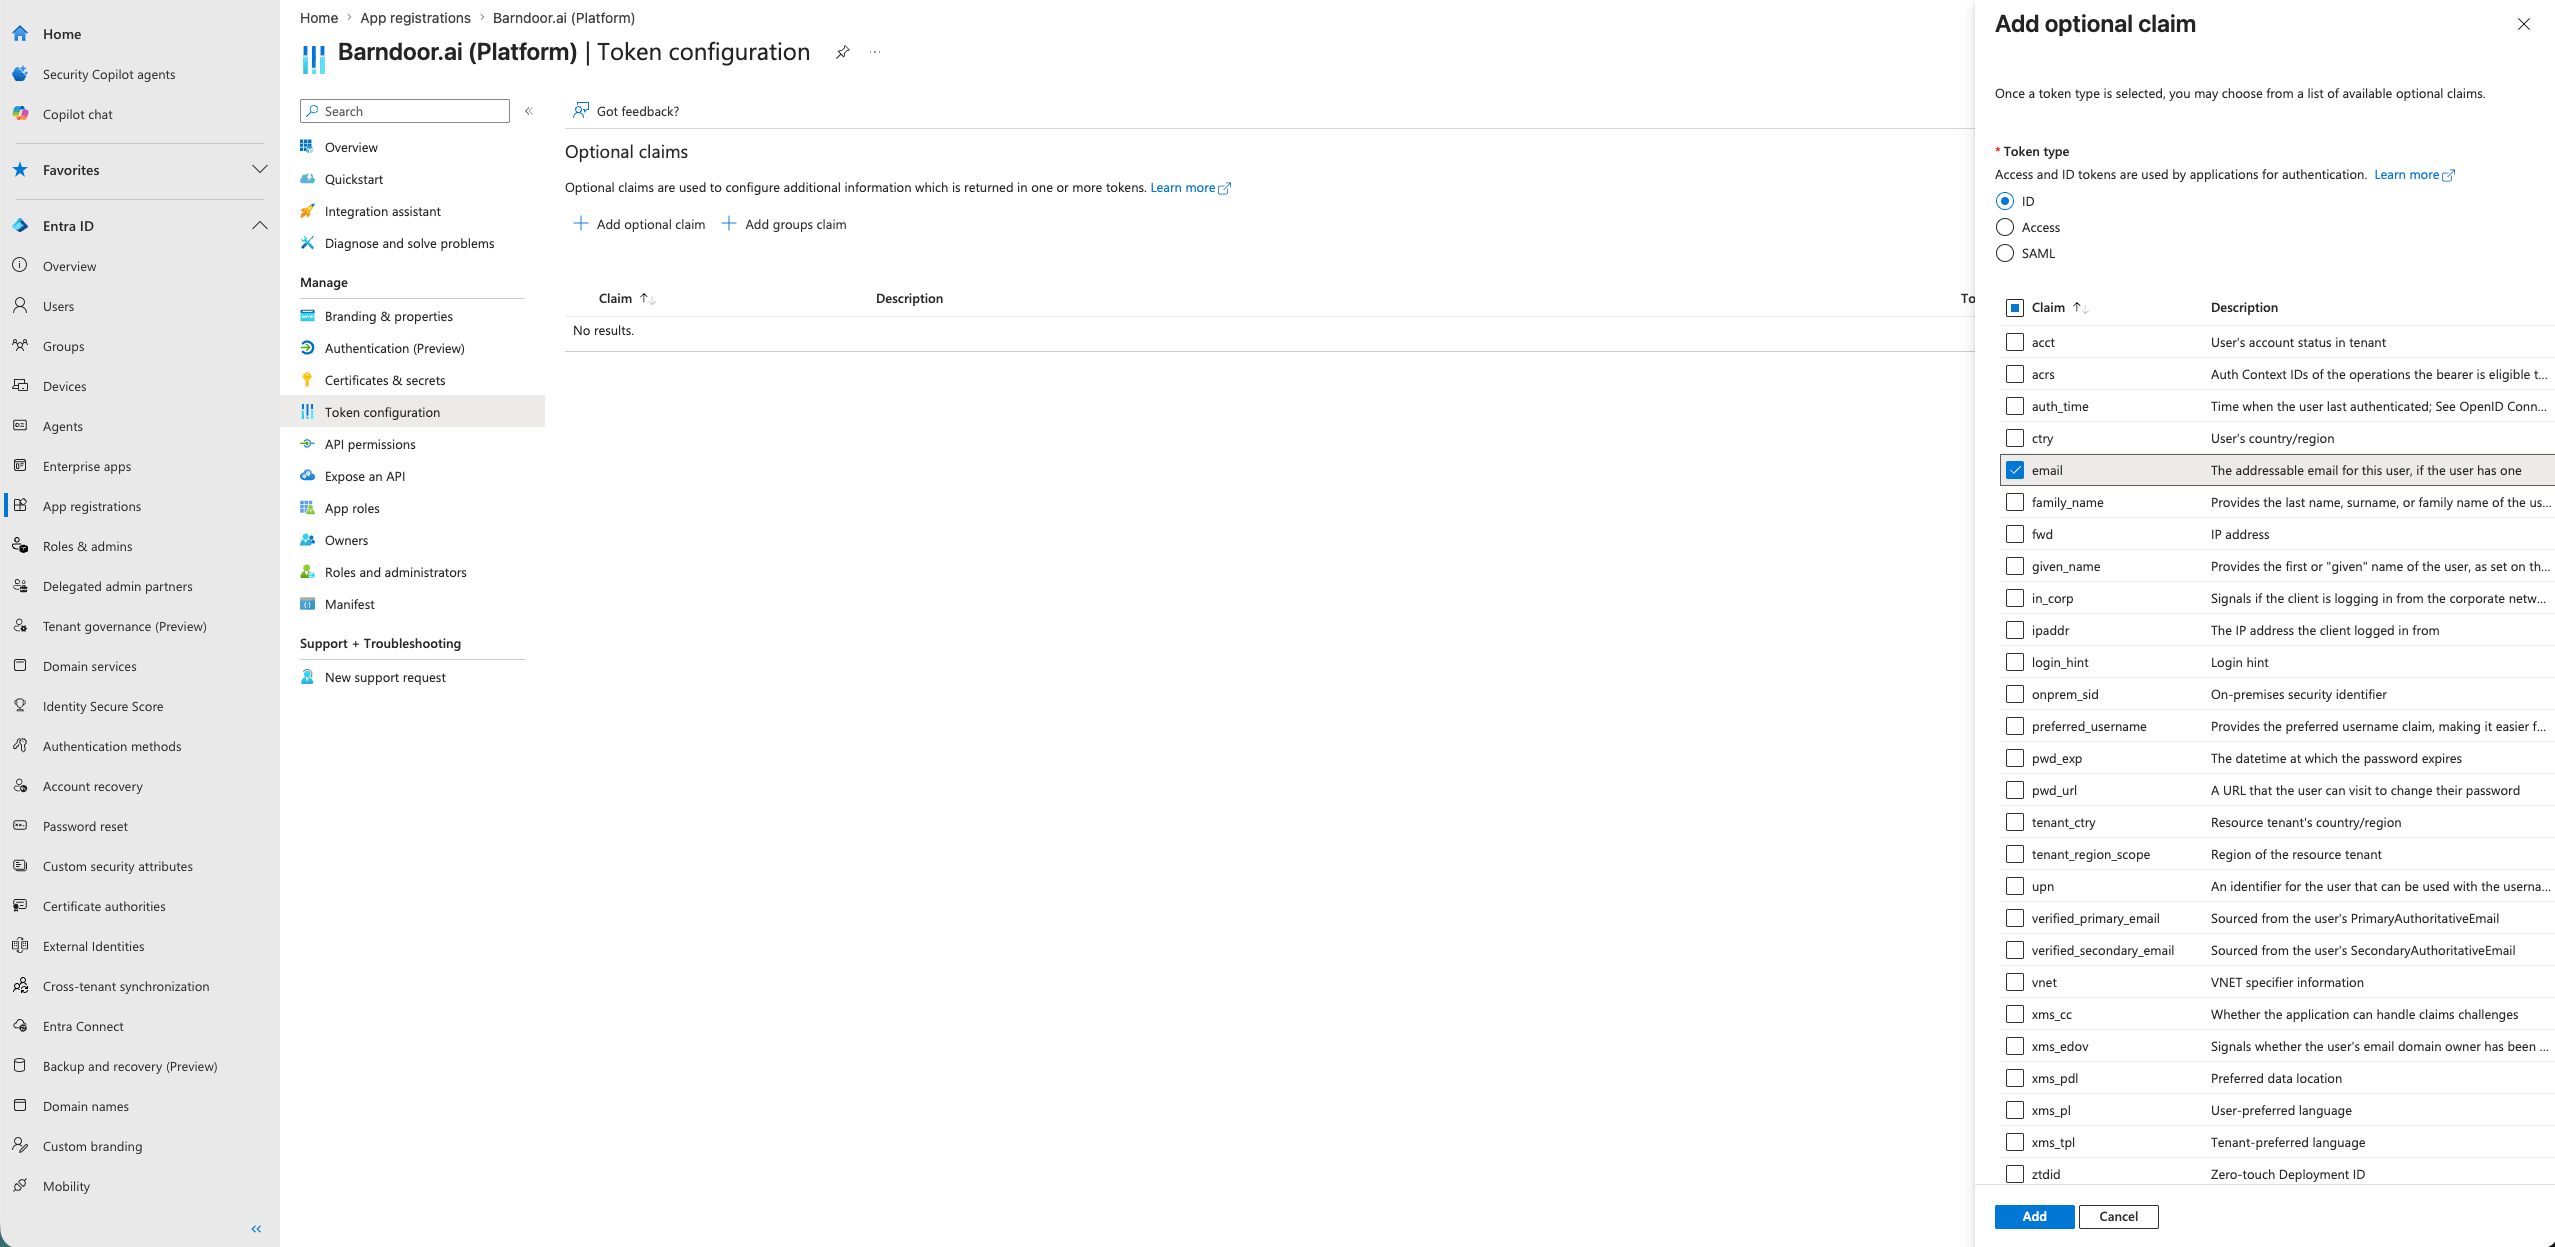
From your new app registration's left nav, click **Token configuration** → **+ Add optional claim**.
* **Token type**: **ID** (this is the one that matters for Barndoor)
* Check the **email** claim and click **Add**.
If Entra prompts you to enable the **email** Microsoft Graph permission to make this claim work, accept it.
The following steps will involve configuring the app registration for this enterprise app. Go to **Identity** → **Applications** → **App registrations**, then find and click your newly created app.
***
### Step 2: Add the email claim to the ID token
From your new app registration's left nav, click **Token configuration** → **+ Add optional claim**.
* **Token type**: **ID** (this is the one that matters for Barndoor)
* Check the **email** claim and click **Add**.
If Entra prompts you to enable the **email** Microsoft Graph permission to make this claim work, accept it.
 ***
### Step 3: Add the groups claim
Still on **Token configuration**, click **+ Add groups claim**.
Pick one of:
* **Security groups** or **All groups** — simple, includes every group the user is in.
* **Groups assigned to the application** — recommended for larger tenants; only sends groups that have been explicitly assigned to the Barndoor app. This keeps the token small and limits exposure.
Under **ID**, **Access**, and **SAML** sub-sections, change **Group ID** to **sAMAccountName**.
***
### Step 3: Add the groups claim
Still on **Token configuration**, click **+ Add groups claim**.
Pick one of:
* **Security groups** or **All groups** — simple, includes every group the user is in.
* **Groups assigned to the application** — recommended for larger tenants; only sends groups that have been explicitly assigned to the Barndoor app. This keeps the token small and limits exposure.
Under **ID**, **Access**, and **SAML** sub-sections, change **Group ID** to **sAMAccountName**.
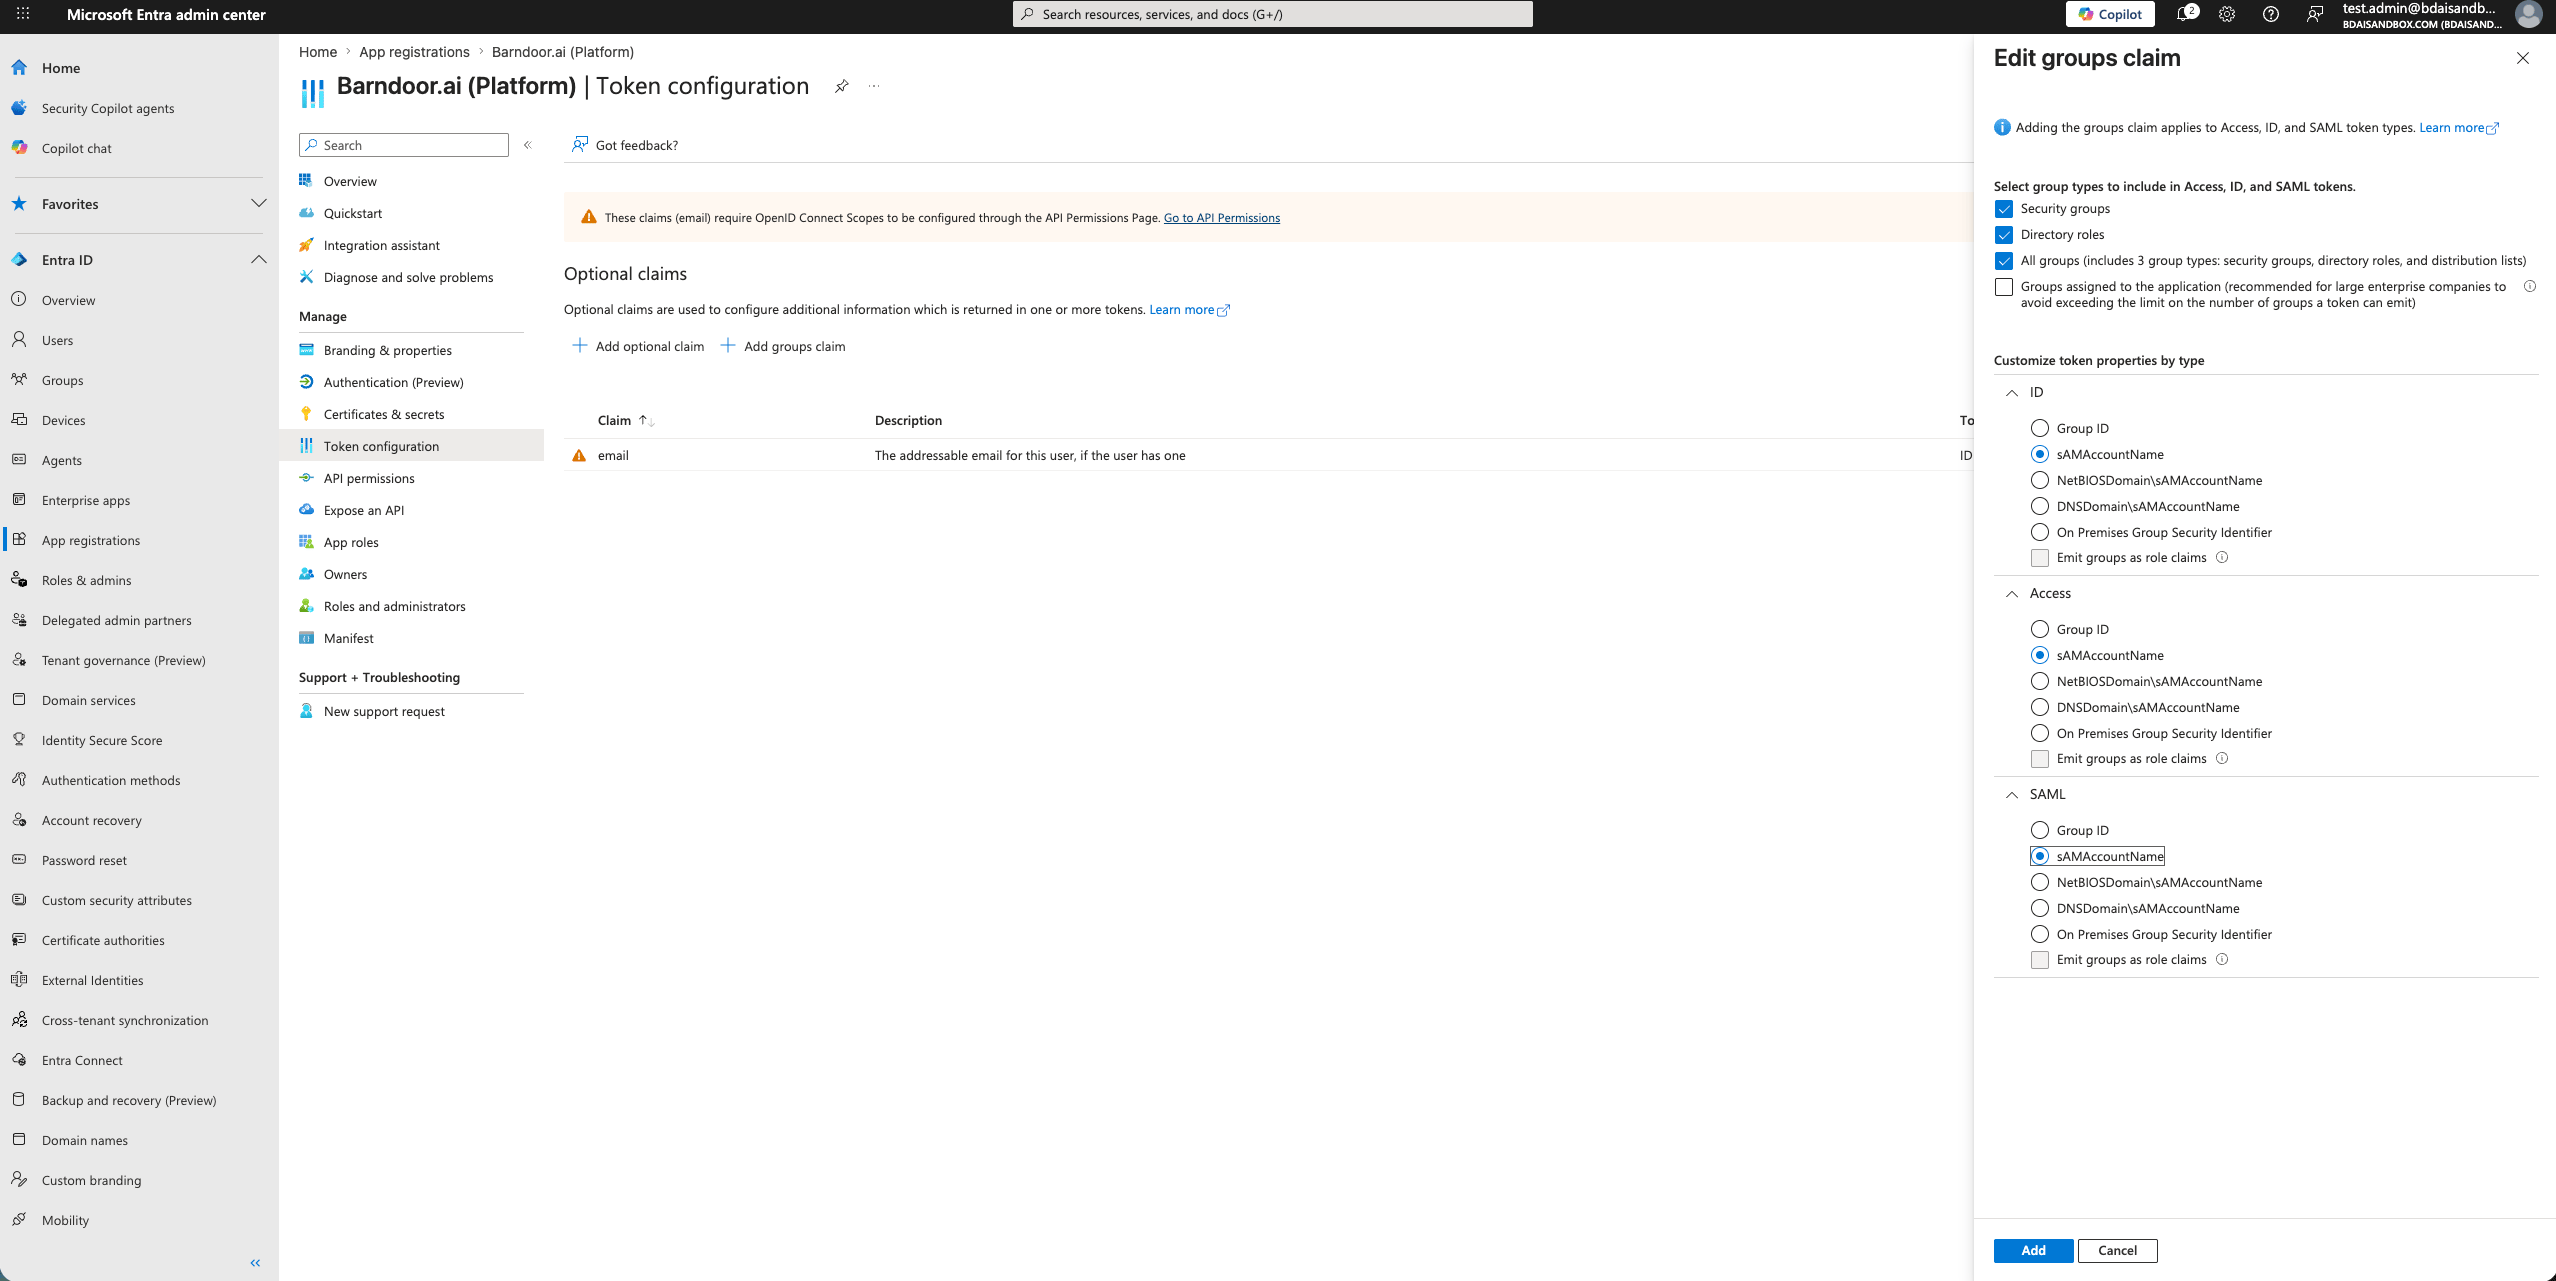 Optionally, also tick **Emit groups as role claims** — this sends groups as `roles` instead of `groups`. By default Barndoor maps them as groups, which is what most teams want.
Click **Add**.
***
### Step 4: Edit the manifest (two changes the UI can't make)
There are two adjustments Entra's UI doesn't surface that you must make in the raw manifest.
From the left nav, click **Manifest**. Use Ctrl/Cmd-F to find the `optionalClaims` block.
Optionally, also tick **Emit groups as role claims** — this sends groups as `roles` instead of `groups`. By default Barndoor maps them as groups, which is what most teams want.
Click **Add**.
***
### Step 4: Edit the manifest (two changes the UI can't make)
There are two adjustments Entra's UI doesn't surface that you must make in the raw manifest.
From the left nav, click **Manifest**. Use Ctrl/Cmd-F to find the `optionalClaims` block.
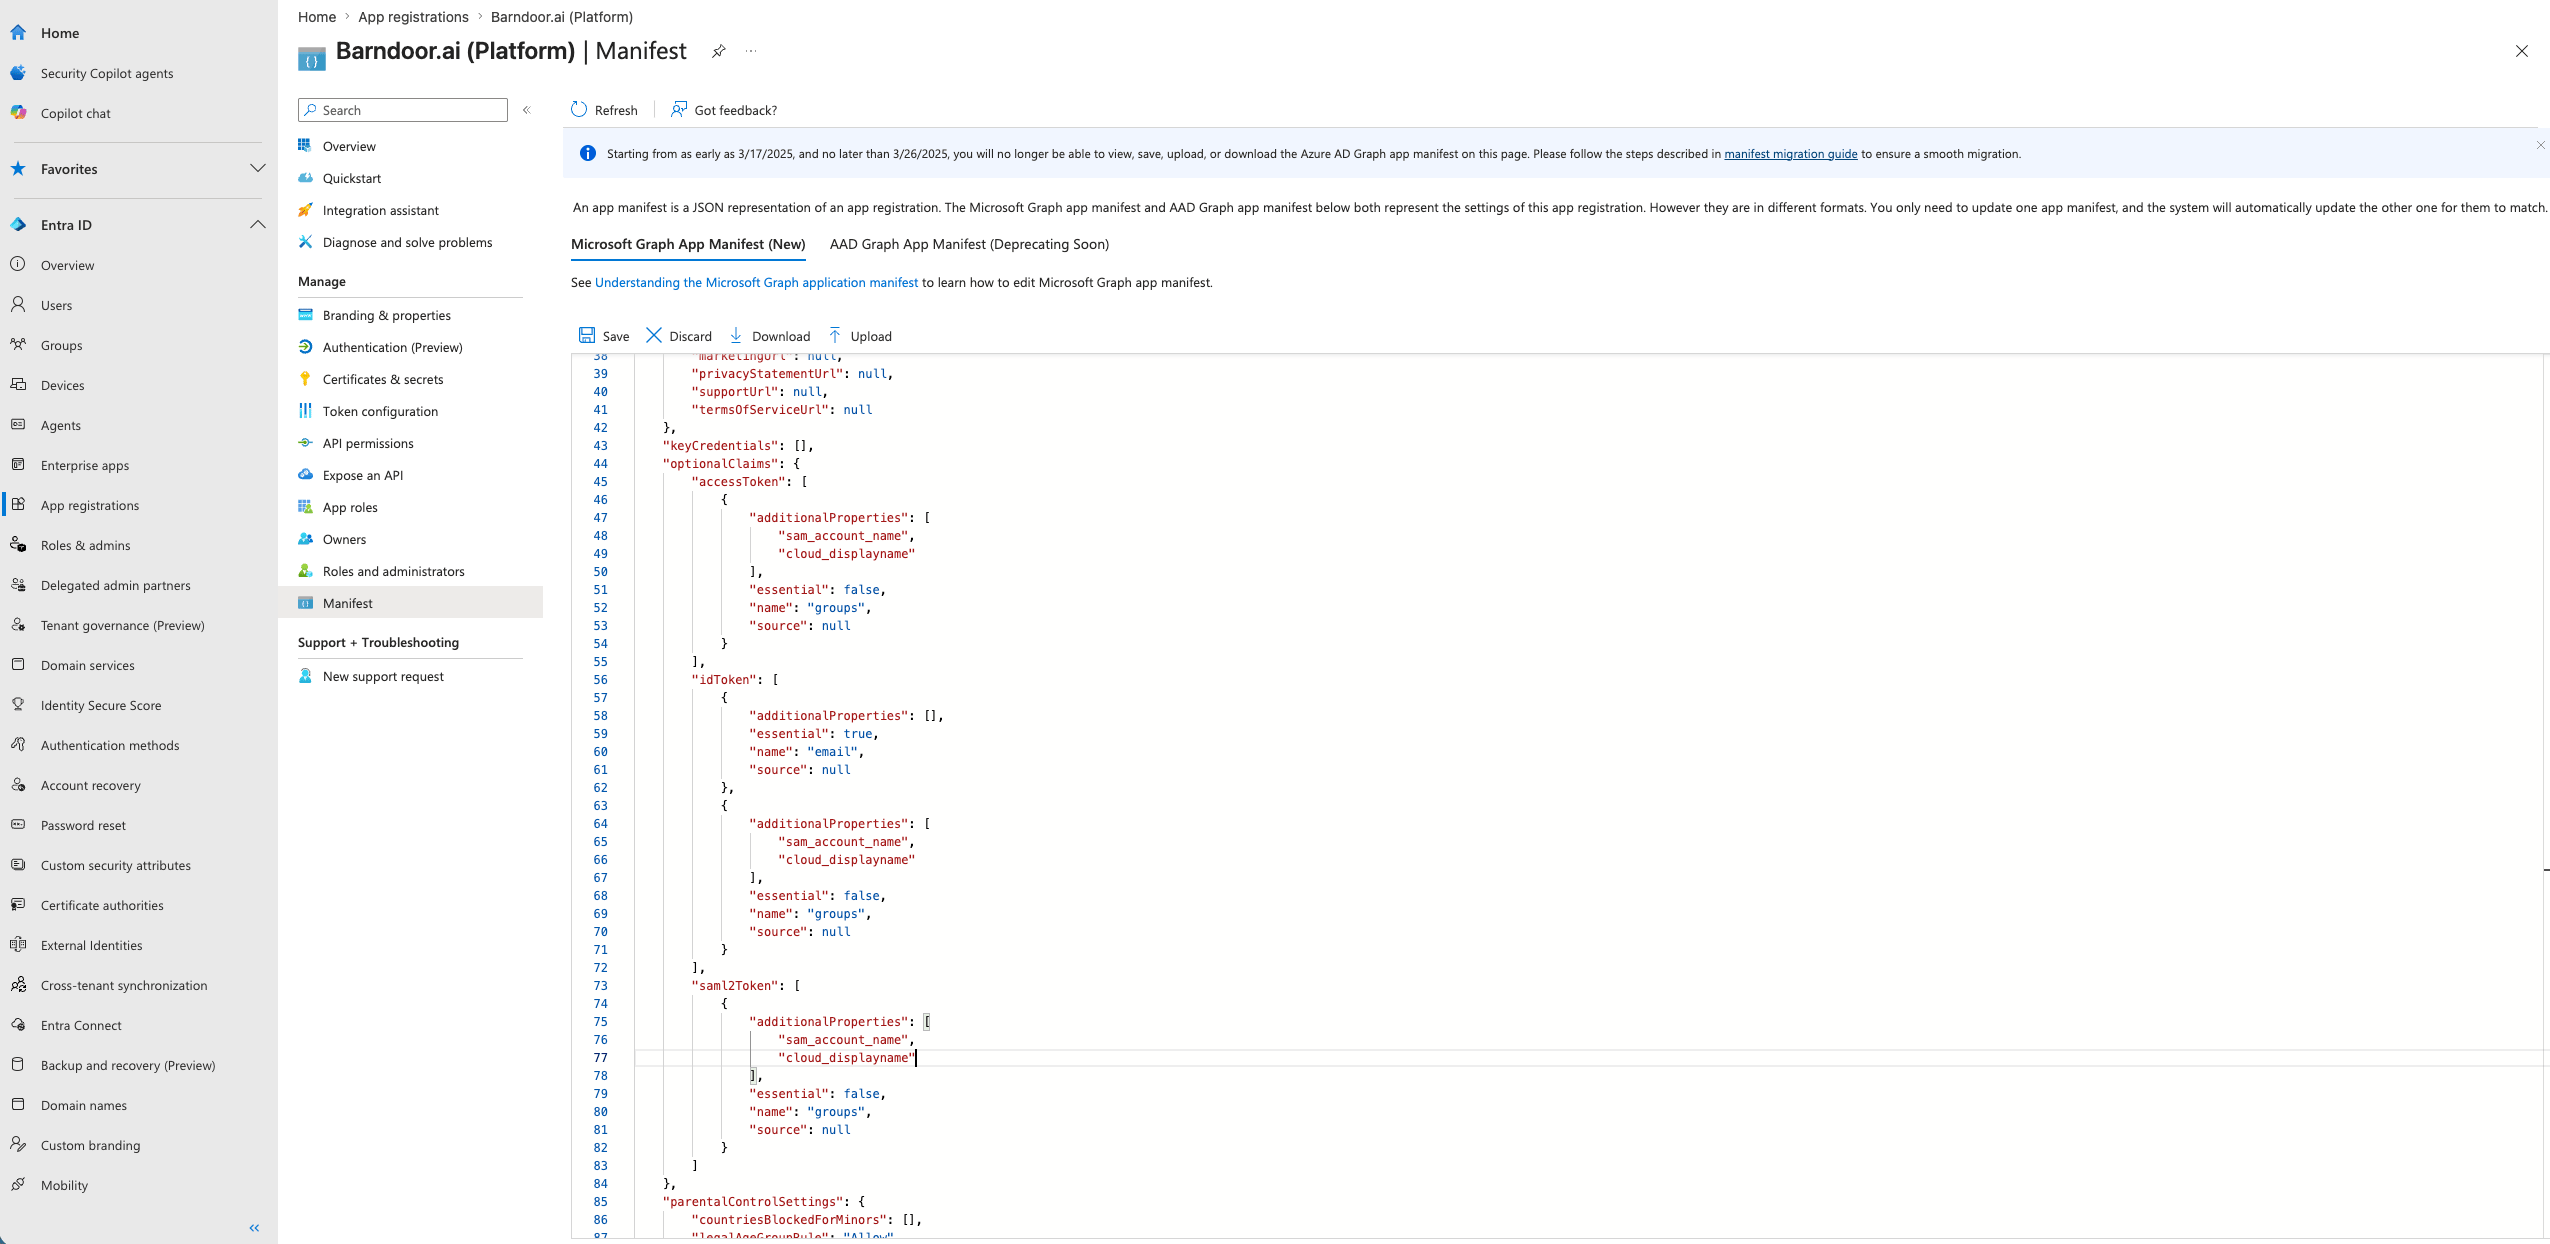 Find the `email` entry **under `idToken`** and set `essential` to `true`:
```json theme={null}
{
"name": "email",
"source": null,
"essential": true,
"additionalProperties": []
}
```
Only set `essential: true` on the entry inside `idToken`. Do **not** mark it essential in `accessToken` or `saml2Token`.
Find each groups entry (you'll see `sam_account_name` listed) and add `cloud_displayname` to `additionalProperties`. Do this in **all three** of `idToken`, `accessToken`, and `saml2Token`:
```json theme={null}
{
"name": "groups",
"source": null,
"essential": false,
"additionalProperties": [
"sam_account_name",
"cloud_displayname"
]
}
```
This is the signal that tells Entra to emit group names rather than UUIDs.
Click **Save** at the top of the manifest editor.
***
### Step 5: Grant API permissions
From the left nav, click **API permissions** → **+ Add a permission** → **Microsoft Graph** → **Delegated permissions**.
Tick the following four scopes:
* `email`
* `offline_access`
* `openid`
* `profile`
Click **Add permissions**.
Find the `email` entry **under `idToken`** and set `essential` to `true`:
```json theme={null}
{
"name": "email",
"source": null,
"essential": true,
"additionalProperties": []
}
```
Only set `essential: true` on the entry inside `idToken`. Do **not** mark it essential in `accessToken` or `saml2Token`.
Find each groups entry (you'll see `sam_account_name` listed) and add `cloud_displayname` to `additionalProperties`. Do this in **all three** of `idToken`, `accessToken`, and `saml2Token`:
```json theme={null}
{
"name": "groups",
"source": null,
"essential": false,
"additionalProperties": [
"sam_account_name",
"cloud_displayname"
]
}
```
This is the signal that tells Entra to emit group names rather than UUIDs.
Click **Save** at the top of the manifest editor.
***
### Step 5: Grant API permissions
From the left nav, click **API permissions** → **+ Add a permission** → **Microsoft Graph** → **Delegated permissions**.
Tick the following four scopes:
* `email`
* `offline_access`
* `openid`
* `profile`
Click **Add permissions**.
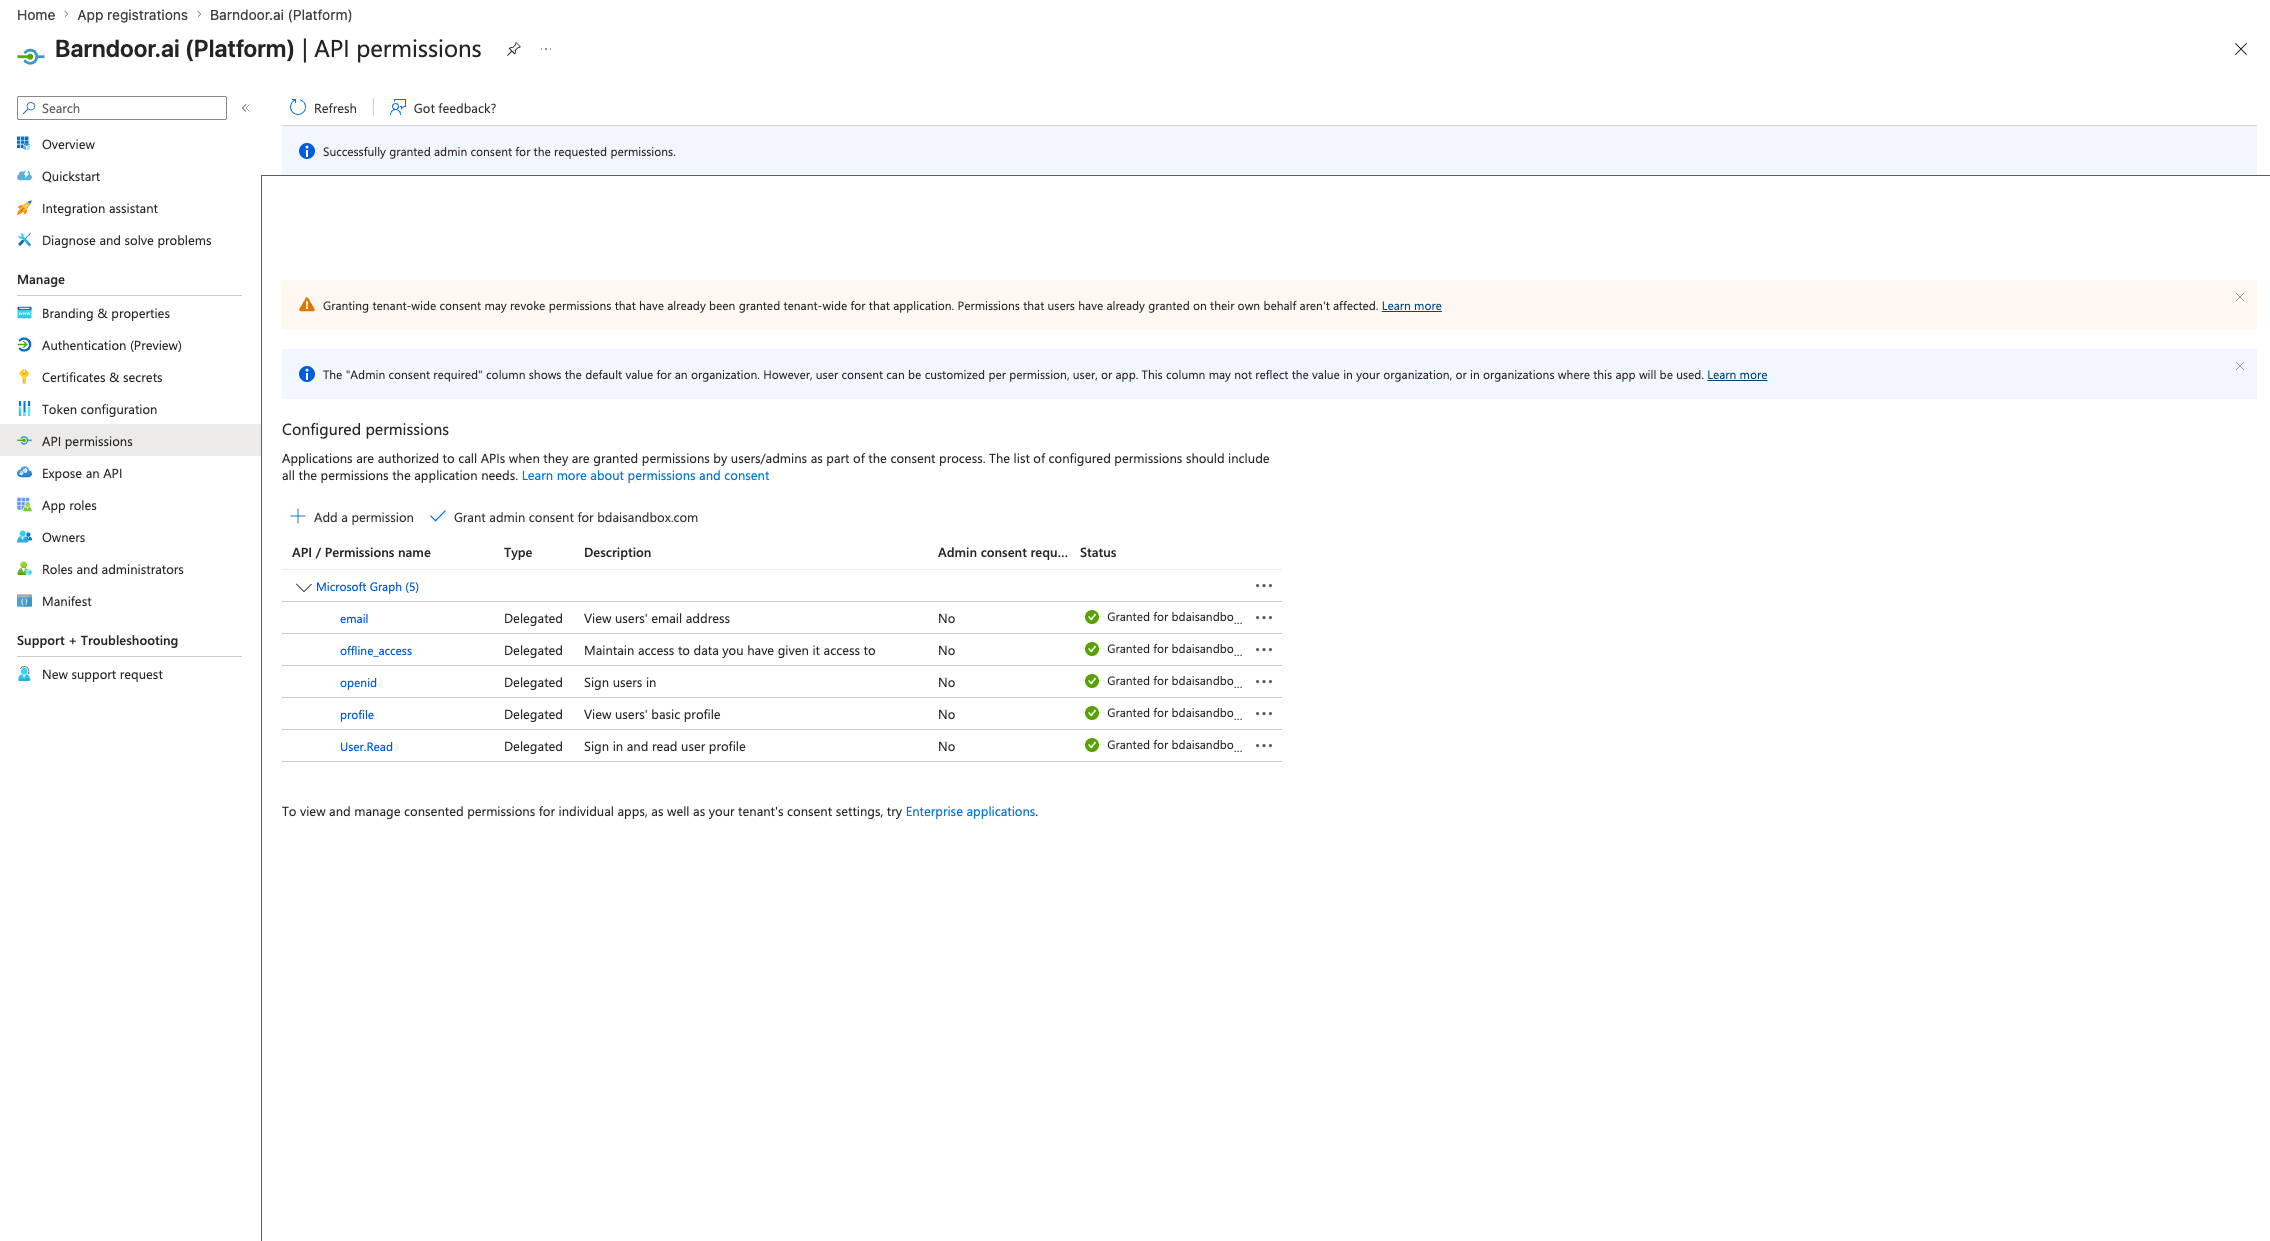
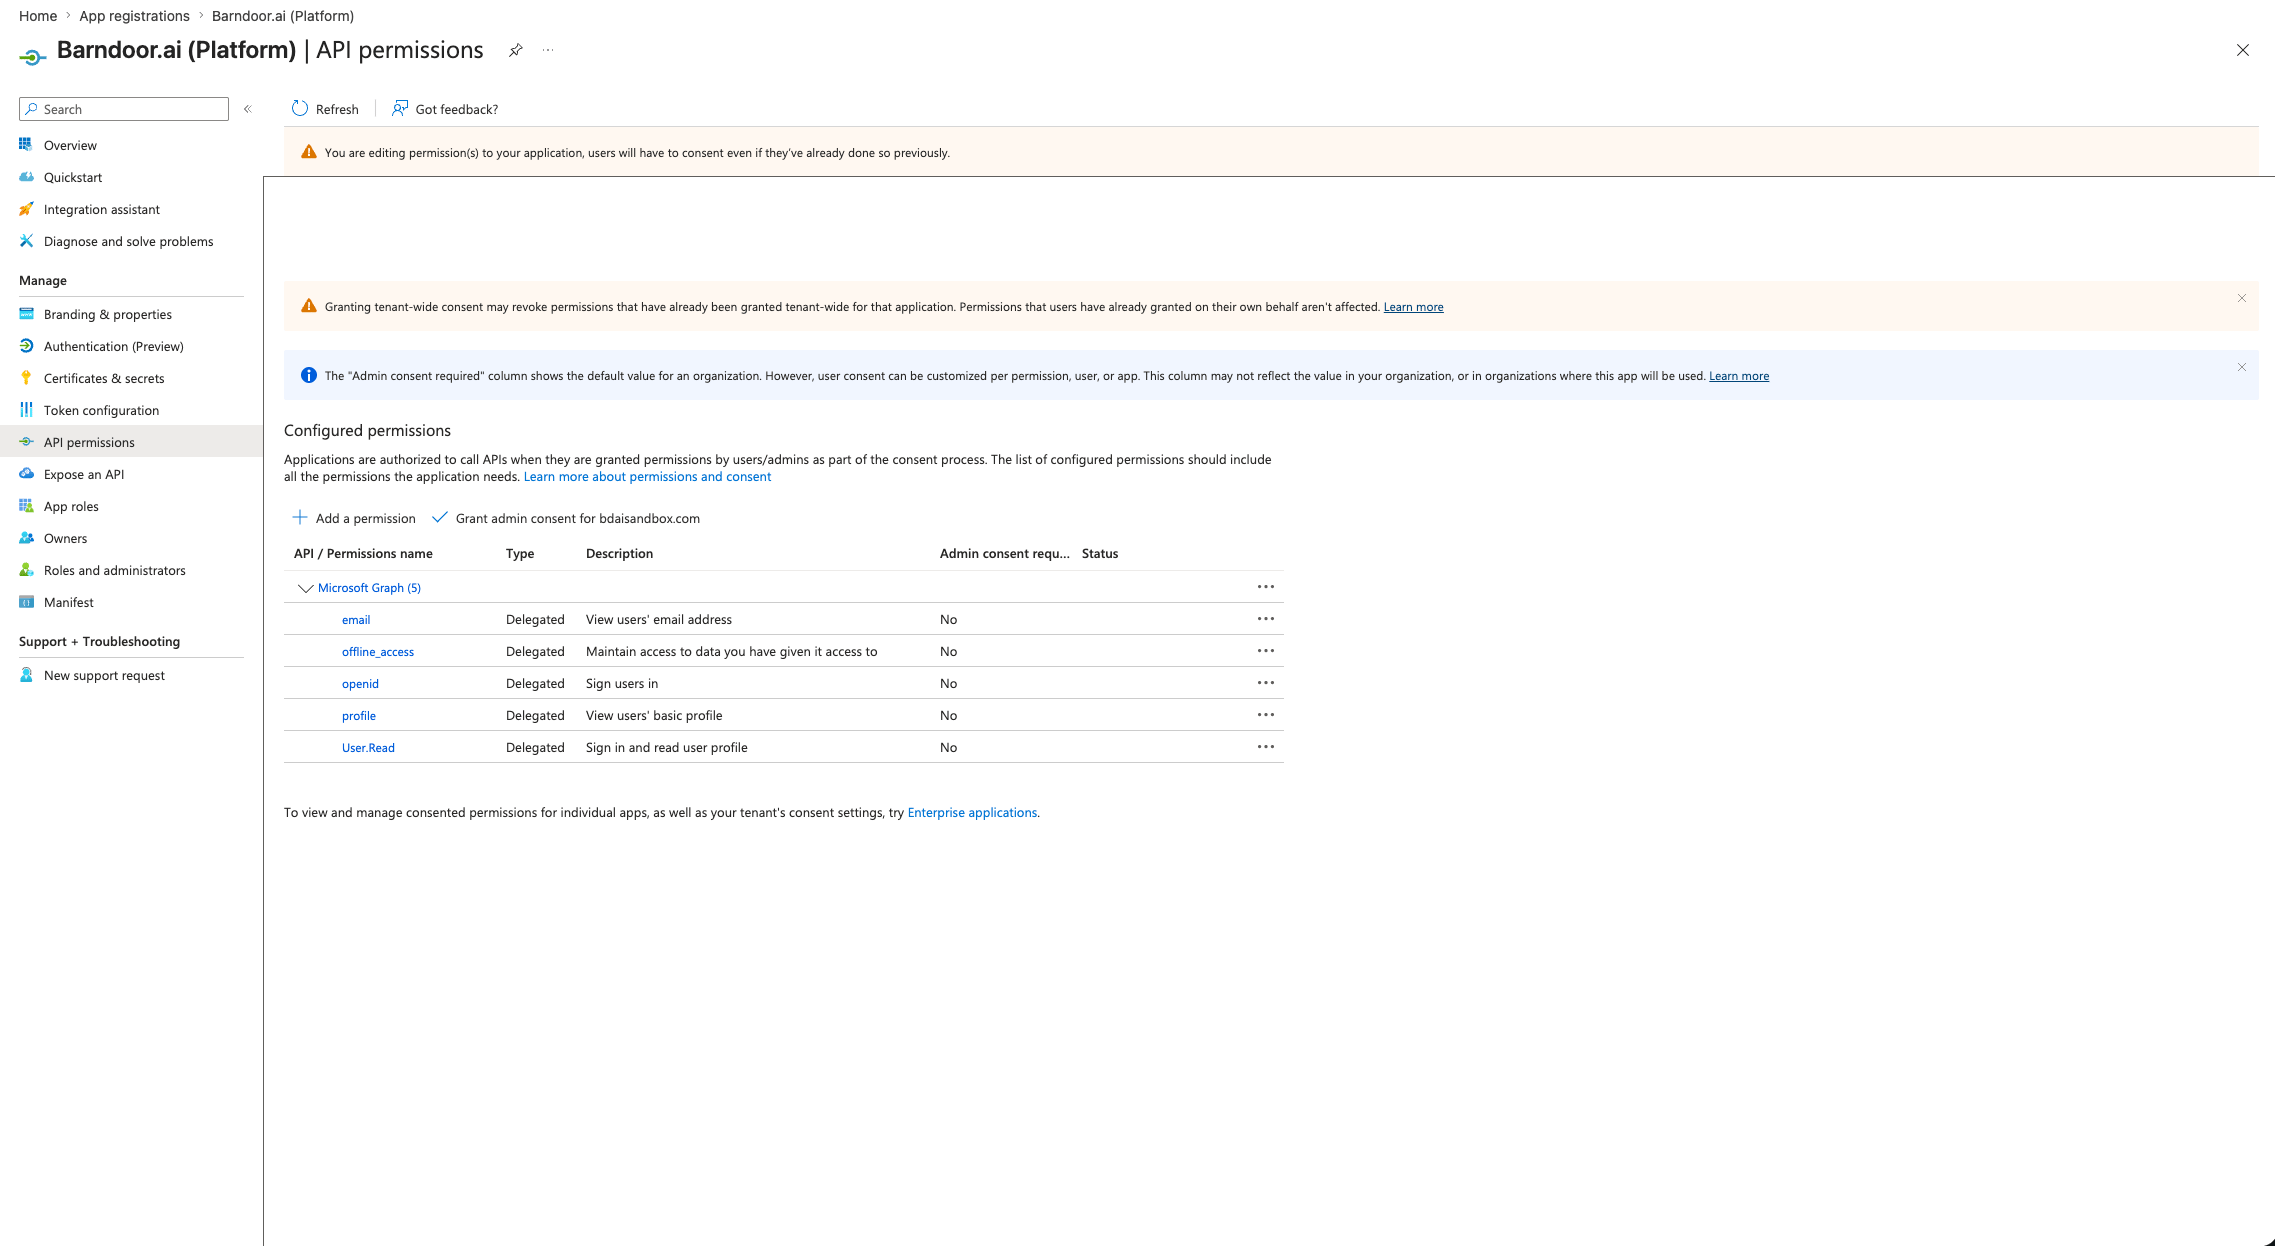 Back on the API permissions screen, click **Grant admin consent for *your tenant*** and confirm. The **Status** column should flip to green checkmarks for all four scopes.
 ***
### Step 6: Create a client secret
Go to **Certificates & secrets** → **Client secrets** tab → **+ New client secret**.
* **Description**: e.g. `Barndoor SSO`
* **Expires**: Max the value (`24 months` at time of writing). Entra requires an expiration.
Click **Add**.
Once the secret is created, **copy the `Value` column (not the `Secret ID`)** to your clipboard.
***
### Step 6: Create a client secret
Go to **Certificates & secrets** → **Client secrets** tab → **+ New client secret**.
* **Description**: e.g. `Barndoor SSO`
* **Expires**: Max the value (`24 months` at time of writing). Entra requires an expiration.
Click **Add**.
Once the secret is created, **copy the `Value` column (not the `Secret ID`)** to your clipboard.
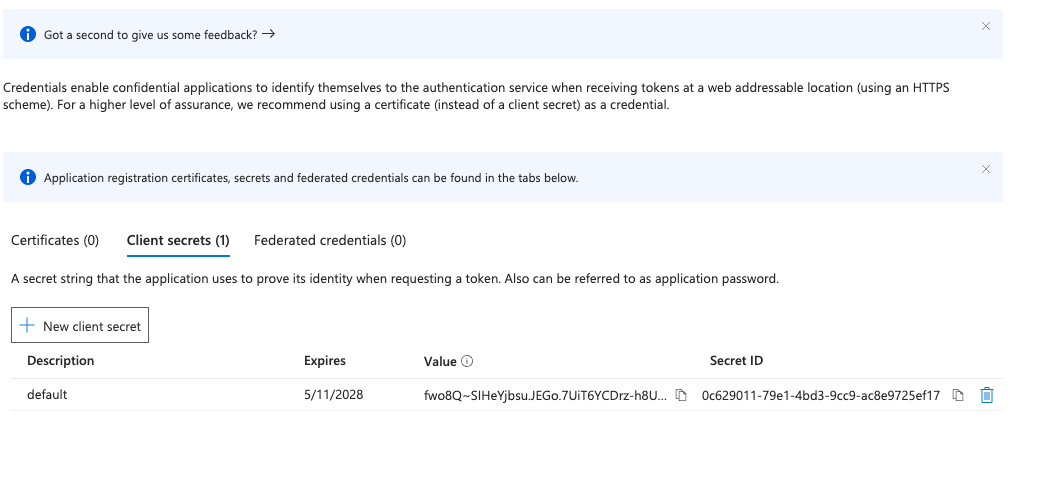 Entra only displays the secret value **once**. As soon as you navigate away from this page it is masked permanently. If you miss it, you'll need to delete the secret and create a new one.
**Mark your calendar.** When the secret expires (24 months max), SSO will silently break. Rotate it in Entra and update Barndoor's IdP config before the expiration date.
***
### Step 7: Collect the remaining values
You'll need three more values from Entra before switching over to Barndoor.
Go back to **Overview**. Copy the **Application (client) ID**. Also note your **Directory (tenant) ID** — you'll need it in Step 9.
Entra only displays the secret value **once**. As soon as you navigate away from this page it is masked permanently. If you miss it, you'll need to delete the secret and create a new one.
**Mark your calendar.** When the secret expires (24 months max), SSO will silently break. Rotate it in Entra and update Barndoor's IdP config before the expiration date.
***
### Step 7: Collect the remaining values
You'll need three more values from Entra before switching over to Barndoor.
Go back to **Overview**. Copy the **Application (client) ID**. Also note your **Directory (tenant) ID** — you'll need it in Step 9.
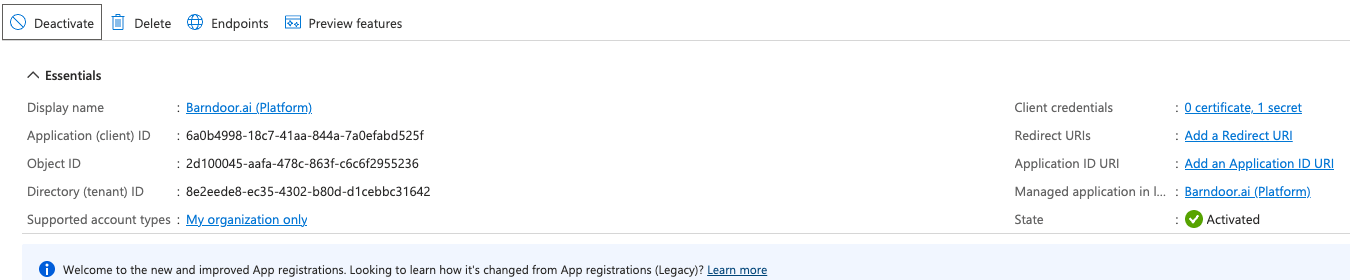 Still on **Overview**, click **Endpoints** in the top bar. A side panel opens with a list of URLs. Copy **OpenID Connect metadata document** (.well-known discovery).
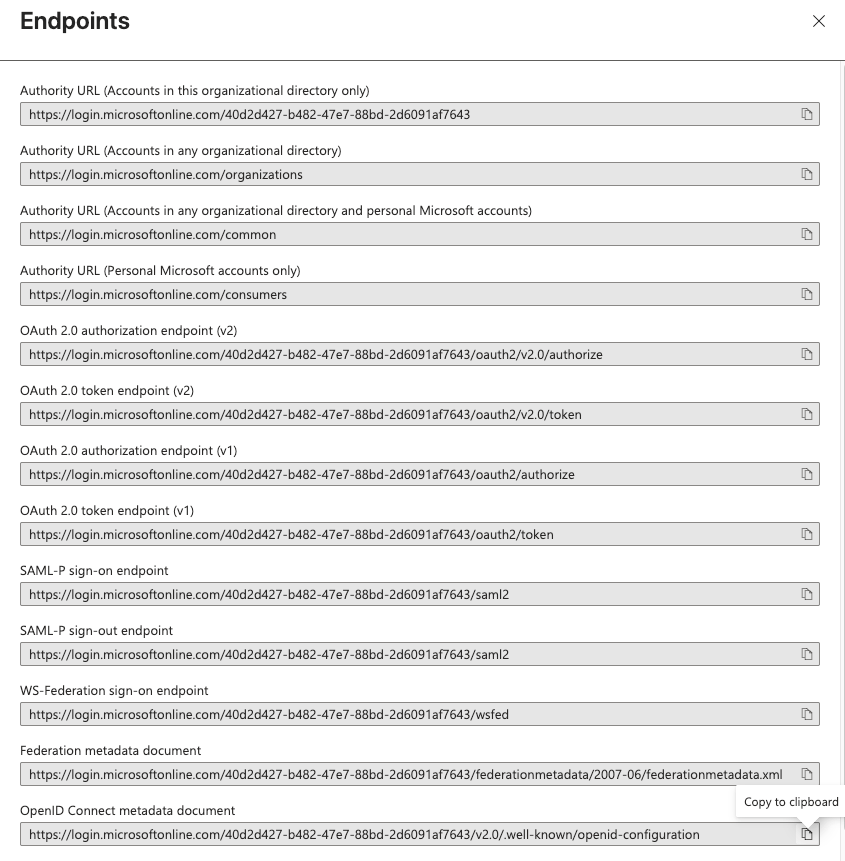 Open a new browser tab and navigate to that URL. It should display the OIDC Discovery document. From the document, copy the value for `issuer`. It should be the format of `https://login.microsoftonline.com/{tenant-id}/v2.0`.
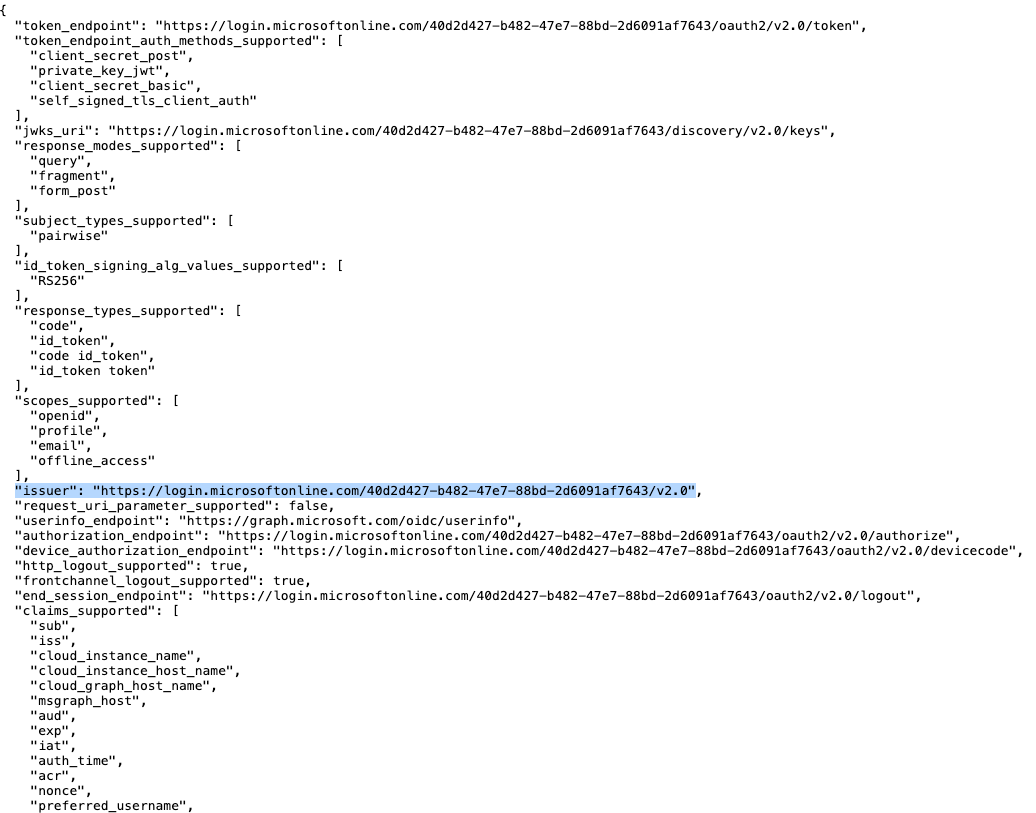 You'll use this URL in Barndoor to auto-discover the OIDC endpoints. Go to the next steps.
***
## Part 2 — Configure the IdP in Barndoor
### Step 8: Open the Barndoor IdP setup form
In Barndoor, go to [**Identity Provider**](https://app.barndoor.ai/idp) and start the **Set up single sign-on (SSO)** flow.
* **Display name**: Whatever you'd like (e.g. `Entra — Acme Corp`)
* **Client ID**: The Application (client) ID from Entra Overview (Step 7)
* **Client Secret**: The secret **Value** you copied in Step 6
***
### Step 9: Set the Issuer URL to trigger OIDC discovery
Entra publishes one URL in its metadata, but **stamps a different URL into the `iss` claim of every token it issues**. Barndoor verifies the `iss` claim against the issuer URL you provide, so the two must match exactly — including a trailing slash.
Paste the Issuer URL from Step 7 into the **Issuer URL** field. Barndoor will use it to auto-fill **Authorization URL**, **Token URL**, **JWKS URL**, etc.
You'll use this URL in Barndoor to auto-discover the OIDC endpoints. Go to the next steps.
***
## Part 2 — Configure the IdP in Barndoor
### Step 8: Open the Barndoor IdP setup form
In Barndoor, go to [**Identity Provider**](https://app.barndoor.ai/idp) and start the **Set up single sign-on (SSO)** flow.
* **Display name**: Whatever you'd like (e.g. `Entra — Acme Corp`)
* **Client ID**: The Application (client) ID from Entra Overview (Step 7)
* **Client Secret**: The secret **Value** you copied in Step 6
***
### Step 9: Set the Issuer URL to trigger OIDC discovery
Entra publishes one URL in its metadata, but **stamps a different URL into the `iss` claim of every token it issues**. Barndoor verifies the `iss` claim against the issuer URL you provide, so the two must match exactly — including a trailing slash.
Paste the Issuer URL from Step 7 into the **Issuer URL** field. Barndoor will use it to auto-fill **Authorization URL**, **Token URL**, **JWKS URL**, etc.
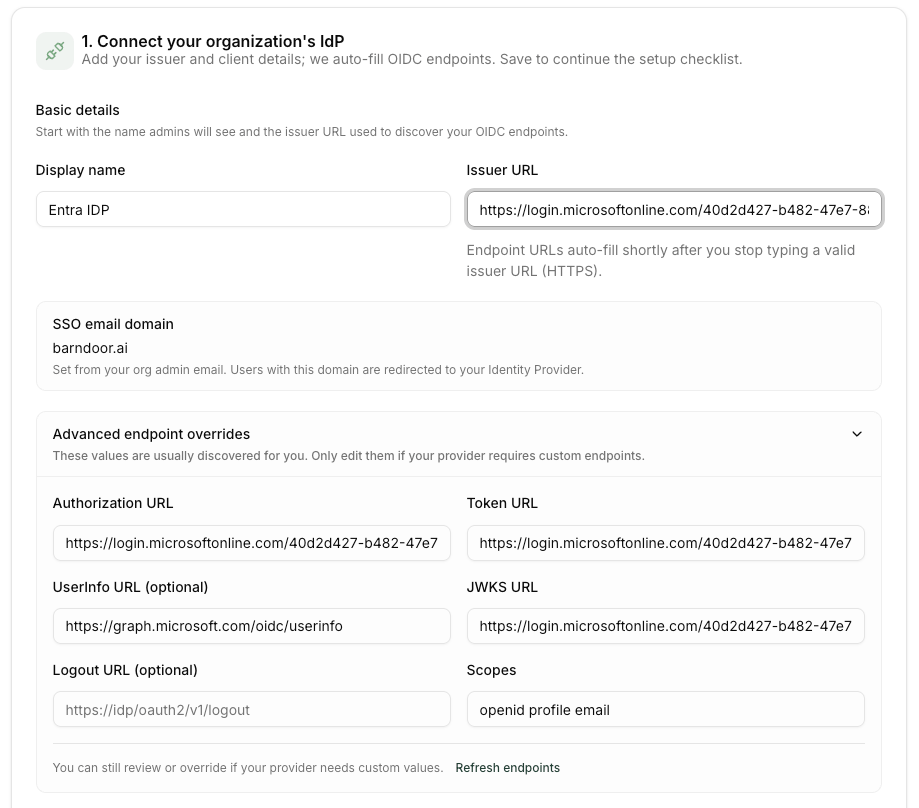 If using the v1 OAuth endpoints, note the issuer is a separate domain from the OAuth endpoints. You will know you are using v1 if your OpenID discovery URL does not contain a version path.
Example: `https://login.microsoftonline.com/{tenant-id}/.well-known/openid-configuration`
**The issuer URL must match the OpenID Metadata document exactly (including trailing slash).** If you omit it, SSO sign-in will fail with a `issuer mismatch` error and there will be no useful surface-level UI feedback; only failed login attempts.
Example: `https://sts.windows.net/{tenant-id}/`
Click **Save connection**. Barndoor will store the configuration and reveal the **Redirect URI** in Step 2 of the setup wizard.
***
### Step 10: Register the Redirect URI back in Entra
On the Barndoor SSO setup page, you'll see a **Redirect URI** that looks like `https://auth.barndoor.ai/realms/.../broker//endpoint`. Click the copy icon.
Back in your Entra app registration, click **Authentication** in the left nav → **+ Add a platform** → **Web**.
Paste the Redirect URI into the **Redirect URIs** field, then click **Configure**.
If using the v1 OAuth endpoints, note the issuer is a separate domain from the OAuth endpoints. You will know you are using v1 if your OpenID discovery URL does not contain a version path.
Example: `https://login.microsoftonline.com/{tenant-id}/.well-known/openid-configuration`
**The issuer URL must match the OpenID Metadata document exactly (including trailing slash).** If you omit it, SSO sign-in will fail with a `issuer mismatch` error and there will be no useful surface-level UI feedback; only failed login attempts.
Example: `https://sts.windows.net/{tenant-id}/`
Click **Save connection**. Barndoor will store the configuration and reveal the **Redirect URI** in Step 2 of the setup wizard.
***
### Step 10: Register the Redirect URI back in Entra
On the Barndoor SSO setup page, you'll see a **Redirect URI** that looks like `https://auth.barndoor.ai/realms/.../broker//endpoint`. Click the copy icon.
Back in your Entra app registration, click **Authentication** in the left nav → **+ Add a platform** → **Web**.
Paste the Redirect URI into the **Redirect URIs** field, then click **Configure**.
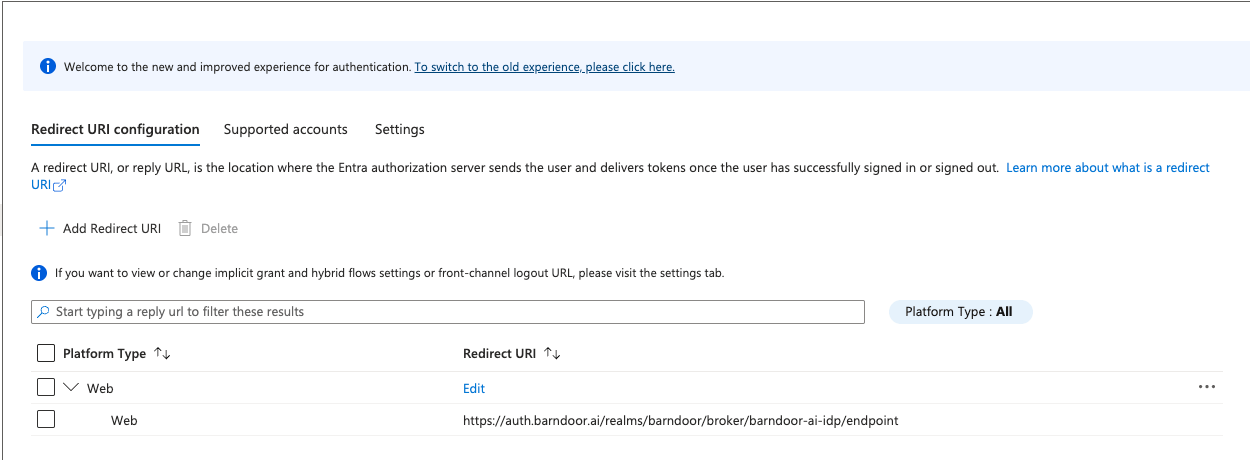 Leave the **Front-channel logout URL** and **Home page URL** fields empty. Entra's initiate-login behavior doesn't interoperate with Barndoor's flow today; setting these can cause confusing redirect loops.
***
### Step 11: Test SSO end-to-end
Back in Barndoor's IdP setup, click **Test SSO**. A popup window opens and should redirect you to Entra's sign-in page.
Leave the **Front-channel logout URL** and **Home page URL** fields empty. Entra's initiate-login behavior doesn't interoperate with Barndoor's flow today; setting these can cause confusing redirect loops.
***
### Step 11: Test SSO end-to-end
Back in Barndoor's IdP setup, click **Test SSO**. A popup window opens and should redirect you to Entra's sign-in page.
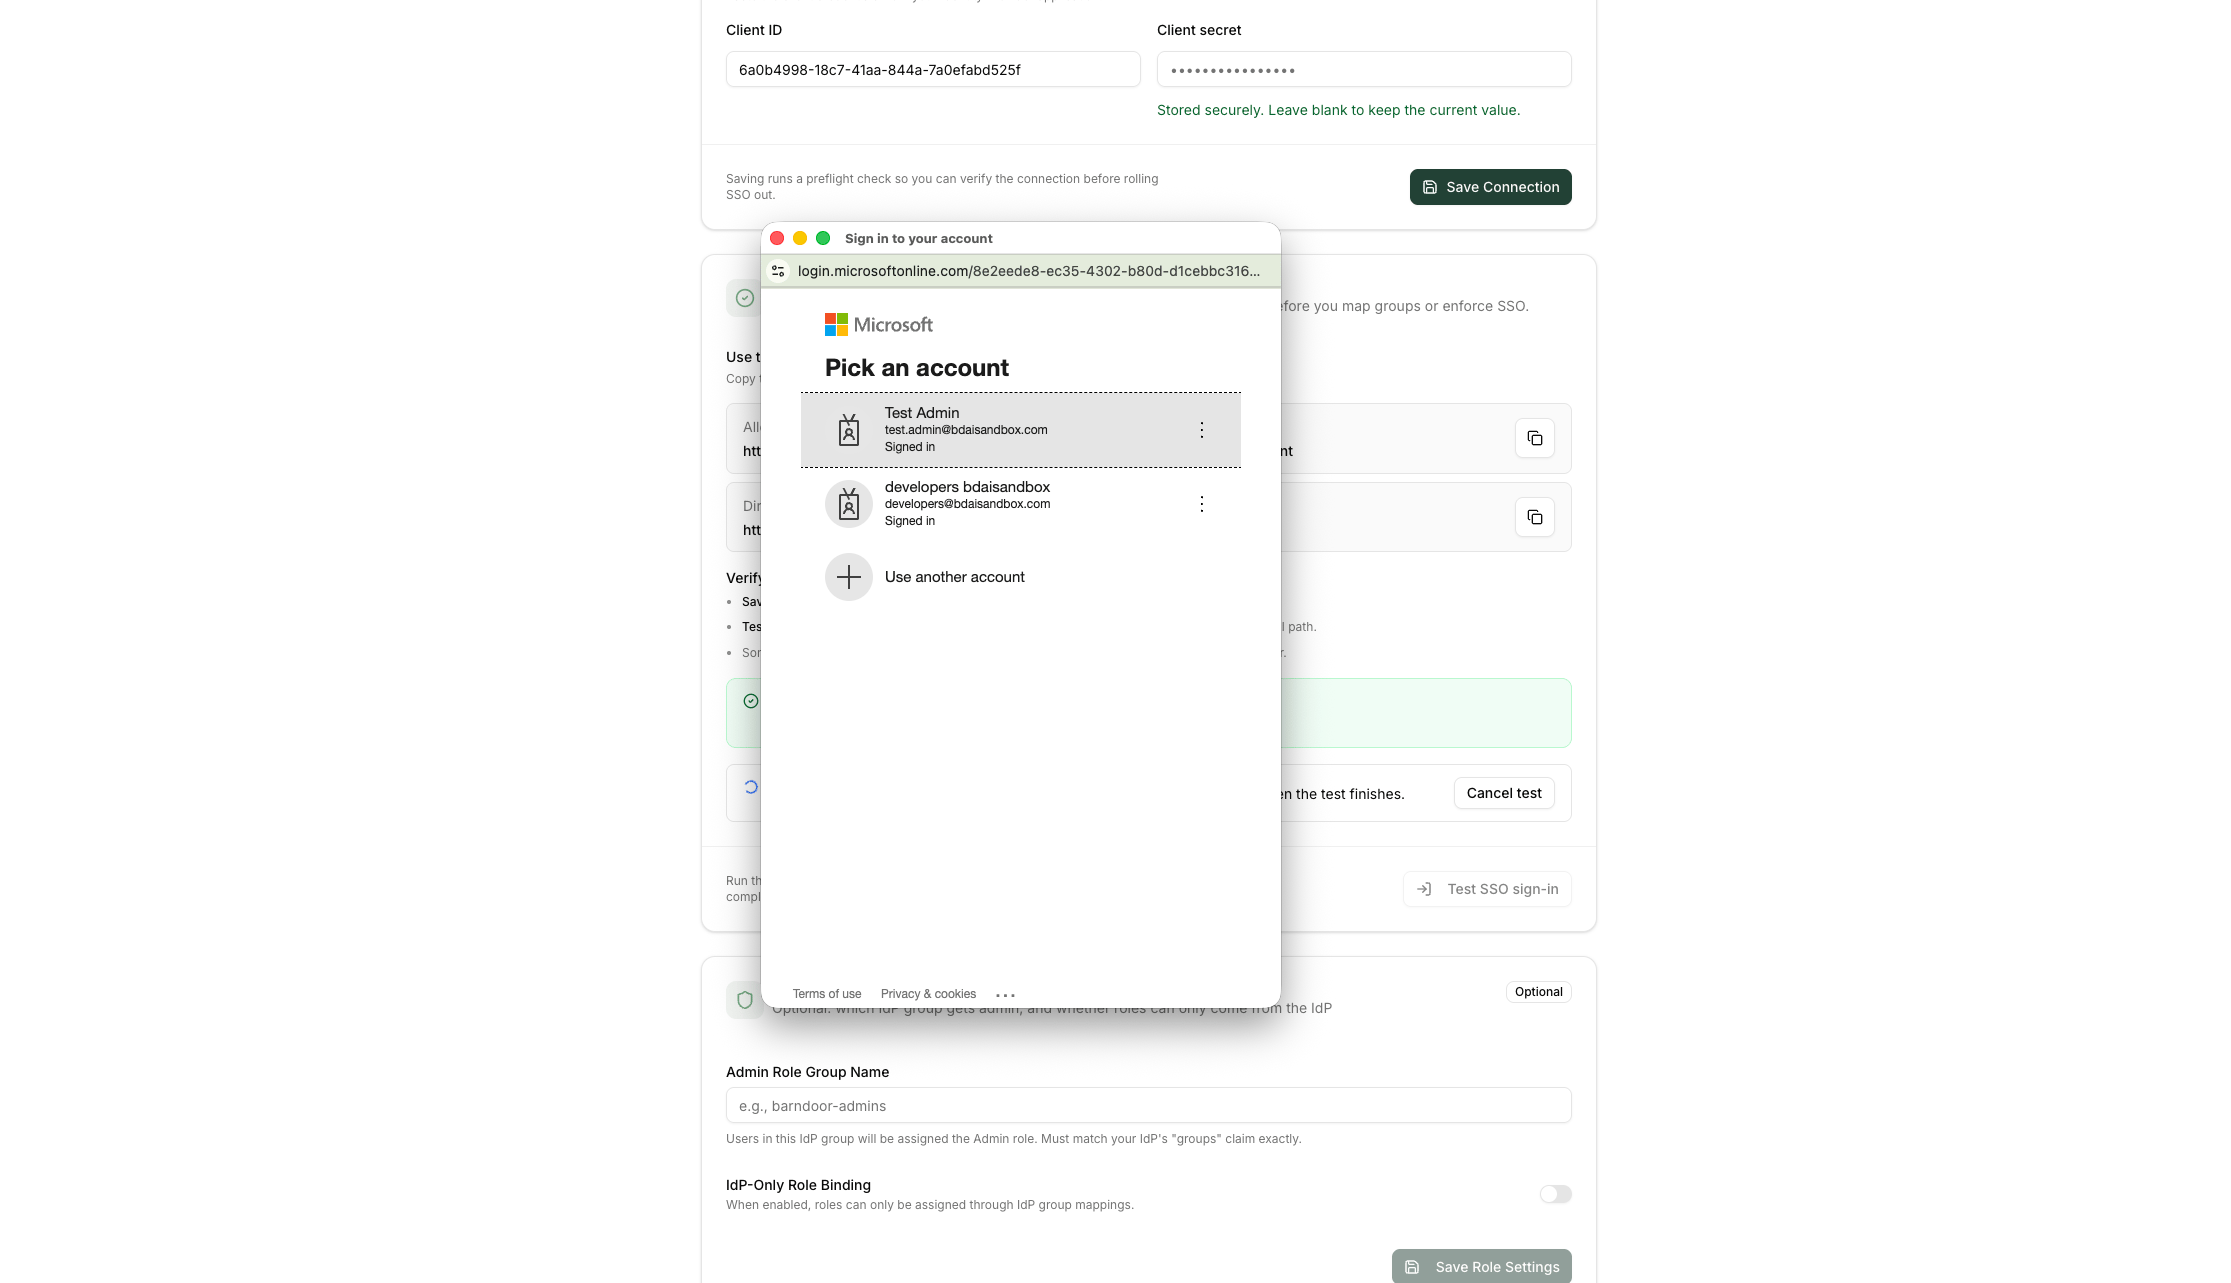 Complete authentication. You should be returned to Barndoor with a success page that also shows your federated identity. Validate your identity contains the `groups` claim configured in earlier steps.
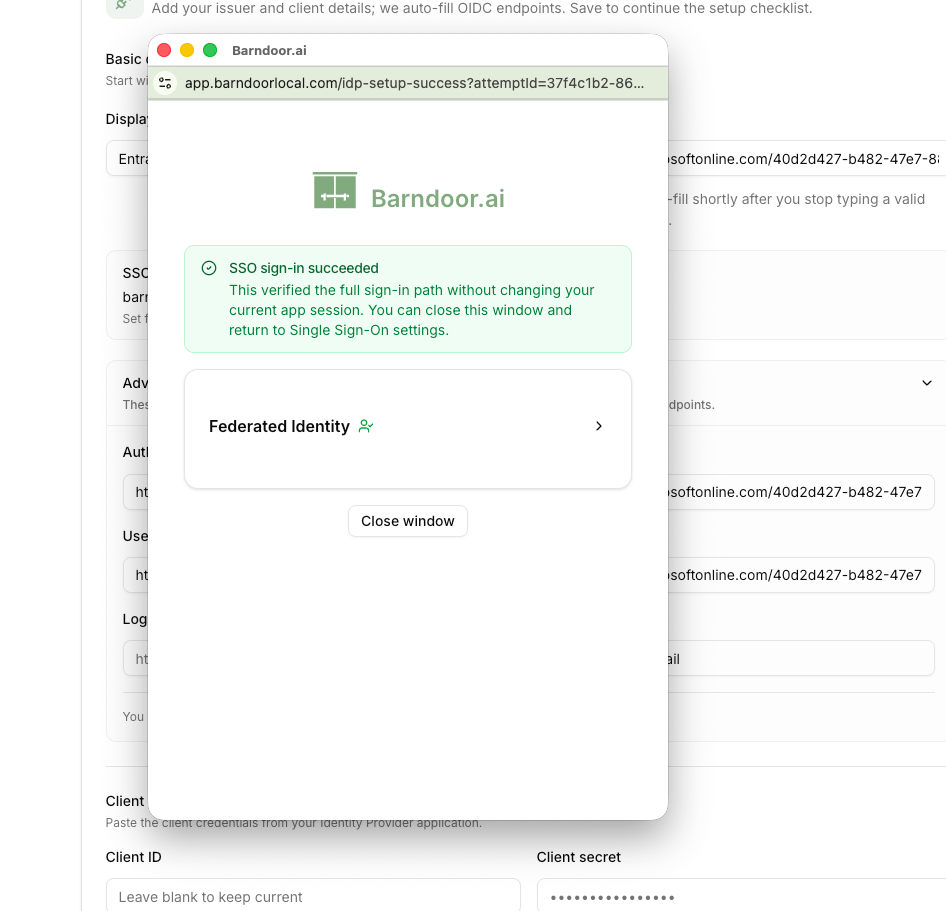 SSO is wired up. Users can now log in to Barndoor with their Entra ID credentials.
***
### Step 12 (optional): Map Entra groups to Barndoor roles
Once SSO works, you can map Entra groups to Barndoor's Admin role using the standard role-mapping flow — see [Connect your IdP — Step 3: Configure Role Mapping](/how-tos/idp-setup#step-3-configure-role-mapping-auto-provision-admins).
**Entra Free tier caveat.** On Entra ID Free (which most trial tenants use), the `cloud_displayname` property added in Step 4 is **silently ignored** and groups arrive as UUIDs rather than human-readable names. Group claims still work — they just aren't pretty.
To get group display names in tokens you need **Entra ID P1 or higher**. If you're stuck on Free, you have two options:
1. Enter group **Object IDs** (UUIDs) in Barndoor's role mapping configuration instead of group names. They're stable per-group, just ugly.
2. Update your Entra tier to a higher plan to support cloud groups.
***
## Part 3 — SCIM provisioning
**SCIM** (System for Cross-domain Identity Management) is an open standard that lets Entra automatically push user and group changes to Barndoor — when someone joins, changes roles, or leaves your organization, Entra provisions, updates, or deprovisions their Barndoor access without anyone touching Barndoor directly.
SCIM provisioning is the **recommended way to manage users in Barndoor**. While SSO (Parts 1–2) handles authentication at login time, SCIM keeps your user directory continuously in sync — ensuring access is granted and, just as importantly, revoked promptly as your team changes.
### Step 13: Configure SCIM Provisioning
**Already set up SSO using the app registration method?** If your existing
Barndoor SSO connection was created using the older **app registration**
approach (rather than the **enterprise app** method described in this guide),
you will **not** be able to enable SCIM provisioning on it — the option will
appear disabled.
To use SCIM provisioning, you must recreate the SSO connection using the
enterprise app method described above
(Part 1 — [Create the Enterprise App](#step-1-create-the-enterprise-app)),
then configure SCIM provisioning against the new connection.
SSO is wired up. Users can now log in to Barndoor with their Entra ID credentials.
***
### Step 12 (optional): Map Entra groups to Barndoor roles
Once SSO works, you can map Entra groups to Barndoor's Admin role using the standard role-mapping flow — see [Connect your IdP — Step 3: Configure Role Mapping](/how-tos/idp-setup#step-3-configure-role-mapping-auto-provision-admins).
**Entra Free tier caveat.** On Entra ID Free (which most trial tenants use), the `cloud_displayname` property added in Step 4 is **silently ignored** and groups arrive as UUIDs rather than human-readable names. Group claims still work — they just aren't pretty.
To get group display names in tokens you need **Entra ID P1 or higher**. If you're stuck on Free, you have two options:
1. Enter group **Object IDs** (UUIDs) in Barndoor's role mapping configuration instead of group names. They're stable per-group, just ugly.
2. Update your Entra tier to a higher plan to support cloud groups.
***
## Part 3 — SCIM provisioning
**SCIM** (System for Cross-domain Identity Management) is an open standard that lets Entra automatically push user and group changes to Barndoor — when someone joins, changes roles, or leaves your organization, Entra provisions, updates, or deprovisions their Barndoor access without anyone touching Barndoor directly.
SCIM provisioning is the **recommended way to manage users in Barndoor**. While SSO (Parts 1–2) handles authentication at login time, SCIM keeps your user directory continuously in sync — ensuring access is granted and, just as importantly, revoked promptly as your team changes.
### Step 13: Configure SCIM Provisioning
**Already set up SSO using the app registration method?** If your existing
Barndoor SSO connection was created using the older **app registration**
approach (rather than the **enterprise app** method described in this guide),
you will **not** be able to enable SCIM provisioning on it — the option will
appear disabled.
To use SCIM provisioning, you must recreate the SSO connection using the
enterprise app method described above
(Part 1 — [Create the Enterprise App](#step-1-create-the-enterprise-app)),
then configure SCIM provisioning against the new connection.
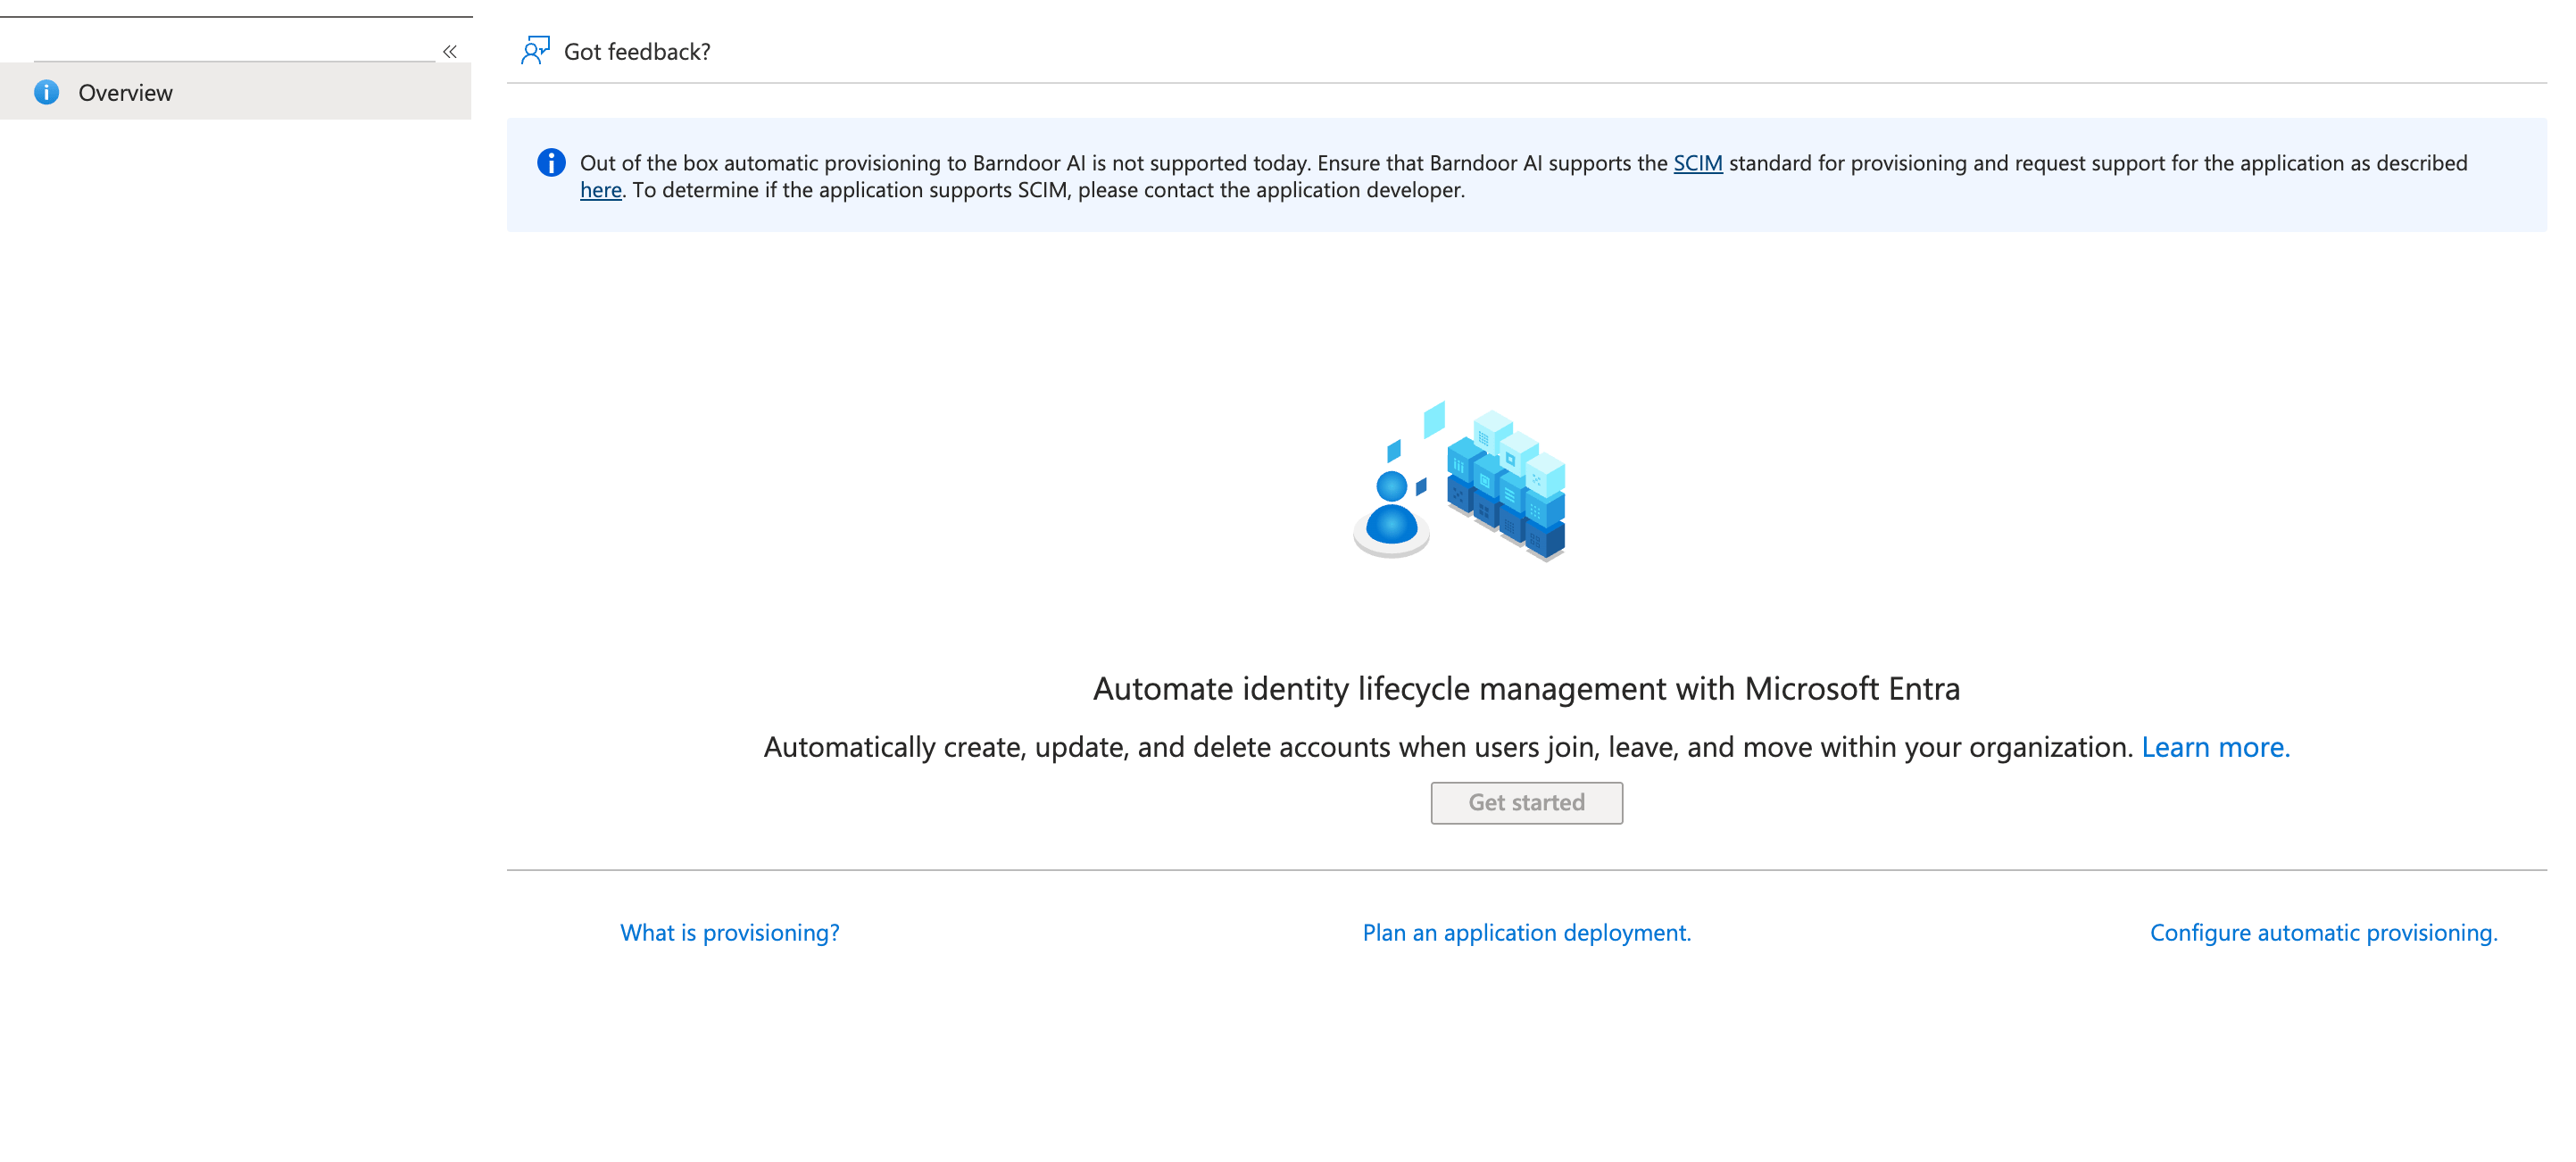 In the Barndoor Platform, do the the Identity Provider page and go to the section labeled SCIM Provisioning.
* Click `Configure SCIM Provisioning`
* Choose an authentication method (OAuth - Client Credentials OR API Token) then click 'Continue'
* Copy the sensitive values from the next dialog. You can only view these once and will need them in the next step
* The SCIM Provisioning card will now show a list of relevant endpoints needed to setup SCIM provisioning in Entra
In the Barndoor Platform, do the the Identity Provider page and go to the section labeled SCIM Provisioning.
* Click `Configure SCIM Provisioning`
* Choose an authentication method (OAuth - Client Credentials OR API Token) then click 'Continue'
* Copy the sensitive values from the next dialog. You can only view these once and will need them in the next step
* The SCIM Provisioning card will now show a list of relevant endpoints needed to setup SCIM provisioning in Entra
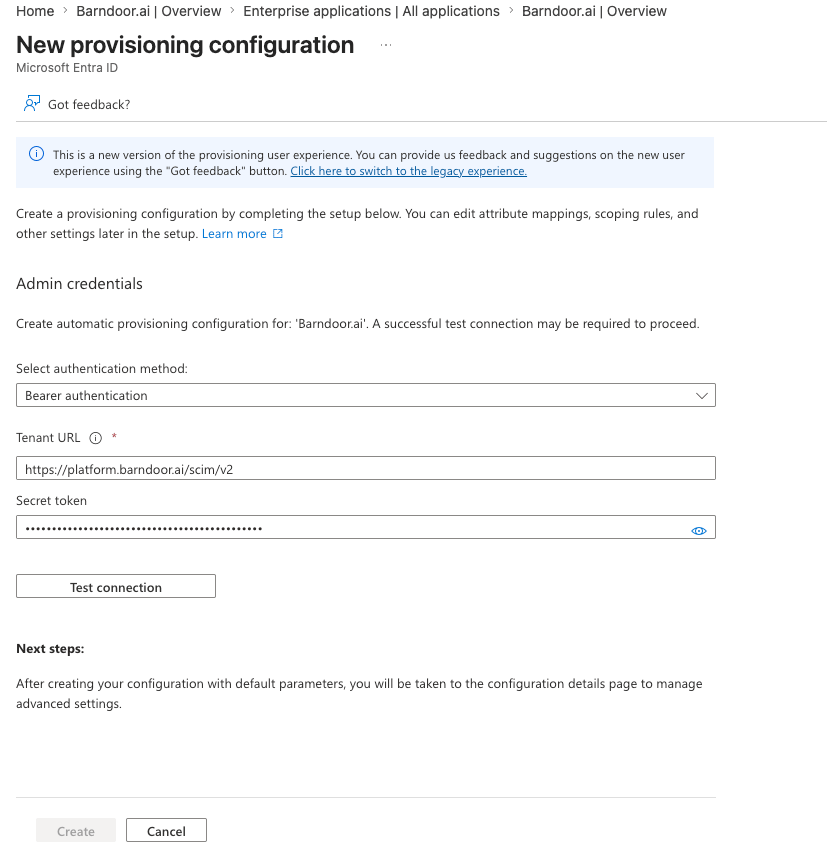
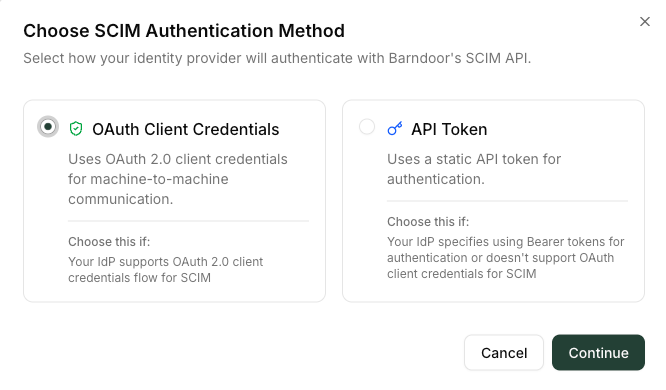 In the [Microsoft Entra admin center](https://entra.microsoft.com), go to **Identity** → **Applications** → **Enterprise Apps** -> Select your Enterprise -> **provisioning** in the sidebar, then click **+ New Configuration**.
Based on the authentication method chosen the previous step, follow either 1 or 2 next.
1. OAuth Client Credentials
* Select 'OAuth2 client credentials grant' as the method for authentication
* Fill in Tenant URL with the `SCIM Base URL` endpoint found on the SCIM Provisioning card in Barndoor
* Fill in OAuth token endpoint with the `Token Endpoint` endpoint found on the SCIM Provisioning card in Barndoor
* Fill in the Client ID and Client Secret values with the same sensitive values from the previous step
2. API Token
* Select 'Bearer authentication' as the method for authentication
* Fill in Tenant URL with the `SCIM Base URL` endpoint found on the SCIM Provisioning card in Barndoor
* Fill in the Secret Token with the same API Token from the previous step
Finally, click `Test Connection` to ensure authentication is setup properly. If successful, finish by clicking `Create`.
In the [Microsoft Entra admin center](https://entra.microsoft.com), go to **Identity** → **Applications** → **Enterprise Apps** -> Select your Enterprise -> **provisioning** in the sidebar, then click **+ New Configuration**.
Based on the authentication method chosen the previous step, follow either 1 or 2 next.
1. OAuth Client Credentials
* Select 'OAuth2 client credentials grant' as the method for authentication
* Fill in Tenant URL with the `SCIM Base URL` endpoint found on the SCIM Provisioning card in Barndoor
* Fill in OAuth token endpoint with the `Token Endpoint` endpoint found on the SCIM Provisioning card in Barndoor
* Fill in the Client ID and Client Secret values with the same sensitive values from the previous step
2. API Token
* Select 'Bearer authentication' as the method for authentication
* Fill in Tenant URL with the `SCIM Base URL` endpoint found on the SCIM Provisioning card in Barndoor
* Fill in the Secret Token with the same API Token from the previous step
Finally, click `Test Connection` to ensure authentication is setup properly. If successful, finish by clicking `Create`.
 Upon SCIM configuration creation, Entra will redirect back to the provisioning overview.
* Find `Provisioning` in the sidebar and ensure provisioning mode is set to 'automatic' and Provisioning Status is 'On'
* Optionally, modify attribute mappings to meet your requirements. Entra defaults are a good starting point.
* Find 'Users and Groups' in the sidebar and add users and groups you would like to synchronize with Barndoor.
* Finally, select 'Overview' and click 'Start Provisioning' to start and initial sync of users and groups.
Upon SCIM configuration creation, Entra will redirect back to the provisioning overview.
* Find `Provisioning` in the sidebar and ensure provisioning mode is set to 'automatic' and Provisioning Status is 'On'
* Optionally, modify attribute mappings to meet your requirements. Entra defaults are a good starting point.
* Find 'Users and Groups' in the sidebar and add users and groups you would like to synchronize with Barndoor.
* Finally, select 'Overview' and click 'Start Provisioning' to start and initial sync of users and groups.
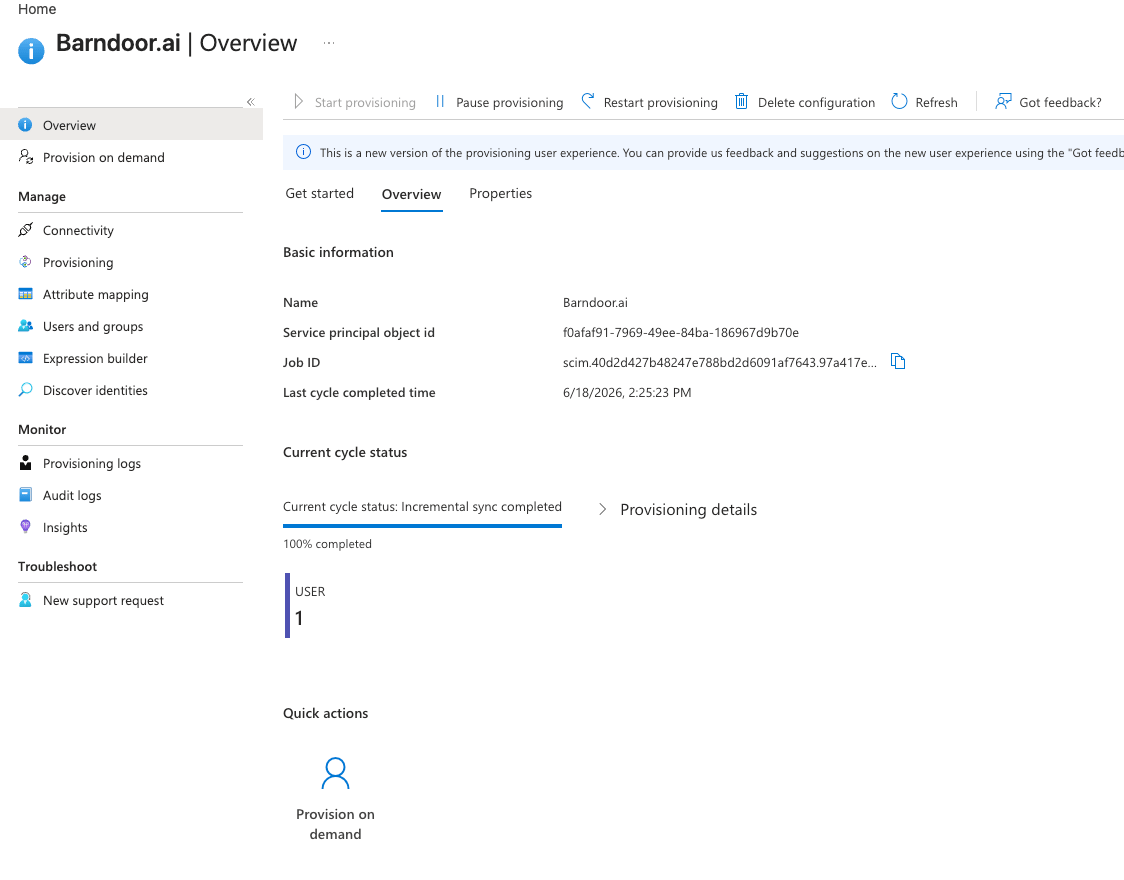 On success, you should see assigned users and groups propogate in the 'User' tab within Barndoor.
***
## Part 4 — Roll out SSO enforcement
After your IdP connection is saved and SSO sign-in works, the **Roll out SSO enforcement** section on the [Identity Provider](https://app.barndoor.ai/idp) page lets you require SSO for every member of your organization. Until you enforce SSO, users can still sign in with Barndoor passwords in addition to your IdP.
If you don't see **Roll out SSO enforcement** controls on the Identity Provider page, organization-wide SSO enforcement may not be enabled for your workspace yet. Contact your Barndoor account team.
**Enforcing SSO is irreversible in production.** It permanently clears Barndoor passwords for all members, terminates every active session (including yours), and requires all future logins through your IdP—except the dedicated break-glass account described below.
### What changes when you enforce SSO
When you confirm enforcement, Barndoor:
* Requires all organization members to sign in through your IdP
* Permanently clears saved Barndoor passwords for every member
* Leaves password sign-in enabled **only** for the break-glass admin email you configure
* Terminates all active sessions, including the administrator who enabled enforcement
After enforcement succeeds, sign out and sign back in through your IdP to continue working as an administrator.
### Prerequisites
Both items in **Before you can enforce SSO** must be complete before **Enforce SSO** is enabled:
Click **Test SSO sign-in**. Barndoor opens a pop-up window and runs the full IdP login path—not just a connection preflight.
Complete authentication in the pop-up. When the test succeeds, the row is marked complete. You can run the test again anytime to confirm sign-in still works.
If the pop-up is blocked, allow pop-ups for the Barndoor site and run the test again.
Click **Manage** on the **Break-glass admin email** row and set an emergency mailbox your security or platform team can use if your IdP is unavailable.
* The address must use your organization's IdP email domain (shown as `@your-domain` in the dialog)
* It must **not** already belong to an existing Barndoor user
* You **cannot** use your own administrator email as the break-glass account
Click **Save**. Barndoor stores the address as the configured break-glass email. The dedicated break-glass user account is created when you enforce SSO.
### Enable organization-wide SSO
When both prerequisites are complete, click **Enforce SSO** at the bottom of the rollout card.
In the confirmation dialog, check every acknowledgement:
* Future logins will be exclusively via IdP SSO
* All Barndoor passwords will be permanently cleared
* Only your break-glass email will be able to sign in via password going forward
* All active sessions—including your current one—will be terminated
The dialog also shows your IdP connection name and redirect URI for a final sanity check.
Click **Confirm Enforcement**. On success, Barndoor shows **SSO enforcement is active** and prompts you to **Sign out and sign in with SSO**.
If enforcement succeeds but Barndoor shows a warning that not all member passwords were cleared or sessions could not be terminated, SSO enforcement is still active. Sign out and sign in again with SSO, verify member access, and contact support if the warning persists.
SSO enforcement is active. All organization members must sign in through your Identity Provider. Password login is disabled for everyone except the break-glass account.
### Set up the break-glass account
When enforcement completes, Barndoor provisions a dedicated **Barndoor Break Glass** administrator account at the email you configured and sends a setup email to that mailbox. The recipient must:
1. Open the setup email and follow the link to set a password
2. At first sign-in, complete the email one-time passcode (OTP) sent to that mailbox—the same second factor used during an IdP outage
Store break-glass credentials in your organization's secure emergency-access process (for example, a sealed envelope or privileged-access vault)—not in shared chat or email threads.
### Manage break-glass access after enforcement
After SSO is enforced, the rollout card shows **SSO enforcement** as active and lets you manage the break-glass email:
* **Resend invite** — If the break-glass account has not finished password setup, resend the setup email from the break-glass dialog
* **Change break-glass email** — Opens a destructive change flow. Enter the new address, check the acknowledgement that the current account will lose password sign-in, then click **Save**. The new mailbox must complete password and OTP setup before it can be used
Changing the break-glass email while SSO is enforced removes the previous break-glass account's password credentials and requires the new mailbox to complete setup from scratch.
### Sign in with break-glass during an IdP outage
If your IdP is unavailable and you need emergency administrator access:
1. On the Barndoor sign-in page, choose password sign-in (not SSO)
2. Enter the break-glass email address and password
3. Complete the email one-time passcode sent to that mailbox
Password sign-in and email OTP at login are available **only** for the break-glass account once SSO is enforced. All other members must use IdP SSO.
### Remove the SSO connection (optional)
To disconnect IdP integration before or after enforcement, open the **actions menu** (⋯) on the rollout card and choose **Remove SSO**. Confirm when prompted.
Removing the SSO connection immediately revokes IdP-based access for your organization. Only users who can still authenticate with a Barndoor password—including the break-glass account, if configured—can sign in. SSO enforcement remains on for the organization; re-connecting an IdP does not restore member password login.
### SSO enforcement troubleshooting
**Common causes:**
* Browser blocked pop-ups for the Barndoor site
* The sign-in window was closed before authentication finished
**Solution:** Allow pop-ups for your Barndoor portal origin, then click **Test SSO sign-in** again. If the test times out, cancel and retry.
**Common causes:**
* Address is outside your organization's IdP email domain
* Address already belongs to an existing Barndoor user
* You entered your own administrator email
**Solution:** Use a dedicated emergency mailbox on your IdP domain that is not yet a Barndoor user. Enter only the part before `@`—the domain is shown in the dialog.
**Solution:** From the break-glass **Manage** dialog after enforcement, click **Resend invite**. Check spam filters and confirm the mailbox is monitored. The recipient must complete password setup from the link before the account can sign in.
**Cause:** SSO enforcement is active, but Barndoor could not clear every member password or terminate every session.
**Solution:** Sign out and sign back in with SSO. Verify affected members can still reach the app through your IdP. Contact Barndoor support if the warning remains or members report unexpected password login.
***
## Troubleshooting
**Cause**: The Issuer URL in Barndoor doesn't exactly match the `iss` claim Entra stamped into the token.
**Fix**: Ensure the Issuer URL matches **exactly** the issuer set in the OpenID Metadata document. Including trailing slashes. If you are using the v1 OAuth endpoints, `https://sts.windows.net//` — including the **trailing slash** — is the issuer. See Step 9.
**Common causes**:
* The **email** claim isn't in the ID token. Re-check Step 2 and confirm `essential: true` is set in the manifest under `idToken` only (Step 4).
* The user signing in doesn't have an email attribute populated in Entra. Verify on the user's profile.
**Fix**: Ensure the email claim is configured and the user has an email attribute set. Steps 2–4.
**Cause**: Entra ID Free does not honor the `cloud_displayname` additional property — it's a paid-tier feature.
**Fix**: Either upgrade to Entra ID P1+, configure Barndoor role mapping against Object IDs (Step 3).
**Cause**: Most likely the Entra client secret expired. Entra caps secrets at 24 months and SSO breaks silently the moment they expire.
**Fix**: Rotate the secret in **Certificates & secrets**, copy the new Value, and update it in Barndoor's IdP settings. Set a calendar reminder a few weeks before the next expiration.
**Cause**: The Redirect URI registered in Entra's **Authentication** settings doesn't exactly match the one Barndoor is sending.
**Fix**: In Barndoor, recopy the Redirect URI from Step 2 of the SSO setup wizard. Paste it into Entra's **Authentication → Web → Redirect URIs**. URLs are case- and trailing-slash-sensitive.
***
## Recap
| Value | Where it comes from | Where it goes |
| :-------------------------------- | :------------------------------------------------- | :---------------------------------------- |
| Application (client) ID | Entra app → Overview | Barndoor Client ID |
| Client Secret (Value) | Entra app → Certificates & secrets | Barndoor Client Secret |
| Issuer URL (from OpenID Metadata) | Entra app → Overview → Endpoints → OpenID Metadata | Barndoor Issuer URL |
| Redirect URI | Barndoor SSO setup → Step 2 | Entra app → Authentication → Web platform |
You've now connected Microsoft Entra ID to Barndoor for SSO, SCIM provisioning (if enabled), and optional organization-wide SSO enforcement with break-glass emergency access.
On success, you should see assigned users and groups propogate in the 'User' tab within Barndoor.
***
## Part 4 — Roll out SSO enforcement
After your IdP connection is saved and SSO sign-in works, the **Roll out SSO enforcement** section on the [Identity Provider](https://app.barndoor.ai/idp) page lets you require SSO for every member of your organization. Until you enforce SSO, users can still sign in with Barndoor passwords in addition to your IdP.
If you don't see **Roll out SSO enforcement** controls on the Identity Provider page, organization-wide SSO enforcement may not be enabled for your workspace yet. Contact your Barndoor account team.
**Enforcing SSO is irreversible in production.** It permanently clears Barndoor passwords for all members, terminates every active session (including yours), and requires all future logins through your IdP—except the dedicated break-glass account described below.
### What changes when you enforce SSO
When you confirm enforcement, Barndoor:
* Requires all organization members to sign in through your IdP
* Permanently clears saved Barndoor passwords for every member
* Leaves password sign-in enabled **only** for the break-glass admin email you configure
* Terminates all active sessions, including the administrator who enabled enforcement
After enforcement succeeds, sign out and sign back in through your IdP to continue working as an administrator.
### Prerequisites
Both items in **Before you can enforce SSO** must be complete before **Enforce SSO** is enabled:
Click **Test SSO sign-in**. Barndoor opens a pop-up window and runs the full IdP login path—not just a connection preflight.
Complete authentication in the pop-up. When the test succeeds, the row is marked complete. You can run the test again anytime to confirm sign-in still works.
If the pop-up is blocked, allow pop-ups for the Barndoor site and run the test again.
Click **Manage** on the **Break-glass admin email** row and set an emergency mailbox your security or platform team can use if your IdP is unavailable.
* The address must use your organization's IdP email domain (shown as `@your-domain` in the dialog)
* It must **not** already belong to an existing Barndoor user
* You **cannot** use your own administrator email as the break-glass account
Click **Save**. Barndoor stores the address as the configured break-glass email. The dedicated break-glass user account is created when you enforce SSO.
### Enable organization-wide SSO
When both prerequisites are complete, click **Enforce SSO** at the bottom of the rollout card.
In the confirmation dialog, check every acknowledgement:
* Future logins will be exclusively via IdP SSO
* All Barndoor passwords will be permanently cleared
* Only your break-glass email will be able to sign in via password going forward
* All active sessions—including your current one—will be terminated
The dialog also shows your IdP connection name and redirect URI for a final sanity check.
Click **Confirm Enforcement**. On success, Barndoor shows **SSO enforcement is active** and prompts you to **Sign out and sign in with SSO**.
If enforcement succeeds but Barndoor shows a warning that not all member passwords were cleared or sessions could not be terminated, SSO enforcement is still active. Sign out and sign in again with SSO, verify member access, and contact support if the warning persists.
SSO enforcement is active. All organization members must sign in through your Identity Provider. Password login is disabled for everyone except the break-glass account.
### Set up the break-glass account
When enforcement completes, Barndoor provisions a dedicated **Barndoor Break Glass** administrator account at the email you configured and sends a setup email to that mailbox. The recipient must:
1. Open the setup email and follow the link to set a password
2. At first sign-in, complete the email one-time passcode (OTP) sent to that mailbox—the same second factor used during an IdP outage
Store break-glass credentials in your organization's secure emergency-access process (for example, a sealed envelope or privileged-access vault)—not in shared chat or email threads.
### Manage break-glass access after enforcement
After SSO is enforced, the rollout card shows **SSO enforcement** as active and lets you manage the break-glass email:
* **Resend invite** — If the break-glass account has not finished password setup, resend the setup email from the break-glass dialog
* **Change break-glass email** — Opens a destructive change flow. Enter the new address, check the acknowledgement that the current account will lose password sign-in, then click **Save**. The new mailbox must complete password and OTP setup before it can be used
Changing the break-glass email while SSO is enforced removes the previous break-glass account's password credentials and requires the new mailbox to complete setup from scratch.
### Sign in with break-glass during an IdP outage
If your IdP is unavailable and you need emergency administrator access:
1. On the Barndoor sign-in page, choose password sign-in (not SSO)
2. Enter the break-glass email address and password
3. Complete the email one-time passcode sent to that mailbox
Password sign-in and email OTP at login are available **only** for the break-glass account once SSO is enforced. All other members must use IdP SSO.
### Remove the SSO connection (optional)
To disconnect IdP integration before or after enforcement, open the **actions menu** (⋯) on the rollout card and choose **Remove SSO**. Confirm when prompted.
Removing the SSO connection immediately revokes IdP-based access for your organization. Only users who can still authenticate with a Barndoor password—including the break-glass account, if configured—can sign in. SSO enforcement remains on for the organization; re-connecting an IdP does not restore member password login.
### SSO enforcement troubleshooting
**Common causes:**
* Browser blocked pop-ups for the Barndoor site
* The sign-in window was closed before authentication finished
**Solution:** Allow pop-ups for your Barndoor portal origin, then click **Test SSO sign-in** again. If the test times out, cancel and retry.
**Common causes:**
* Address is outside your organization's IdP email domain
* Address already belongs to an existing Barndoor user
* You entered your own administrator email
**Solution:** Use a dedicated emergency mailbox on your IdP domain that is not yet a Barndoor user. Enter only the part before `@`—the domain is shown in the dialog.
**Solution:** From the break-glass **Manage** dialog after enforcement, click **Resend invite**. Check spam filters and confirm the mailbox is monitored. The recipient must complete password setup from the link before the account can sign in.
**Cause:** SSO enforcement is active, but Barndoor could not clear every member password or terminate every session.
**Solution:** Sign out and sign back in with SSO. Verify affected members can still reach the app through your IdP. Contact Barndoor support if the warning remains or members report unexpected password login.
***
## Troubleshooting
**Cause**: The Issuer URL in Barndoor doesn't exactly match the `iss` claim Entra stamped into the token.
**Fix**: Ensure the Issuer URL matches **exactly** the issuer set in the OpenID Metadata document. Including trailing slashes. If you are using the v1 OAuth endpoints, `https://sts.windows.net//` — including the **trailing slash** — is the issuer. See Step 9.
**Common causes**:
* The **email** claim isn't in the ID token. Re-check Step 2 and confirm `essential: true` is set in the manifest under `idToken` only (Step 4).
* The user signing in doesn't have an email attribute populated in Entra. Verify on the user's profile.
**Fix**: Ensure the email claim is configured and the user has an email attribute set. Steps 2–4.
**Cause**: Entra ID Free does not honor the `cloud_displayname` additional property — it's a paid-tier feature.
**Fix**: Either upgrade to Entra ID P1+, configure Barndoor role mapping against Object IDs (Step 3).
**Cause**: Most likely the Entra client secret expired. Entra caps secrets at 24 months and SSO breaks silently the moment they expire.
**Fix**: Rotate the secret in **Certificates & secrets**, copy the new Value, and update it in Barndoor's IdP settings. Set a calendar reminder a few weeks before the next expiration.
**Cause**: The Redirect URI registered in Entra's **Authentication** settings doesn't exactly match the one Barndoor is sending.
**Fix**: In Barndoor, recopy the Redirect URI from Step 2 of the SSO setup wizard. Paste it into Entra's **Authentication → Web → Redirect URIs**. URLs are case- and trailing-slash-sensitive.
***
## Recap
| Value | Where it comes from | Where it goes |
| :-------------------------------- | :------------------------------------------------- | :---------------------------------------- |
| Application (client) ID | Entra app → Overview | Barndoor Client ID |
| Client Secret (Value) | Entra app → Certificates & secrets | Barndoor Client Secret |
| Issuer URL (from OpenID Metadata) | Entra app → Overview → Endpoints → OpenID Metadata | Barndoor Issuer URL |
| Redirect URI | Barndoor SSO setup → Step 2 | Entra app → Authentication → Web platform |
You've now connected Microsoft Entra ID to Barndoor for SSO, SCIM provisioning (if enabled), and optional organization-wide SSO enforcement with break-glass emergency access.