> ## Documentation Index
> Fetch the complete documentation index at: https://docs.barndoor.ai/llms.txt
> Use this file to discover all available pages before exploring further.
# Protection Profiles
> Create named detection engines that define which data types to scan for. Policies can't be created until at least one profile exists.
A **Protection Profile** is a named detection engine. It defines which data types to scan for, which runtime stages to inspect, and which enforcement actions are available to policies that use it. Policies cannot be created until at least one profile exists.
## View your profiles
Navigate to **Data Control Center → Protection Profiles**.
 The dashboard lists every profile in your organization with:
* **Profile name** — the display name you gave it
* **Type** — the underlying detector (Regex Detector, Custom Regex, Classifier, External Provider)
* **Supported Actions** — the enforcement actions available to policies that use this profile (Block, Redact, Tokenize, Alert Only, Bypass)
## Create a profile
1. Click **Add Protection Profile** in the top-right corner of the Protection Profiles tab.
The catalog opens:
The dashboard lists every profile in your organization with:
* **Profile name** — the display name you gave it
* **Type** — the underlying detector (Regex Detector, Custom Regex, Classifier, External Provider)
* **Supported Actions** — the enforcement actions available to policies that use this profile (Block, Redact, Tokenize, Alert Only, Bypass)
## Create a profile
1. Click **Add Protection Profile** in the top-right corner of the Protection Profiles tab.
The catalog opens:
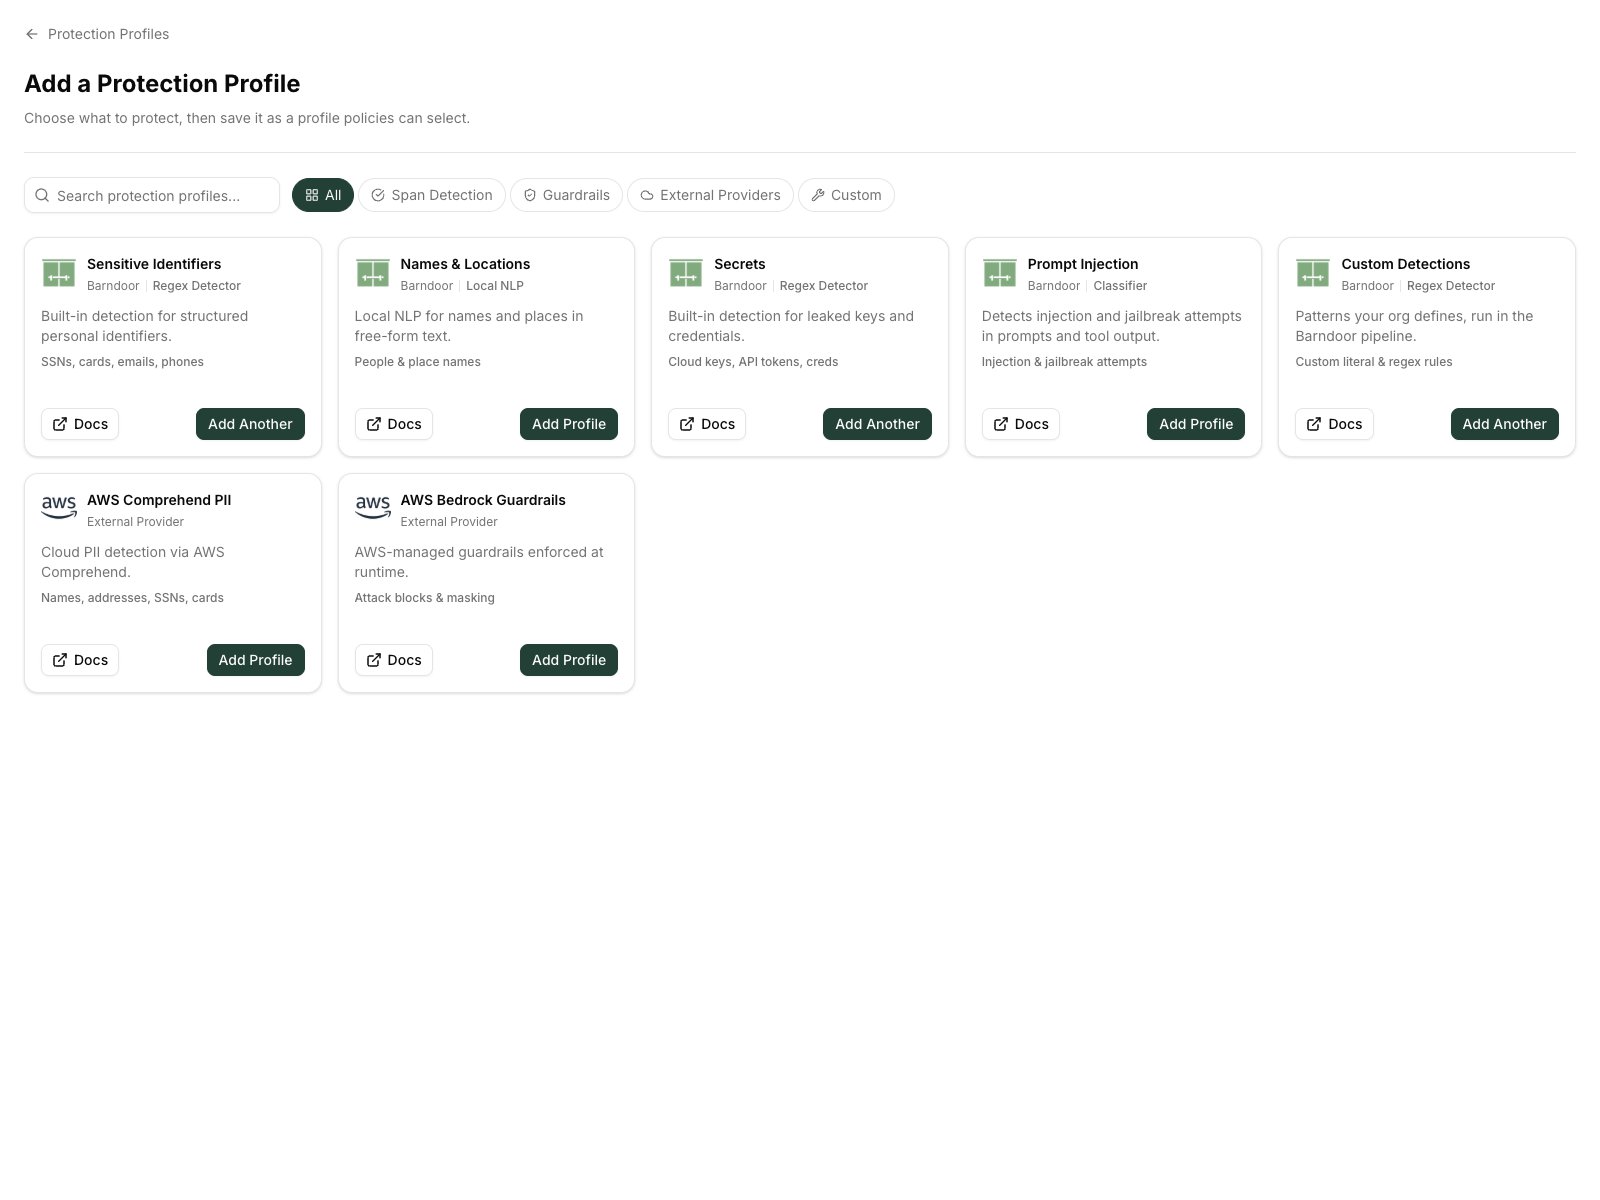 2. Choose a profile type:
| Type | Best for |
| -------------------------- | ----------------------------------------------------------------------------------------------- |
| **Sensitive Identifiers** | SSNs, credit cards, emails, phone numbers, passports, dates of birth — structured personal data |
| **Names & Locations** | Free-text NLP detection of people, organizations, and places |
| **Secrets** | Cloud keys, API tokens, database credentials, CI/CD secrets, cryptographic material |
| **Prompt Injection** | Detecting injection and jailbreak attempts in prompts and tool outputs |
| **Custom Detections** | Your organization's own data patterns via regex or literal rules |
| **AWS Comprehend PII** | Cloud-based PII detection via AWS Comprehend |
| **AWS Bedrock Guardrails** | AWS-managed guardrails enforced at runtime |
If a built-in type already exists in your org, the button reads **Add Another**. You can have multiple profiles of the same type with different detection-type selections.
3. On the configuration screen, give the profile a descriptive name (for example, "Regulated customer identifiers — revenue ops"). Select which detection types within the category to enable.
4. Click **Save** to create the profile.
## Edit a profile
1. On the Protection Profiles dashboard, find the profile you want to change.
2. Click the **⋮** menu on the right side of the row and select **Edit**.
3. Update the name or the enabled detection types.
4. Save the changes.
All policies that reference this profile inherit the updated detection set immediately.
## Delete a profile
1. On the Protection Profiles dashboard, click **⋮ → Delete** on the profile row.
2. A confirmation modal lists any active policies that reference this profile. Deleting the profile removes it from those policies; policies that lose all profiles are archived automatically.
3. Confirm the deletion.
Deleting a profile does not remove historical detection events that used it. Past audit records are preserved.
## Create a custom detection type
Custom detection types let you define regex or literal patterns for data formats unique to your organization — for example, an internal customer ID with a known prefix.
1. On the Protection Profiles dashboard, click **New custom type**.
2. Enter a name, description, and one or more patterns:
* **Regex** — a regular expression (e.g., `cust_[0-9]{8}`)
* **Literal** — an exact string match
3. Save. The custom type becomes available when configuring any profile of type **Custom Detections**.
## Test that detections work
Use the **Policy Test Workbench** to verify that a profile detects the data it should before attaching it to an enforcing policy.
1. Navigate to **Data Control Center → Test**.
2. Paste a sample payload containing the data you expect the profile to detect.
3. Select the runtime stage and choose the protection profiles to run.
4. Review the findings: which detection types fired, at what spans, and with what confidence.
If a detection fires when you expect it to, the profile is configured correctly. If not, check that the relevant detection types are enabled in the profile's configuration.
## Monitor detection activity
After profiles are running in production, check **Data Control Center → Detection Activity** to see what they are finding. Filter by detection type to see only the signals your profile generates. Each row shows the detection type, action taken, runtime stage, timestamp, and confidence score.
2. Choose a profile type:
| Type | Best for |
| -------------------------- | ----------------------------------------------------------------------------------------------- |
| **Sensitive Identifiers** | SSNs, credit cards, emails, phone numbers, passports, dates of birth — structured personal data |
| **Names & Locations** | Free-text NLP detection of people, organizations, and places |
| **Secrets** | Cloud keys, API tokens, database credentials, CI/CD secrets, cryptographic material |
| **Prompt Injection** | Detecting injection and jailbreak attempts in prompts and tool outputs |
| **Custom Detections** | Your organization's own data patterns via regex or literal rules |
| **AWS Comprehend PII** | Cloud-based PII detection via AWS Comprehend |
| **AWS Bedrock Guardrails** | AWS-managed guardrails enforced at runtime |
If a built-in type already exists in your org, the button reads **Add Another**. You can have multiple profiles of the same type with different detection-type selections.
3. On the configuration screen, give the profile a descriptive name (for example, "Regulated customer identifiers — revenue ops"). Select which detection types within the category to enable.
4. Click **Save** to create the profile.
## Edit a profile
1. On the Protection Profiles dashboard, find the profile you want to change.
2. Click the **⋮** menu on the right side of the row and select **Edit**.
3. Update the name or the enabled detection types.
4. Save the changes.
All policies that reference this profile inherit the updated detection set immediately.
## Delete a profile
1. On the Protection Profiles dashboard, click **⋮ → Delete** on the profile row.
2. A confirmation modal lists any active policies that reference this profile. Deleting the profile removes it from those policies; policies that lose all profiles are archived automatically.
3. Confirm the deletion.
Deleting a profile does not remove historical detection events that used it. Past audit records are preserved.
## Create a custom detection type
Custom detection types let you define regex or literal patterns for data formats unique to your organization — for example, an internal customer ID with a known prefix.
1. On the Protection Profiles dashboard, click **New custom type**.
2. Enter a name, description, and one or more patterns:
* **Regex** — a regular expression (e.g., `cust_[0-9]{8}`)
* **Literal** — an exact string match
3. Save. The custom type becomes available when configuring any profile of type **Custom Detections**.
## Test that detections work
Use the **Policy Test Workbench** to verify that a profile detects the data it should before attaching it to an enforcing policy.
1. Navigate to **Data Control Center → Test**.
2. Paste a sample payload containing the data you expect the profile to detect.
3. Select the runtime stage and choose the protection profiles to run.
4. Review the findings: which detection types fired, at what spans, and with what confidence.
If a detection fires when you expect it to, the profile is configured correctly. If not, check that the relevant detection types are enabled in the profile's configuration.
## Monitor detection activity
After profiles are running in production, check **Data Control Center → Detection Activity** to see what they are finding. Filter by detection type to see only the signals your profile generates. Each row shows the detection type, action taken, runtime stage, timestamp, and confidence score.